Since Microsoft® Visual InterDev™ keeps two copies of the application while you are working, you may find that some files are on the local but not the master server and vice versa. For example, if you are working with multiple developers in local mode or offline, you might need to synchronize or update the applications to make sure that your local file list matches the master application.
Tasks you may want to perform:
Files on the master server that are not in your local directory are called master files. Local files that are not yet copied to the master directory are called personal files.
You can look at the differences in source code between the master and local copies of a file.
To compare the local and master copies of a file
Note If you are working in master mode, don't save the file before comparing. If you do save, the changes will be automatically saved to the master server and the files will be identical.
The File Difference dialog box appears with the differences highlighted in gray. If the files aren't different, a message states that they are identical.
For more information about comparing files, see the File Difference dialog box. If you are using source control with your project, see Resolving Merge Conflicts.
After you have saved your changes to your local Web application and you are ready to add your changes to the master Web application, you can release the local copies.
To update the master Web application
Note If your project is under source control, choose Check In from the Source Control submenu on the Project menu.
Your local versions of the files are copied to the master Web server and become the current versions on the master Web application.
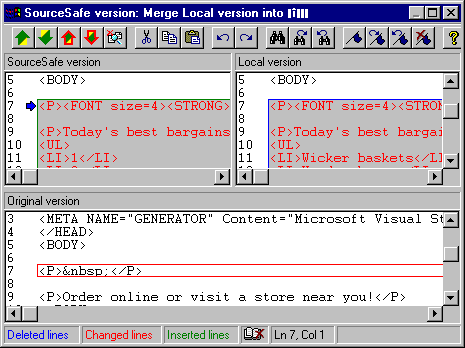
If someone made changes to the master version after you got the copy you changed, the Merge dialog box appears when you release the your local copy. In the Merge dialog box, you can review differences between the files and accept or reject the changes.
For example, in the following picture, the SourceSafe version is the master version that someone saved to the server. The local version reflects the latest local copy. The Original version pane allows you to edit the file and shows the merge decisions you have made.

To merge the files
Both the master and the local copies reflect the changes you saved.
For more information, see Resolving Merge Conflicts.
You might not want your changes propagated to the master Web server. For example, you may have decided you like the script in the current version better than the changes you just made to the file. You can discard your current local copy, leaving the master version in tact.
To discard changes to a local copy
Note If your project is under source control, choose Undo Check Out from the Source Control submenu on the Project menu.
Your local copy of each selected file is replaced by the master version of the file.
If you want to get the latest file list from the master Web application, you can refresh your project. If you want to get the new versions of read-only files that you already have locally, you can synchronize your local Web application with the master Web application. To replace your write-enabled files with master copies, you can get the latest versions.
To get changed files from the master Web application
The Project Explorer shows the list of files for the Web application whether they are in the master or local Web application. If someone has added, deleted, moved, or renamed files from the master server, your project list will be out of date. You can refresh your project to display any changes made to the master application.
Also, if someone has enabled or disabled source control on the Web project, you need to refresh your project to see those changes.
To view the current list of files in both the master and local applications