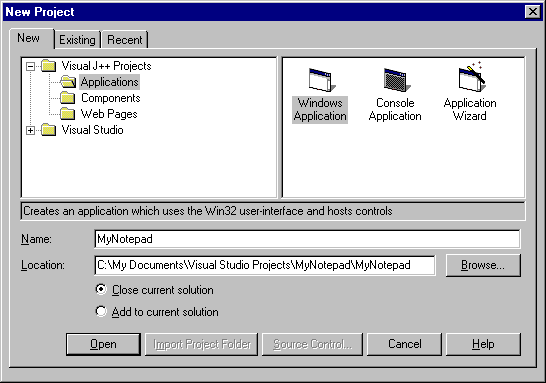
To create the main form, use the New Project dialog box that appears when you first open Visual J++ or select New Project from the File menu. Select the Windows Application icon, type in the name of your application form (MyNotepad in this case), and choose Open, and Visual J++ creates a project with that name.
The project contains a form called Form1.java by default, which will be renamed to MyNotepad.java in a later step.

The Visual J++ Forms Designer makes it easy to layout the form. To open the form in design mode, select Form1.java in the Project Explorer and then choose Designer from the View menu (or choose View Designer from the shortcut menu). With the form displayed, you can add controls from the toolbox. To access the WFC controls in the toolbox, click on the Toolbox tab or choose Toolbox from the View menu, and click the WFC Controls button in the toolbox to display those controls.
For this sample, an edit control was added to the form from the toolbox.
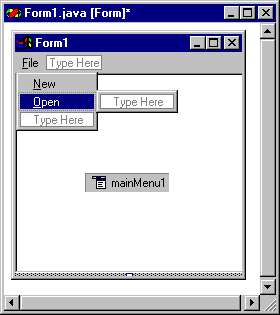
Adding a menu is just as easy: drag the MainMenu control from the toolbox onto the form and place it anywhere; then begin typing in the first box and continue adding menu items in the boxes below or to the right.

Note that you can create an accelerator key on the menu by entering an ampersand (&) before the desired character. This becomes underlined on the menu.
To set properties, use the Properties window. In this case, most properties were left with default values for the sake of simplicity. The following properties on the edit control were changed: the multiline property was set to true, the doc property to was set to Fill, the scrollBars property was set to Vertical, and the font name property was set to Fixedsys to better emulate Notepad. There may be other properties you'll want to set as well on the form and controls.
You'll probably want to rename some of the components to make more sense programmatically. Renaming is done by selecting the form or control and setting the name property. In the case of MyNotepad, the following name changes were made:
| Default Name | New Name |
| Edit1 | EditBox |
| MainMenu1 | Menu |
| MenuItem1 | FileMenu |
| MenuItem2 | FileMenuNew |
| MenuItem3 | FileMenuOpen |
| MenuItem4 | FileMenuSave |
| MenuItem5 | FileMenuSaveAs |
| MenuItem6 | FileMenuExit |
| MenuItem7 | HelpMenu |
| MenuItem8 | HelpMenuAbout |
You may want the main form to have a different name than Form1.java. To do this, select Form1.java in the Project Explorer, right-click and choose Rename from the shortcut menu, and type the new name (in this case, MyNotepad.java).
If you do change the name, remember that you must change all occurrences of Form1 in the source code. To do this, first close the Forms Designer. Then open the source by choosing View Code from the shortcut menu. Choose Find and Replace from the Edit menu, and replace all instances of Form1 with the new name (for example, replace Form1 with MyNotepad).
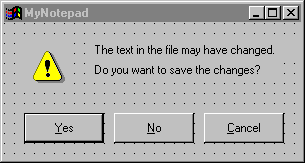
The NewDialog dialog box is just another form in the project. To create additional forms, choose Add Form from the Project menu, select Form in the Add Item dialog box, type the name of the new form (NewDialog.java, in this case) and click Open.
In this case, three buttons were added and named YesButton, NoButton, and CancelButton, with appropriate labels (&Yes, &No, and &Cancel). The button control has a dialogResult property, which is useful when the buttons are used on a modal dialog. For example, if the YesButton control's dialogResult property is set to Yes and the user clicks this button, the dialog box closes and returns DialogResults.Yes. In this case, the dialogResult properties were set as follows:
| Control | dialogResult Property |
| YesButton | Yes |
| NoButton | No |
| CancelButton | Cancel |
One note of interest here is that the Form class has an acceptButton property that determines which button is clicked when the user presses ENTER. In this case the acceptButton property was set to the YesButton control. The Form class also has a cancelButton property that determines which button to click when the ESC key is pressed; this was set to the CancelButton control.
Likewise, the accelerator (&) characters in the button labels were used to map a specific key to each button (for example, because the label for the YesButton button is "&Yes", pressing Y clicks that button).
Two additional label controls were then added to display the message text of the dialog box. Finally, the PictureBox control was added to the form and that control's image property was set to a bitmap containing an exclamation graphic.

Because an image was added to the form, Visual J++ automatically created a resource file (called NewDialog.resources) and serialized the image to this file when the form was saved. The resource file provides a mechanism for localizing the form to different languages, although in this case it is mostly used for packaging. You can also set the localizable property of a form to true to cause a resource file to be added to your project, in which case all resources, including strings are added to the resource file.