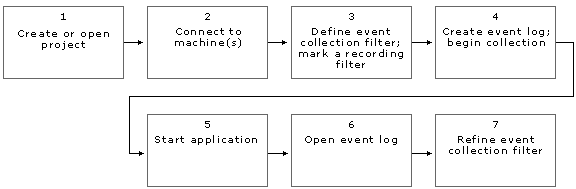
Understanding application structure, analyzing performance, and isolating faults all require you to undergo an analysis process. This process is basically the same in all cases. Projects, filters, event logs, and views are the tools you use within Visual Studio Analyzer during the analysis process. The following figure illustrates the basic steps in the process.
Each step is summarized in the following list. Use the links to learn more about how to complete each step.
Projects organize event logs, filters, and references to the machines where your application runs. See Understanding Visual Studio Analyzer Projects for information on what projects are and how to create them, and Starting Visual Studio Analyzer for the steps to create or open a project.
See Connecting to Machines for Monitoring with Visual Studio Analyzer for the steps to connect to a machine.
Filters define which events to collect while your application is running and which events in an event log to include in a Visual Studio Analyzer view. See Understanding Visual Studio Analyzer Filters for information on what filters are, the sample filters supplied with Visual Studio Analyzer, creating filters, and applying filters to views.
Events are the data of Visual Studio Analyzer. The event log contains the events that are collected from your application. Filters determine which events are collected when you run your application and which events are displayed when you view the event log. See Understanding Visual Studio Analyzer Events for information on what events are, system-defined events, what events tell you, and event security.
If you want a filter you have defined to take effect when you start collecting events, you must set the filter as the recording filter by clicking Set Record Filter on the filter's shortcut menu.
Event logs provide a place for collected events. All the events generated by a particular run of your application are stored in a single event log. An event log is what you open in a Visual Studio Analyzer view, and what you see of the contents of an event log is determined by a Visual Studio Analyzer filter. See Understanding Visual Studio Analyzer Event Logs for information on what event logs are, creating event logs, and how event logs and views work together.
To start collecting events, click Record Events on the event log's shortcut menu.
Views are ways of looking at an event log, which contains the Visual Studio Analyzer events generated by your application. See Understanding Visual Studio Analyzer Views for a list of the different views available, as well as information on opening, combining, and linking views.
See Creating and Refining Event Filters for the steps to refine a filter.