The resource requirements and constraints of the CX2590 are listed below:
Use Infedit to put this logical configuration information into the Log Config Sections folder:
1. Right-click on the Log Config Sections folder and then select the New Logical Configuration Section option from the popup menu to create a new subfolder under the Log Config folder.
2. Double-click on the new subfolder to display the items you can edit.
You are given the opportunity to edit two items: Section Name and Priority.
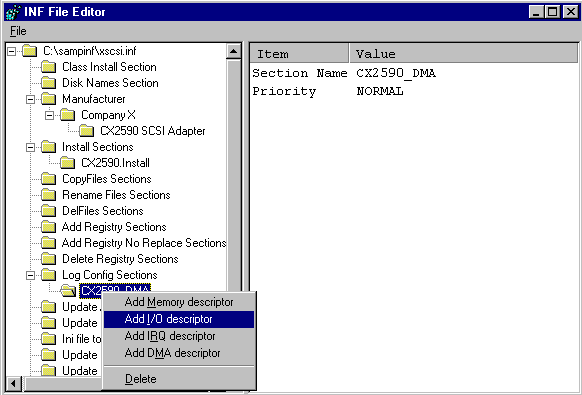
To enter the I/O port, IRQ, and DMA channel requirements, right-click on the subfolder you just named (in this example, that subfolder is named CX2590_DMA). At this point, the relevant part of the Infedit screen will look like this, with the popup menu:
The I/O port requirements for the CX2590 are four contiguous I/O ports based at I/O addresses 180H, 190H, 1A0h and 1B0h.
To add the I/O port requirements for the CX2590:
1. Select the Add I/O Descriptor option from the popup menu to add an I/O descriptor subfolder.
2 If you double-click on the new subfolder in order to edit items, the edit area on the right side of the Infedit screen does not give you an opportunity to edit any items. This indicates that there is another popup menu available, so right-click in the new subfolder to display the popup.
The popup menu gives you two options for edit displays: Add Type 1 I/O Range and Add Type 2 I/O Range. These are just two different ways of entering the same information, but for some I/O port requirements (such as the ones used in this example), the Type 2 form is quicker to use. See the Log Config Sections topic in "References" for details about the two different ways of expressing I/O port requirements.
To continue with the example, after you select the Add Type 2 I/O Range option an Input/Output Range 0 subfolder is created. Double-click on the new subfolder to display the items you can edit in the edit area.
Since the I/O port requirements for the CX2590 are four contiguous I/O ports based at I/O addresses 180H, 190H, 1A0h and 1B0h you can double-click on each of the items in the edit display, except Alias Offset and Attributes, and use the Edit String dialogs to produce an edit display that looks like the screen shown below. When you enter a value into the Edit String dialog, you do not need to enter the entire hexadecimal expression. For example, when you enter the value for the Size item, just enter "4" instead of "0x0004."
Note that when you double-click the Attributes item, no Edit String dialog box is displayed. That is because the Attributes item is reserved for future use.
The IRQ requirements for the CX2590 are one exclusive IRQ chosen from IRQ 4, 5, 9, 10, or 11.
To add the IRQ requirements to the XSCSI.INF file for the CX2590:
1. Right-click on the CX2590_DMA subfolder under the Log Config Sections folder and select the Add IRQ Descriptor option. This will create an IRQ Descriptor subfolder.
2 Double-click on the new subfolder.
An array of IRQs and Yes/No values appears in the edit area. Double-click on individual IRQ item names to set IRQs 4, 5, 9, 10, and 11 to Yes and all other IRQs to No. When you are done, the IRQ array in the edit area will look like this:
Item             Value
  IRQ Sharable     No
  IRQ  0           No
  IRQ  1           No
  IRQ  2           No
  IRQ  3           No
  IRQ  4           Yes
  IRQ  5           Yes
  IRQ  6           No
  IRQ  7           No
  IRQ  8           No
  IRQ  9           Yes
  IRQ 10           Yes
  IRQ 11           Yes
  IRQ 12           No
  IRQ 13           No
  IRQ 14           No
  IRQ 15           No
The CX2590 requires one DMA channel for NORMAL operation. The CX2590 can use either DMA channel 0, 1, 2, or 3 and the DMA bus width is eight bits.
To add the DMA requirements to the XSCSI.INF file for the CX2590:
1. Right-click on the CX2590_DMA subfolder under the Log Config Sections folder and select the Add DMA Descriptor option. This will create an DMA Descriptor subfolder.
2. Double-click on the new subfolder.
An array of DMAs and Yes/No values appears in the edit area. Double-click on individual DMA item names to set DMA channels 0, 1, 2, and 3 to Yes and all other DMAs to No. In this example, there is no need to change the default DMA bus width of 8 bits. When you are done, the DMA array will look like this:
Item             Value
  DMA Bus Width    8 bits
  DMA  0           Yes
  DMA  1           Yes
  DMA  2           Yes
  DMA  3           Yes
  DMA  4           No
  DMA  5           No
  DMA  6           No
  DMA  7           No
Note that given the requirements in this example, adding this DMA descriptor to the INF file does not satisfy all the DMA requirements for this example. The DMA requirements are:
"One DMA channel, although the board will work without one."
In order to meet the requirement "the board will work without one," you will have to add another logical configuration section to the INF file, with priority set to SUBOPTIMAL and with no DMA item. The method for doing this is shown in the next section.
To add a second logical configuration section to the INF file XSCSI.INF
1. Right-click on the Log Config Sections folder and select the New Logical Configuration Section option from the popup menu. A new subfolder will be displayed with no section name (the displayed section name will be <Section name>.
2. Double-click on the new folder to display the items you can edit.
You are given the opportunity to edit two items: Section Name and Priority.
To enter the IO port and IRQ requirements, right-click on the subfolder you just named and follow the same procedures as shown in the earlier topics "Adding the I/O Description Item" and "Adding the IRQ Description Item."
Note that you will not add a DMA description item to this logical configuration section because it describes the device configuration where the device is running sub optimally, without a DMA channel.
For the logical configuration sections you have built (named CX2590_DMA and CX2590_NoDMA) to be recognized by the operating system installer, the names of the two sections have to be added to the Install section. To do this
1. Double-click on the Install sections subfolder named CX2590.Install. A list of all the types of sections that can be referred to in an Install section will be displayed in the edit area on the right side of the screen.
2. Since you want to add logical configuration names to the install section, double-click the Log Config item in the edit box list. The Edit Section List dialog is displayed with the a list section names displayed in the Available Sections list box on the left-hand side of the dialog.
3. Highlight the names of both logical configuration sections, CX2590_DMA and CX2590_NoDMA, and select the Add> button to move both section names to the Included Sections list on the right of the dialog. Then click the OK button.
At this point, the edit display looks like this:
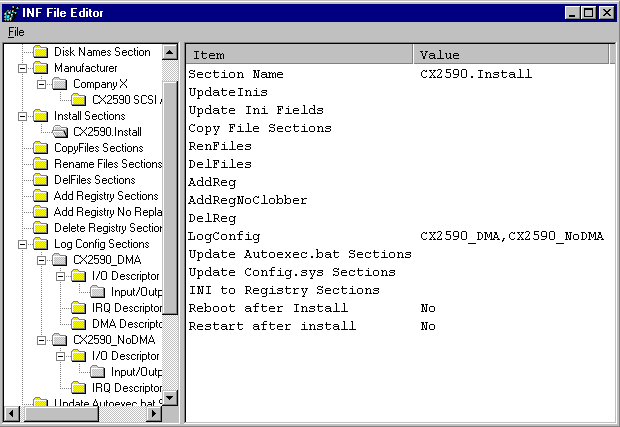
This display reflects that the two logical configuration sections have been put into the INF file and added to the install section script. Other types of sections have to be built to complete the INF file requirements stated in "Sample INF File Requirements." Entries have to added to the registry and device driver files have to be copied from a device installation diskette to the appropriate sub directories on the hard drive.