Pre-requisites
for installing Newgen OmniDocs WorkGroup / Enterprise Server
·
If Operating
System is Windows NT 4.0 then, Service Pack 5.0 or above should be installed on
the system before installing OmniDocs Server.
·
Setup will
install Microsoft Data Access Component (MDAC) in the beginning of the
installation, if needed. It is advisable to reboot the system after the
completion of Data Access Components setup.
·
For OmniDocs
Workgroup server, JRE 1.3 (Java Runtime
environment) is required.
Download
JRE 1.3 from following URL :
“http://java.sun.com/j2se/1.3/download.html”
·
For OmniDocs
Web Components the prerequisites are:
a)
If Operating
System is Windows NT, then Windows NT Option pack 4 should be installed along
with the IIS server.
b)
If Operating
System is Windows 2000 then Service Pack 2 and IIS 5.0 should be installed on the system.
DownLoad
Windows 2000 Service pack 2 from following
URL :
“http://www.microsoft.com/windows2000/downloads/servicepacks/sp2/sp2lang.asp”
DownLoad IIS Patch from following URL :
“http://download.microsoft.com/download/iis50/Patch/Q319733/NT5/EN-US/Q319733_W2K_SP3_X86_EN.exe”
c) For Enterprise server Setup SQL Server 7.0 or SQL 2000 should be installed over the machine. Full Text Search support should be installed along with SQL Server. The Microsoft SQL Search service should be running.
d) For WorkGroup Server setup MSDE (Microsoft SQL Server Desktop edition) is required. The setup itself prompts if MSDE is not installed over the machine.
Setup Procedure
Installation for OmniDocs Server takes place in following steps:
The
OmniDocs server setup folder consists of a file setup.exe. This file has to be
run to install the OmniDocs Server.
A. If Microsoft Data Access Components (MDAC) not installed on the machine then it is installed automatically by the OmniDocs Server installation. Installation. OmniDocs Server requires MDAC version 2.5 to run successfully.
|
After installing each component you have to Re-start your
computer. And if any of the components is already installed in the
system, it will not be installed again. If the Operating System is Windows 2000 Professional,
Windows 2000 Advanced Server, or Windows ME then MDAC setup will not run as
MDAC is already present on these Operating Systems. |
MDAC
Installation
To install the
Microsoft Data Access:
Double click the “Setup.exe”. Information message box appears:

Fig 2.1 Information message box
1.
Click OK command
button to proceed.
The Microsoft Data
Access screen appears:

Fig 2.2 Microsoft Data Access
2.5 screen
2. Click the Yes command button to proceed, else click No.
The Microsoft Data Access 2.5 Setup screen appears:

Fig 2.3 Microsoft Data Access 2.1 Setup
3. Click the Complete command button to proceed, else click Exit Setup.
The setup starts,

Fig 2.4 Microsoft Data Access 2.1 Setup
4. To cancel the setup, click Cancel command button.

Fig 2.5 Microsoft Data Access Components 2.5 Setup
After the successful installation of MDAC, Re-start your computer.
To restart the computer, click Restart Windows command button else click Exit Setup.
B. Installing OmniDocs Server
After installing MDAC the setup continues to install OmniDocs Server on your machine.
During the installation the user can use the Back button to got to the previous screen, Next button to proceed to the next screen and Cancel button to terminate the setup at any point.
1. Double click the Setup.exe
The InstallShield Wizard progress bar is invoked

Fig 2.6 InstallShield Wizard progress bar
2. After the completion of the progress bar, the Welcome screen is invoked.

Fig 2.7 Welcome screen
3. After this the License Agreement screen is invoked.

Fig 2.8 License Agreement screen
· The user has to agree with the License agreement to proceed with the installation of OmniDocs Server.
4. After this the Customer Information screen is invoked.

Fig 2.9 Customer Information screen
· Enter the name of the use in the User Name.
· Enter the name of the company in the Company Name.
· Enter the CD Key for installing the OmniDocs OmniDocs Server provided along with the software CD.
· Click Next to proceed with the Installation.
If you are installing
OmniDocs Server WorkGroup version then you MSDE (Microsoft SQL Server Desktop
Edition) should be installed on your system. The setup notifies the user and
itself installs MSDE on your machine.
Please refer the Section INSTALLING MSDE for this.

Fig 2.10 Choose Destination location screen
· Click Browse to browse through the folders. The user can select the folder in which he wants to install OmniDocs Server.
The Choose Folder screen is invoked.

Fig 2.11 Choose Folder screen
a) Select the directory where you wish to install the setup or specify the path in the Path.
b) Click OK to save the selected directory, and to close the Choose Folder screen.
The selected path is displayed in the Destination Path.
5. The Select Program Folder screen is invoked.

Fig 2.12 Select Program Folder screen
a) Select the folder from the list, or specify the new name of the folder in the Existing Folders list.
b) Click Next to proceed with the setup.
The setup will restart the web services and then start installing the components.

The Setup Status progress bar is invoked,

Fig 2.13 Setup Status screen
The setup will prompt you to create a default cabinet.
If the user selects
No then he can create the cabinet
later on. Refer to section Cabinet Creation.

Fig 2.14 Setup Type screen
If Yes is selected then the setup continues with the creation of the default cabinet
6. The setup prompts to enter the default cabinet information.

Fig 2.15 Choose Information screen
· Specify the name of the cabinet in Cabinet.
· Specify the machine name in Server.
· Specify the Login ID and Password for the SQL Server.
· Click Next to continue with the setup process. The setup starts creating the default cabinet. This may take sometime.
7. After this the Installation is complete. The InstallShield Wizard Complete screen is displayed.

Fig 2.16 InstallShield Wizard Complete screen
·
To restart the computer select the option Yes, I want to restart my computer now.
·
To restart the computer later on , select the option No, I will restart my computer later.
·
Click Finish
button to successfully finish the setup process
+ |
It is advisiable to restart the computer for the successful
implementation of the setup process |
INSTALLING MSDE (Microsoft SQL Server Desktop Edition)
The MSDE installation resides in the folder MSDE2000 in the installation directory. The setup.exe inside this folder starts the installation of MSDE.

Fig 2.17 Message Box
Pressing Yes starts the installation of MSDE. The MSDE setup continues with the installation of MSDE on your system. Restart the system and then again continue with the installation of OmniDocs Server.
Configuring OmniDocs Web
OmniDocs Web can be installed along with the installation of OmniDocs Server. For the installation of OmniDocs Web, select the ‘OmniDocs Web’ option. Once OmniDocs web is installed there are some prerequisites that has to be meet for proper working of OmniDocs web. These requirements are stated below.
Provide
Proper rights to IUSR_[machinename] user.
For proper working of OmniDocs web IUSR_[machinename] user should have rights of Administrator user on system. By default this user has guest users rights.
For Windows NT
If server machine is Windows NT then open the user/manager
for domain option.

Fig 2.18 User Manager dialog box
Select the user IUSR_[machinename] (in this case this is IUSR_JASPAL) and click on properties from User menu, or press Enter key.

Fig 2.19 User Properties dialog box
Click Groups button.

Fig 2.20 Group Memeberships dialog box
· Select the Administrators from right side list and click on <-Add button to include this user in Administrators group.
· Now remove we have to remove this user from Guests group.
For this select Guests from Member Of list and click Remove->.

Fig 2.21 Group Memeberships dialog box
Now the screen will look like this.

Fig 2.22 Group Memeberships dialog box
Click Ok to save all changes.
In this way we have given Administrative rights to IUSR_[machinename] user.
If server machine is Windows 2000/Windows 2000 Advanced server then this process can be completed in this way.
For windows 2000/
Windows 2000 advanced server :
Open the computer
Management

Fig 2.23 Computer Management screen
Select the Local
Users and Groups option. In right side pan user
will be displayed with all of users and groups defined on server. Select the [IUSR_machinename] user from list.

Fig 2.24 Computer Management screen
In this particular case this is IUSR_TIRU.
Select this user and click on Properties
option from Action menu, or simply
double click on this user name or press enter. Property window for this user is
displayed.
Select the Member
of tab from the property window, by default
this user is group of Guests group.

Fig 2.25 Properties dialog box
Click on Add
button, select groups screen is displayed.

Fig 2.26 Select Groups dialog box
Select the Administrators from upper side pan and click Add.

Fig 2.27 Select Groups dialog box
Now the property
window for user will look like this

Fig 2.28 Properties dialog box
Now we have to
remove Guests group from this. For this
select Guests and click Remove command button.

Fig 2.29 Properties dialog box
Click Apply to save all changes.
Check
Registry key values
1. Make sure that in “HKEY_CURRENT_USER\Control Panel\International\” , sTimeFormat key is there . If this key is not there then make an entry for this key and assign value "h:mm:ss tt"
2. Make sure that in “HKEY_CURRENT_USER\Control Panel\International\” , sShortDate key is there . If this key is not there then make an entry for this key and assign value "mm/dd/yyyy"
3. Make sure that in “HKEY_CURRENT_USER\Control Panel\International\” , sDate key is there . If this key is not there then make an entry for this key and assign value "/"
4. Make sure that in “HKEY_CURRENT_USER\Control Panel\International\” , sDecimal key is there . If not then make this and assure that value of this key is "." only.
5.
Make sure that in “HKEY_CURRENT_USER\Control
Panel\International\” , sTime key is
there . If not then make this and assure that value of this key is
":" only.
Set the environment for OmniDocs Web:
The installion of OmniDocs Web takes place under a user specified folder named as OmniDocs Server. After the successful installation of OmniDocs Server with the Web client a folder named OmniDocsWeb appears under the OmniDocs Server folder.
The next step is to provide web sharing to the OmniDocs Web folder.
To provide the web
sharing,
1. Select the OmniDocs Web folder, right click, a pop up menu appears, click the Sharing option. The OmniDocsWeb properties dialog box is invoked.

Fig 2.30 OmnidDocsWeb Properties screen
2. Select the Web Sharing tab.
3. Select the option ‘Share this folder”.
4. Click Add command button to provide web access.
The Edit Alias dialog box is invoked.

Fig 2.31 Edit Alias dialogbox
4 Specify the Alias name for the OmniDocsWeb folder.
5 Provide all the Access rights to this folder. (Read, Write and Scripts)
The Web Access is enabled for the OmniDocsWeb folder.
To specify
righs over the Web Server directory
Web Server
settings :
1. Go to the Internet Services Manager, and select the virtual directory OmniDocsWeb or the virtual directory where you have installed OmniDocsWeb. By default the installation goes in the directory “c:\program files\OmniDocs Server\Omniweb”

Fig 2.32 Internet Information Server screen
Select virtual directory OmniDocsWeb, right click the selected directory, a pop up menu is ivoked select the Properties option.
The OmniDocsWeb Properties dialog box is invoked,
1. Select the Directory Security tab.

Fig 2.33 OnniDocs Web Properties screen
2. Click Edit command button from the Anonymous Access and Authentication Control option.
The Authentication Methods dialog box is invoked for defining the Authentication Methods.

Fig 2.34Authentication Methods screen
3. Check the Anonymous Access option. Click the Edit command button.
The Anonymous User Account dialog box is invoked,

Fig 2.35 Anonymous User Account screen
4. Click Browse command button, the Select Windows NT User Account dialog box is invoked.
a) Select the required user.
b) The User list displays the users. For instance if the user name is “IUSR-XXXX” where XXXX is the name of the server machine.
5. Check the Allow IIS to control password option.
After defining the web sharing over the web server directory, specify the directory security settings over the web server directory.
To specify the
Directory Security Settings,
1. Go to the Windows Explorer and select the Web Server Directory. Right click the folder and click the Properties option.
The OmniDocs Web Properties dialog box is invoked.

Fig 2.36 OmniDocs Web Properties dialog box
a) Select the Security tab.
b) Click Add to add a user. the Select User, Computers, or Groups dialog box is invoked.
c) The user list displays list of users, for instance is the user name is “ISUR_XXXX” , XXXX is the name of the eb server.

Fig 2.37 Select Users, Computers, or Groups dialog box
2. Assign the Read, Write, Execute and Delete rights to this respective user over the folder.
The next step is to increase the script timeout from Internet Service Manager to facilitate uploading of large size document.
1. Open the Internet Service Manager, select the virtual directory OmniDocsWeb, right click the selected directory, a pop up menu is ivoked select the Properties option.
The OmniDocsWeb Properties dialog box is invoked,
.

Fig 2.38 OmniDocsWeb Properties dialog box
Click on the configuration button and Application Configuration window is invoked. Select the App Option. In this tab by default ASP Script timeout will be specified as 90 seconds.

Fig 2.39 Application Configuration dialog box
Increase the ASP Script timeout to 1000 seconds and click on OK to save changed made in script timeout value.

Fig 2.40 Application Configuration dialog box
The next step is to set the path,
1. Go to My Computer and right click, a pop up menu is invoked. Select the Properties option.
The System Properties dialog box is invoked:

Fig 2.41 System Properties
2. Specify the following path in Value text box.
“C:\Program Files\Newgen Common\oivt” and the path where the OmniDocs Server is installed (with semicolon “; “as a separator).
3.
Click OK command
button to close the System Properties
dialog box.
4.
Restart your computer.
|
+ |
For accessing the OmniDocs on your Web Browser, start the OmniCabinet Transaction Server and the SMS Server. |
|
+ |
To access shared cabinet from the OmniDocs Web, Register the specified cabinet from the Administration module for the first time where the OmniDocs Web component is installed. |
Now you are enable to view the OmniDocs Web site.
Invoke the Web Browser and type the URL
<http:\\[ machine name]\omnidocsweb\start.asp>.
Creating cabinet through OmniDocs Service Administration
The steps to craete a
cabinet are
1. Goto Start, point to Programs and then click Newgen OmniDocs Enterprise Server ( incase of MSQL and Oracle cabinets) / Newgen OmniDocs Workgroup Server ( incase of MSDE cabinets) and then click OmniDocs Service Administration.
Introducing OmniDocs Service Administration (OSA):
The OSA is used for remote administration of the OmniDocs Document Server (Java Transaction Server (JTS)) and the Storage Management Server (SMS).
These servers listen on a port, called the Admin Port in addition to the client ports (for the OmniDocs clients request). OSA manages these servers by connecting to their Admin port.
Starting OmniDocs Service Administration module
To start the OmniDocs Service Administration module
When the application is launched, the Login dialog box is invoked

Fig 2.42 Login dialog box
1. Select the username from the User drop down list.

Fig 2.43 Login dialog box
2. Specify the password in the Password.
3. Click OK to login.
4. Click Cancel to exit from the application.
The OSA screen is invoked displaying the list of all the registered servers.

Fig 2.44 List of Servers
|
+ |
· There are no registered servers when the screen is invoked for the first time. · The sequence of steps are: 1. Register the server. 2. Connect the specific server 3. Once the OSA (OmniDocs Service Administration) is connected with the server various operations like, Start, Stop and Manage can be performed on the selected server. |
|
+ |
The OSA has to be first disconnected from the server and only then it can be unregistered. |
1. Select the JTS option from the Select Service drop down list.
List of all registered JTS cabinets are displayed in the list.
List of all registered JTS are
displayed in the list.
![]()
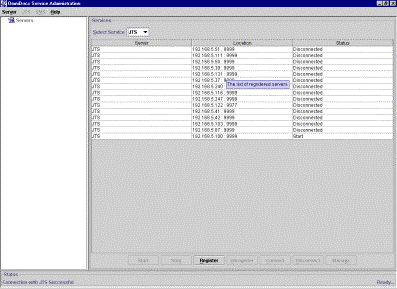
Fig 2.45 List of JTS servers
If the JTS is not registered through OmniDocs Service Administration, you have to register the JTS,
Registering the JTS
To register the JTS server
1. Click Register.
The Register dialog box is invoked.
|
+ |
Once the server is registered it is displayed in the list and is in a disconnected state. |
Connecting to the JTS server
To connect to the JTS server
1. Select the server that needs to be connected.
2. Click Connect.
The OSA gets connected with the server.
Managing connected server
To manage the connected server
|
+ |
Only when the JTS is managed can all the server operations (other than Start and Stop) be performed on it. |
1. Select the connected server from the list of registered servers.
2. Click Manage.
Manage
![]()

Fig 2.46 Managing the JTS server
An entry of the connected server along with its IP Address is displayed in the Servers tree in the repository view.
Entry of the server along with it’s IP Address is
displayed in the Server tree.
![]()
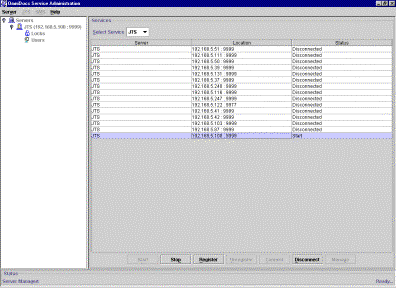
Fig 2.47 Server IP Address
3. Select the JTS server in the repository view.
The following screen is invoked displaying the JTS server information.

Fig 2.48 JTS server information
Editing the properties of the JTS server
To edit the properties of the JTS server
1. Click Edit.
|
+ |
Edit is a toggle button and changes to Update. |

Fig 2.49 JTS server information
|
+ |
The editable modes are the Server Port, the Transaction log, Connection log, Socket timeout and the Batch Size. |
2. Make the changes as per the requirement.
Edit is a toggle button, which changes to Update. Change made
![]()
![]()

Fig 2.50 JTS server information
3. Click Update to save the changes made.
Change reflected
![]()

Fig 2.51 JTS server information
Creating cabinet
To create a cabinet
1. Click Create.
The Create Cabinet dialog box is invoked

Fig
2.52 Create Cabinet
2. Select the cabinet type that needs to be created, it can be a Document database, an Image server database or Both.
3. Select the required Database Type from the options available. The various options available are MSSQL, Oracle, Postgres, and MSDE.
Creating MSSQL database cabinet
To create MSSQL database cabinet
1. Select the MSSQL database option from the Database Type.

Fig 2.53 Create Cabinet (MSSQL database)
2. Check the Enable FTS option to enable the FTS.
3. Specify the initial database size in Device Size.
4. Specify the initial log size in Log Size.
5. Specify the cabinet information,
a) Specify the cabinet name in the Cabinet Name.
b) Specify the server name (name of the machine where MSSQL server is running) in the Server Name.
c) Specify the username in the User name.
d) Specify the password in the Password.
e) Specify the path where the database information (i.e .DAT file) is to be stored in the Database Path.
|
+ |
The database (DAT) file is formed on the machine that we specify in the Server Name edit box i.e. the machine where the MSSQL Server is installed. |
f) Specify the CD key for the user licenses in the CD Key.
g) Select the required security level from the Security Level drop down list.
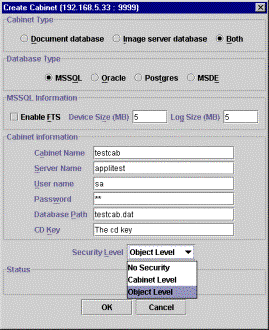
Fig 2.54 Create Cabinet (MSSQL database)
· No Security implies no validation of rights on any object, for any user.
· Cabinet Level implies that the rights are applicable at the cabinet level. All the rights on an object for a user would be inherited from the cabinet.
· Object Level implies object level security, which means that all the rights and privileges are assigned to all the objects of OmniDocs.
· Click OK to create the cabinet as per the requirements.
h) Click Cancel to close the Create Cabinet dialog box.
|
+ |
An SQL cabinet can only be created when the SQL authentication is in mixed mode. |
Creating Oracle database cabinet
To create an oracle database cabinet
1. Select the Oracle database option from the Database Type.
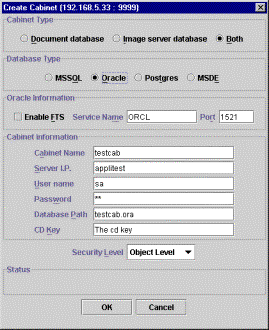
Fig 2.55 Create Cabinet (Oracle database)
2. Check the Enable FTS option to enable the FTS.
3. Specify the initial database size in Device Size.
4. Specify the initial log size in Log Size.
5. Specify the cabinet information,
a) Specify the cabinet name in the Cabinet Name.
b) Specify the server IP Address in the Server IP.
c) Specify the username in the User name.
d) Specify the password in the Password.
e) Specify the path where the database information is to be stored in the Database Path.
f) Specify the CD key for user licenses in the CD Key.
g) Select the required security level from the Security Level drop down list.
h) Click OK to create the cabinet as per the requirements.
i) Click Cancel to close the Create Cabinet dialog box.
Creating MSDE database cabinet
To create a MSDE database cabinet
1. Select the MSDE option from Database Type.
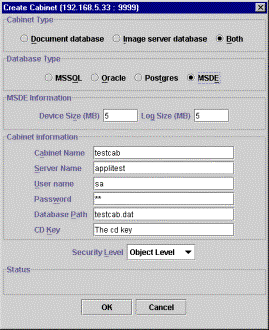
Fig 2.56 Create Cabinet (MSDE database)
2. Specify the initial database size for the required cabinet in Device Size.
3. Specify the initial log size for the required cabinet in Log Size.
4. Specify the cabinet information,
a) Specify the cabinet name in Cabinet Name.
b) Specify the server name in Server Name.
c) Specify the username in the User Name.
d) Specify the password in Password.
e) Specify the path where the information has to be stored in the Database Path.
f) Specify the CD Key for user licenses in the CD Key.
5. Select the required security level from the Security Level drop down list.
6. Click OK to create a cabinet as per the requirements.
7. Click Cancel to close the Create Cabinet dialog box.
Once a cabinet is created it has to be associated with the JTS to display it in the list of JTS cabinets. After the cabinet is associated with the JTS it's information is displayed in the JTS view.
In order to Associate a cabinet you should
first STOP the JTS Services. Association of the cabinet is complete only after
the server is restarted.
Associating selected cabinet
To associate selected cabinet
1. Click Associate.
The Associate a Cabinet dialog box is invoked,
The Associate a Cabinet dialog box has 3 tabs, the Database, Cabinet properties, and the Connection tab.
Database tab
a) Click the Database tab (Database tab is shown by default when the user clicks on the Associate button).

Fig 2.57 Associate a Cabinet dialog box (Database tab)
b) Select the required database type from the options available.
· Select the Microsoft SQL Server 7.0/2000 option to associate the selected cabinet with the SQL database.
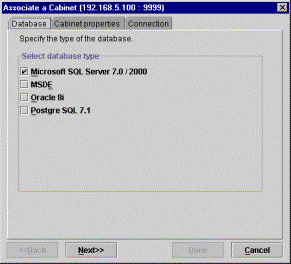
Fig 2.58 Associate a Cabinet dialog box (Microsoft SQL Server 7.0/2000)
· Select the MSDE option to associate the selected cabinet with MSDE.
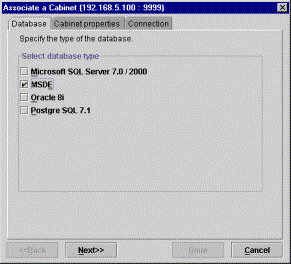
Fig 2.59 Associate a Cabinet dialog box (MSDE)
· Select the Oracle 8i option to associate the selected cabinet with Oracle 8i.

Fig 2.60 Associate a Cabinet dialog box (Oracle 8i)
Specify the configuration setting of the TNS Port and the SID if no default settings have been set.
Cabinet properties tab
a) Click the Cabinet properties tab (or the Next button)
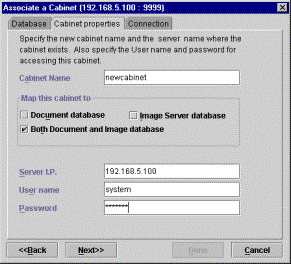
Fig 2.61 Associate a Cabinet dialog box (Cabinet properties tab)
b)
Specify the cabinet name in Cabinet Name.
|
+ |
The cabinet name is same as that of the database name. |
c) Check the option Document database, if the database is a Document database.
d) Check the option Image Server database, if the database is an Image Server Database.
e) Check the option Both Document and Image database, if the database contains both the document and image server information.
f) Specify the computer name in Computer Name.
g) Specify the login in the Login Name.
h) Specify the password in the Password.
i) Click Back to go to the previous screen.
j) Click Next to proceed.
Connection tab
a) Click the Connection tab.

Fig 2.62 Associate a Cabinet dialog box (Connection tab)
b) Specify the maximum number of connections that the JTS should maintain with the database in Maximum connection.
c) Specify the minimum number of connections that the JTS should maintain with the database in Minimum connection..
d) Specify the query time out for the selected cabinet in Query timeout
e) Click Back to go to the previous screen.
2. Click Done to associate the selected cabinet.
3. Click Cancel to close the Associate a Cabinet dialog box without associating.
Once the cabinet has been associated with the JTS the connected cabinet information is displayed in the JTS view.
Cabinet created after the
association.
![]()
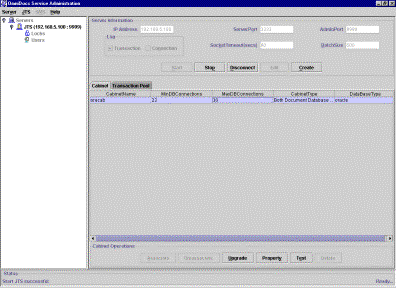
Fig 2.63 Entry of connected cabinet
Once the cabinet has been created and associated with the JTS through OmniDocs Service Administration.
Close the OmniDocs Service Administration.
For this cabinet to work, the cabinet has to be registered through the OmniDocs Administration module.
To invoke the OmniDocs Administration module,
Goto Start, point to Programs and then click Newgen OmniDocs Enterprise Server ( incase of MSQL and Oracle cabinets) / Newgen OmniDocs Workgroup Server ( incase of MSDE cabinets) and then click OmniDocs Service Administration.
Invoking Administration Desktop
Invoking Administration desktop

Fig 2..64 Newgen OmniDocs Administration
To register the cabinet in OmniDocs Service Administration,
Registering shared cabinet
To register a shared cabinet
1. Click Setup menu and then click Register. The Register dialog box appears:

Fig 2.65 Register dialog box
2. Specify the IP address and Port Number for connecting the server.
3. For connecting to the server, click the Connect command button.
4. Select shared cabinet from the Cabinet(s) list and select the required Site of the cabinet.
5. To register the cabinet, click the Register command button, else click Close.
After the cabinet has been registered, you have to connect to the required cabinet
Connecting to cabinet
1. Select the Shared cabinet that has to be connected, then enter the User Name and the Password.
2. For connecting to the requisite cabinet click Connect command button, else click Cancel.
Menu Bar
Details of the
connected cabinet are displayed in the Content View
Cabinet properties Status Bar Cabinet List Tool Bar![]()
![]()
![]()
![]()
![]()

Fig 2.66 Newgen OmniDocs Administration
Components
The Administration Desktop main screen includes:
Menu bar, topmost bar of the screen, has menus for available actions.
Tool bar has icons for various actions. It provides shortcuts for menu options.
Repository view displays the hierarchical structure of the Shared cabinet.
Content view displays the properties of the selected object. The objects are folder, keywords, user, group, global index, data class and volume.
Status bar displays the Shared cabinet’s name, User’s name and current date and time.
After connection with the cabinet the site has to be created.
Creating a site
To create a site
1. Select Site node from the repository view.
2. Click File menu point to New and then click Site
The Site option is also invoked from the right click of the mouse.
The site properties are displayed

Fig 2.67 Creating Site
3. Enter the site name in the Site textbox.
4. Enter the IP of the machine where the SMS server is running in the Site Address text box.
5. Enter the Port No. in the Port No text box.
6. Click OK command button to save the changes made
7. Click Cancel command buton to close the site properties dialog box without saving the changes made.
After a site has been created, a volume has
to be created corresponding to the site.
Creating a volume
To create a volume
1 Select the Volume node from the repository view.
2 Click File menu point to New and select Volume
The New
Volume option is also invoked from the right click of the mouse.
The Volume properties screen is invoked

Fig 2.68 Creating Volume
3 Enter the Volume name in the Volume Name textbox
4 Enter the VolBlock size in the VolBlock Size text box
5 Select the home site from the Home Site combo box
6 Select the default path from the Default Path combo box
7 Select the replication type from the Replication Type combo box.
8 Click Replicas to create replica(s) of the selected volume.
After the volume is created, this volume has to be associated as the default image volume of the cabinet.
Default Image Volume
![]()

Fig 2.69 Default
Volume Creation
Select the Image Volume which has been created, from the Default Image Volume combo box.
After performing the steps, the cabinet is ready to work on.