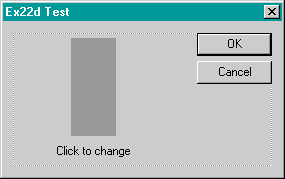
Programmers have been using DLLs for custom controls since the early
days of Windows because custom controls are neatly self-contained. The
original custom controls were written in pure C and configured as stand-alone
DLLs. Today you can use the features of the MFC library in your custom controls, and you can use the wizards to make coding easier. A regular DLL is the best choice for a custom control because the control doesn't need a
C++ interface and because it can be used by any development system that accepts custom controls (such as the Borland C++ compiler). You'll probably want to use the MFC dynamic linking option because the resulting DLL will be small and quick to load.
What Is a Custom Control?
You've seen ordinary controls and Microsoft Windows common controls in Chapter 6, and you've seen ActiveX controls in Chapter 8. The custom control acts like an ordinary control, such as the edit control, in that it sends WM_COMMAND notification messages to its parent window and receives user-defined messages. The dialog editor lets you position custom controls in dialog templates. That's what the "head" control palette item, shown here, is for.
![]()
You have a lot of freedom in designing your custom control. You can
paint anything you want in its window (which is managed by the client
application) and you can define any notification and inbound messages you need. You
can use ClassWizard to map normal Windows messages in the control
(WM_LBUTTONDOWN, for example), but you must manually map the
user-defined messages and manually map the notification messages in the parent window class.
A Custom Control's Window Class
A dialog resource template specifies its custom controls by their symbolic window class names. Don't confuse the Win32 window class with the C++ class; the only similarity is the name. A window class is defined by a structure that contains the following:
The Win32 RegisterClass function copies the structure into process memory so that any function in the process can use the class to create a window. When the dialog window is initialized, Windows creates the custom control child windows from the window class names stored in the template.
Suppose now that the control's WndProc function is inside a DLL.
When the DLL is initialized (by a call to DllMain), it can call RegisterClass for the control. Because the DLL is part of the process, the client program can create child windows of the custom control class. To summarize, the client knows the name string of a control window class and it uses that class name to construct the child window. All the code for the control, including the WndProc function, is inside the DLL. All that's necessary is that the client load the DLL prior to creating the child window.
The MFC Library and the WndProc Function
Okay, so Windows calls the control's WndProc function for each message sent to that window. But you really don't want to write an old-fashioned switch-case statement—you want to map those messages to C++ member functions, as you've been doing all along. Now, in the DLL, you must rig up a C++ class that corresponds to the control's window class. Once you've done that, you can happily use ClassWizard to map messages.
The obvious part is the writing of the C++ class for the control. You simply use ClassWizard to create a new class derived from CWnd. The tricky part is wiring the C++ class to the WndProc function and to the application framework's message pump. You'll see a real WndProc in the EX22D example, but here's the pseudocode for a typical control WndProc function:
LRESULT MyControlWndProc(HWND hWnd, UINT message
                         WPARAM wParam, LPARAM lParam)
{
    if (this is the first message for this window) {
        CWnd* pWnd = new CMyControlWindowClass();
        attach pWnd to hWnd
    }
    return AfxCallWndProc(pWnd, hWnd, message, WParam, lParam);
}
The MFC AfxCallWndProc function passes messages to the
framework, which dispatches them to the member functions mapped in
CMyControlWindowClass.
Custom Control Notification Messages
The control communicates with its parent window by sending it special WM_COMMAND notification messages with parameters, as shown here.
| Parameter | Usage |
| (HIWORD) wParam | Notification code |
| (LOWORD) wParam | Child window ID |
| lParam | Child window handle |
The meaning of the notification code is arbitrary and depends on the control. The parent window must interpret the code based on its knowledge of the control. For example, the code 77 might mean that the user typed a character while positioned on the control.
The control might send a notification message such as this:
GetParent()->SendMessage(WM_COMMAND,GetDlgCtrlID() | ID_NOTIFYCODE << 16, (LONG) GetSafeHwnd());
On the client side, you map the message with the MFC ON_CONTROL macro like this:
ON_CONTROL(ID_NOTIFYCODE, IDC_MYCONTROL, OnClickedMyControl)
Then you declare the handler function like this:
afx_msg void OnClickedMyControl();
You have already seen user-defined messages in Chapter 7. This is the means
by which the client program communicates with the control. Because a
standard message returns a 32-bit value if it is sent rather than posted, the client can
obtain information from the control.
The EX22D Example—A Custom Control
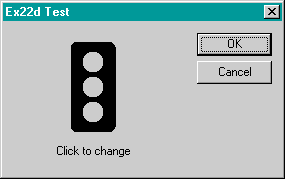
The EX22D program is an MFC regular DLL that implements a traffic light control indicating off, red, yellow, and green states. When clicked with the left mouse button, the DLL sends a clicked notification message to its parent and responds to two user-defined messages, RYG_SETSTATE and RYG_GETSTATE. The state is an integer that represents the color. Credit goes to Richard Wilton, who included the original C-language version of this control in his book Windows 3 Developer's Workshop (Microsoft Press, 1991).
The EX22D project was originally generated using AppWizard, with linkage to the shared MFC DLL, just like EX22C. Figure 22-1 shows the code for the primary source file, with the added code in the InitInstance function in boldface. The dummy exported Ex22dEntry function exists solely to allow the DLL to be implicitly linked. The client program must include a call to this function. That call must be in an executable path in the program or the compiler will eliminate the call. As an alternative, the client program could call the Win32 LoadLibrary function in its InitInstance function to explicitly link the DLL.
|
EX22D.CPP
// ex22d.cpp : Defines the initialization routines for the DLL.
//

#include "stdafx.h"
#include "ex22d.h"
#include "RygWnd.h"

#ifdef _DEBUG
#define new DEBUG_NEW
#undef THIS_FILE
static char THIS_FILE[] = __FILE
__;
#endif

extern "C" __declspec(dllexport) void Ex22dEntry() {} // dummy function

(generated comment lines omitted)

///////////////////////////////////////////////////////////////////////
// CEx22dApp

BEGIN_MESSAGE_MAP(CEx22dApp, CWinApp)
    //{{AFX_MSG_MAP(CEx22dApp)
        // NOTE - the ClassWizard will add and remove mapping macros here.
        //    DO NOT EDIT what you see in these blocks of generated code!
    //}}AFX_MSG_MAP
END_MESSAGE_MAP()

///////////////////////////////////////////////////////////////////////
// CEx22dApp construction

CEx22dApp::CEx22dApp()
{
    // TODO: add construction code here,
    // Place all significant initialization in InitInstance
}

///////////////////////////////////////////////////////////////////////
// The one and only CEx22dApp object

CEx22dApp theApp;

BOOL CEx22dApp::InitInstance()
{
    CRygWnd::RegisterWndClass(AfxGetInstanceHandle());
    return CWinApp::InitInstance();
}
|
Figure 22-1. The EX22D primary source listing.
Figure 22-2 shows the code for the CRygWnd class, including the global RygWndProc function. (Click the Add Class button in ClassWizard to create this class.) The code that paints the traffic light isn't very interesting, so we'll concentrate on the functions that are common to most custom controls. The static RegisterWndClass member function actually registers the RYG window class and must be called as soon as the DLL is loaded. The OnLButtonDown handler is called when the user presses the left mouse button inside the control window. It sends the clicked notification message to the parent window. The overridden PostNcDestroy function is important because it deletes the CRygWnd object when the client program destroys the control window. The OnGetState and OnSetState functions are called in response to user-defined messages sent by the client. Remember to copy the DLL to your system directory.
|
RYGWND.H
#if !defined(AFX_RYGWND_H__1AA889D5_9788_11D0_BED2_00C04FC2A0C2
__INCLUDED_)
#define AFX_RYGWND_H__1AA889D5_9788_11D0_BED2_00C04FC2A0C2
__INCLUDED_

#if _MSC_VER > 1000
#pragma once
#endif // _MSC_VER > 1000
// RygWnd.h : header file
//

///////////////////////////////////////////////////////////////////////
// CRygWnd window

#define RYG_SETSTATE WM_USER + 0
#define RYG_GETSTATE WM_USER + 1

LRESULT CALLBACK AFX_EXPORT
    RygWndProc(HWND hWnd, UINT message, WPARAM wParam, LPARAM lParam);

class CRygWnd : public CWnd
{
private:
    int m_nState; // 0=off, 1=red, 2=yellow, 3=green
    static CRect  s_rect;
    static CPoint s_point;
    static CRect  s_rColor[3];
    static CBrush s_bColor[4];

// Construction
public:
    CRygWnd();
public:
    static BOOL RegisterWndClass(HINSTANCE hInstance);

// Attributes
public:

// Operations
public:

// Overrides
    // ClassWizard generated virtual function overrides
    //{{AFX_VIRTUAL(CRygWnd)
    protected:
    virtual void PostNcDestroy();
    //}}AFX_VIRTUAL

// Implementation
public:
    virtual ~CRygWnd();

    // Generated message map functions
private:
    void SetMapping(CDC* pDC);
    void UpdateColor(CDC* pDC, int n);
protected:
    //{{AFX_MSG(CRygWnd)
    afx_msg void OnPaint();
    afx_msg void OnLButtonDown(UINT nFlags, CPoint point);
    //}}AFX_MSG
    afx_msg LRESULT OnSetState(WPARAM wParam, LPARAM lParam);
    afx_msg LRESULT OnGetState(WPARAM wParam, LPARAM lParam);
    DECLARE_MESSAGE_MAP()
};

///////////////////////////////////////////////////////////////////////
//{{AFX_INSERT_LOCATION}}
// Microsoft Visual C++ will insert additional declarations
//  immediately before the previous line.
#endif // !defined(AFX_RYGWND_H__1AA889D5_9788_11D0_BED2_00C04FC2A0C2__INCLUDED_)
RYGWND.CPP
// RygWnd.cpp : implementation file
//

#include "stdafx.h"
#include "ex22d.h"
#include "RygWnd.h"

#ifdef _DEBUG
#define new DEBUG_NEW
#undef THIS_FILE
static char THIS_FILE[] = __FILE
__;
#endif

LRESULT CALLBACK AFX_EXPORT
    RygWndProc(HWND hWnd, UINT message, WPARAM wParam, LPARAM lParam)
{
    AFX_MANAGE_STATE(AfxGetStaticModuleState());

    CWnd* pWnd;

    pWnd = CWnd::FromHandlePermanent(hWnd);
    if (pWnd == NULL) {
        // Assume that client created a CRygWnd window
        pWnd = new CRygWnd();
        pWnd->Attach(hWnd);
    }
    ASSERT(pWnd->m_hWnd == hWnd);
    ASSERT(pWnd == CWnd::FromHandlePermanent(hWnd));
    LRESULT lResult = AfxCallWndProc(pWnd, hWnd, message,
                                     wParam, lParam);
    return lResult;
}

///////////////////////////////////////////////////////////////////////
// CRygWnd

// static data members
CRect  CRygWnd::s_rect(-500, 1000, 500, -1000); // outer rectangle
CPoint CRygWnd::s_point(300, 300); // rounded corners
CRect  CRygWnd::s_rColor[] = {CRect(-250, 800, 250, 300),
                              CRect(-250, 250, 250, -250),
                              CRect(-250, -300, 250, -800)};
CBrush CRygWnd::s_bColor[] = {RGB(192, 192, 192),
                              RGB(0xFF, 0x00, 0x00),
                              RGB(0xFF, 0xFF, 0x00),
                              RGB(0x00, 0xFF, 0x00)};

BOOL CRygWnd::RegisterWndClass(HINSTANCE hInstance) // static member
                                                    //  function
{
    WNDCLASS wc;
    wc.lpszClassName = "RYG"; // matches class name in client
    wc.hInstance = hInstance;
    wc.lpfnWndProc = RygWndProc;
    wc.hCursor = ::LoadCursor(NULL, IDC_ARROW);
    wc.hIcon = 0;
    wc.lpszMenuName = NULL;
    wc.hbrBackground = (HBRUSH) ::GetStockObject(LTGRAY_BRUSH);
    wc.style = CS_GLOBALCLASS;
    wc.cbClsExtra = 0;
    wc.cbWndExtra = 0;
    return (::RegisterClass(&wc) != 0);
}

///////////////////////////////////////////////////////////////////////

CRygWnd::CRygWnd()
{
    m_nState = 0;
    TRACE("CRygWnd constructor\n");
}

CRygWnd::~CRygWnd()
{
    TRACE("CRygWnd destructor\n");
}


BEGIN_MESSAGE_MAP(CRygWnd, CWnd)
    //{{AFX_MSG_MAP(CRygWnd)
    ON_WM_PAINT()
    ON_WM_LBUTTONDOWN()
    //}}AFX_MSG_MAP
    ON_MESSAGE(RYG_SETSTATE, OnSetState)
    ON_MESSAGE(RYG_GETSTATE, OnGetState)
END_MESSAGE_MAP()
void CRygWnd::SetMapping(CDC* pDC)
{
    CRect clientRect;
    GetClientRect(clientRect);
    pDC->SetMapMode(MM_ISOTROPIC);
    pDC->SetWindowExt(1000, 2000);
    pDC->SetViewportExt(clientRect.right, -clientRect.bottom);
    pDC->SetViewportOrg(clientRect.right / 2, clientRect.bottom / 2);
}

void CRygWnd::UpdateColor(CDC* pDC, int n)
{
    if (m_nState == n + 1) {
        pDC->SelectObject(&s_bColor[n+1]);
    }
    else {
        pDC->SelectObject(&s_bColor[0]);
    }
    pDC->Ellipse(s_rColor[n]);
}

///////////////////////////////////////////////////////////////////////
// CRygWnd message handlers

void CRygWnd::OnPaint()
{
    int i;
    CPaintDC dc(this); // device context for painting
    SetMapping(&dc);
    dc.SelectStockObject(DKGRAY_BRUSH);
    dc.RoundRect(s_rect, s_point);
    for (i = 0; i < 3; i++) {
        UpdateColor(&dc, i);
    }
}

void CRygWnd::OnLButtonDown(UINT nFlags, CPoint point)
{
    // Notification code is HIWORD of wParam, 0 in this case
    GetParent()->SendMessage(WM_COMMAND, GetDlgCtrlID(),
        (LONG) GetSafeHwnd()); // 0
}
void CRygWnd::PostNcDestroy()
{
    TRACE("CRygWnd::PostNcDestroy\n");
    delete this; // CWnd::PostNcDestroy does nothing
}

LRESULT CRygWnd::OnSetState(WPARAM wParam, LPARAM lParam)
{
    TRACE("CRygWnd::SetState, wParam = %d\n", wParam);
    m_nState = (int) wParam;
    Invalidate(FALSE);
    return 0L;
}

LRESULT CRygWnd::OnGetState(WPARAM wParam, LPARAM lParam)
{
    TRACE("CRygWnd::GetState\n");
    return m_nState;
}
|
Figure 22-2. The CRygWnd class listing.
The EX22B program already links to the EX22A and EX22C DLLs. Now you'll revise the project to implicitly link to the EX22D custom control.
Here are the steps for updating the EX22B example:

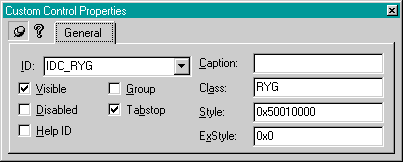
Specify RYG as the window class name of the custom control, as shown.

Then use ClassWizard to generate a class CTest22dDialog, derived from CDialog.
enum { OFF, RED, YELLOW, GREEN } m_nState;
Also add the following import and user-defined message IDs:
extern "C" __declspec(dllimport) void Ex22dEntry(); // dummy function
#define RYG_SETSTATE WM_USER + 0
#define RYG_GETSTATE WM_USER + 1
CTest22dDialog::CTest22dDialog(CWnd* pParent /*=NULL*/)
    : CDialog(CTest22dDialog::IDD, pParent)
{
    //{{AFX_DATA_INIT(CTest22dDialog)
      // NOTE: the ClassWizard will add member initialization here
    //}}AFX_DATA_INIT
    m_nState = OFF;
    Ex22dEntry(); // Make sure DLL gets loaded
}
ON_CONTROL(0, IDC_RYG, OnClickedRyg) // Notification code is 0

void CTest22dDialog::OnClickedRyg()
{
    switch(m_nState) {
    case OFF:
        m_nState = RED;
        break;
    case RED:
        m_nState = YELLOW;
        break;
    case YELLOW:
        m_nState = GREEN;
        break;
    case GREEN:
        m_nState = OFF;
        break;
    }
    GetDlgItem(IDC_RYG)->SendMessage(RYG_SETSTATE, m_nState);
    return;
}
When the dialog gets the clicked notification message, it sends the RYG_SETSTATE message back to the control in order to change the color. Don't forget to add this prototype in the Test22dDialog.h file:
afx_msg void OnClickedRyg();
void CEx22bView::OnTestEx22ddll()
{
    CTest22dDialog dlg;
    dlg.DoModal();
}
Of course, you'll have to add the following line to Ex22bView.cpp:
#include "Test22dDialog.h"
