In this tutorial, you will use a technique that pastes images of trees on flat planes. You will create and modify a script that creates a billboard effect, where one object is made to face another object throughout the animation. The facing object will rotate only about the world Z-axis. This effect is useful for trees, people, and scene elements that use a bitmap on a plane object, to force them to always face the camera.
You will create the script from a template, and you will modify the script by adding a ready-made function. Then you will modify the script to make object selection more flexible.
The purpose of these steps is to show you how to modify existing scripts to incorporate the functions you need for your own projects. In the process, you will learn to use 2D tree objects as an alternative to 3D trees.
In this tutorial, you will learn how to:
Skill level: Advanced
Time to complete: 1 hour
All the files necessary to do the tutorials can be found in the \tutorials folder on the DVD that shipped with 3ds Max. Before doing the tutorials, copy the \tutorials directory from the disc to your local program installation.
Open the test file for the script:
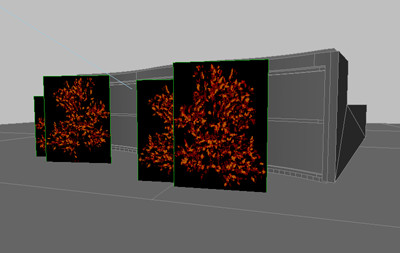
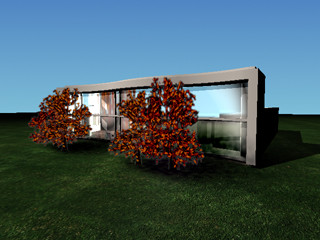
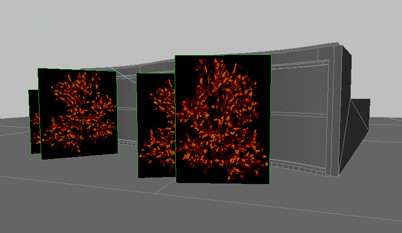
This scene has planes (billboards) placed in front of the building rather than tree models. Images of oak trees have been placed on the billboards. Each image has an alpha channel that is used as an opacity map to make the image background transparent. All objects have been frozen except the billboards, the light, and the camera.
The scene renders faster than it would if 3D trees were present, and the billboard trees look reasonably good from the current camera angle. Because the scene uses ray-traced shadows, the shadows from the tree maps are rendered accurately, with the transparent areas casting no shadows.
The camera is animated, but the billboards do not turn to face the camera as it moves.
From this angle, it is obvious that the trees are simply pasted onto flat boards. You could solve this problem by manually animating the billboards to follow the camera. However, if you had numerous trees, people, and other objects that needed to face the camera, the animation process would quickly become unwieldy.
Instead, you will use a script to add a script controller to each billboard that forces it to face the camera at all times, even when the camera is animated.
Try out the script:
First, you will run a finished version of the script to see how it works. Later in this tutorial, you will learn to write this script yourself.
 Go to
the Utilities panel.
Go to
the Utilities panel.The MAXScript rollout is displayed.
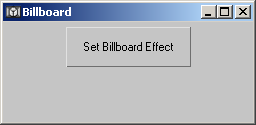
A Billboard dialog appears with one button labeled Set Billboard Effect.
The script works with selected objects. You select the objects to look at the camera, and the camera itself. The script figures out which object is the camera, and forces the other objects’ local Z-axes to face the camera.
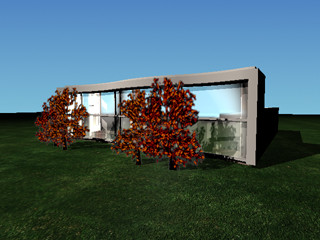
The planes on the current frame turn to face the camera.
The planes now face the camera wherever it goes.
As you move the camera, the planes turn to face its location.
Inspect the script:
Next, you will look at the contents of the script to see what it contains.
The script appears in a MAXScript window. In this window, you can read and edit the script.
The first part of the script is called the header. This part contains basic information such as the script file name, script name, script version number, 3ds Max version number(s), author’s name, date, and purpose. This information is in comment form, which means the program ignores this information when looking for code to execute. Comments that span several lines are located between the symbols /* and */, while single-line comments are preceded by double hyphens (--). The entire script contains occasional comments to inform you of the purpose of each line or section.
After the header, the makeBillboard function is defined, but not executed. This function assigns a script controller to the rotation of each billboard object. The script controller calculates the world Z rotation required to keep the billboard looking at the camera. The billboard’s local Z-axis defines the front of the object. This convention is chosen to match the orientation of objects created in the Front viewport.
When the script is run, the function is loaded, but not executed. It is ready to be called later in the script.
The first task that the script performs is to check if a Billboard dialog is already open, and if so, it closes it. This prevents multiple copies of the dialog from being created.
The rollout is defined, and given a name. Within this definition, variables are set, and a UI control item (a button) and its associated event are defined. The variable for the camera is called laObj (for look-at object), while the array for holding the billboard objects is called bbObjsArr (for billboard objects array).
Next, the script looks at all the selected objects. The camera is identified by checking the superClass of each object. It places the camera in the laObj variable, and puts the remaining objects in the bbObjsArr array.
The script then loops through the bbObjsArr array and calls the makeBillboard function for each object listed in it.
At the end, the script creates the dialog and waits for you to click the button.
Inspect the makeBillboard function:
The makeBillboard function is the one that does the actual work of creating the script controllers for the objects that look at the camera. It contains several sections that perform different tasks.
fn makeBillboard
obj -- The billboard object.
targ -- The lookat object.
The two variables that follow fn makeBillboard, obj and targ, are arguments for the function. Arguments are values that are passed to the function so it can perform an operation on them. The arguments could appear on the same line as fn makeBillboard, but placing them on separate lines allows you to include comments after each one.
Immediately after the function name and arguments is an equals sign, and open parenthesis. The code that defines the function begins after the open parenthesis.
This action highlights the entire function definition within the opening and closing parentheses. The opening parenthesis is just after fn makeBillboard declaration and its equals sign, while the closing parenthesis occurs many lines later.
The function setWaitCursor() is called at the beginning of the function to cause the Windows hourglass to display while the function is processing. The function setArrowCursor() is called at the end to restore the arrow cursor. Both these functions are built into MAXScript.
The rest of the function is contained in an if...then... clause. This provides error handling to ensure that valid objects have been passed to the function. The following line prevents the script from attempting to process deleted or nonexistent objects which would cause the script to fail.
if obj!=undefined AND (NOT isDeleted obj) AND targ!=undefined AND (NOT isDeleted targ) then
The body of the if...then... clause builds a string, scriptStr, that comprises the actual script for the script controller. The script uses basic trigonometry to calculate the rotation angle required. When using a ready-made function within a script, you don’t have to know the details of the function. It is sufficient to know the arguments and the value returned by the function.
At the end of this clause, the script controller is assigned, and the script’s time range is expanded. For a script controller, the active time range is automatically set to the current animation range. If you decide to increase the number of frames in your animation after you run this script, you will have to manually expand the range for the controller. The script avoids this situation by setting the controller’s time range to a very large interval.
The code that performs this step is as follows:
-- Assign rotation script controller.
ctrl=obj.rotation.controller=rotation_script()
-- Set time range wide in case user expands it later.
setTimeRange ctrl (interval -1000 10000)
-- Put script string into script controller.ctrl.
script=scriptStr
Open the template:
Next, you will recreate the script from a template. This will introduce you to the tools you can use to create your own scripts.
This template has placeholders for all the elements needed to create a script.
The template saves time when you're creating a new script. Writing the script is simply a matter of filling in each of the placeholders.
Changing the file name now will prevent you from overwriting the template.
Fill in the header:
The template’s header provides a basic layout for a header, with entries for file name, version, and other details.
Add a function to the template:
You can add the makeBillboard function to the template with a simple copy-and-paste operation.
Fill in the rollout information:
The rollout declaration has a place for the rollout title that appears when you run the script. It also has an internal rollout name that you can replace with a more descriptive name.
local bbObjsArr -- Declare billboard objects array.
local laObj -- Declare look-at object.
The local declaration sets the scope of the variables. In a script, a variable can be available to the entire script, or only to a specific area of the code within the parentheses where the declaration is made. In this case, the local command indicates that these variables should be available only to this section. In this case, the local declaration ensures that these variables are available only to the rollout. This prevents name conflicts with other portions of the code, and protects the variables’ values from being overwritten by code that shouldn’t access them.
button but_setBBEffect "Set Billboard Effect" width:125 height:40\
tooltip:"Select billboard objects and camera, then click button"
A button is created on the rollout, and its value is assigned to the variable but_setBBEffect. The text appearing on the button is set to Set Billboard Effect. The button’s width and height are set, and a mouse-over tooltip is provided.
The rollout definition is also the place where you define what will happen when one of the rollout UI control items is clicked. This information goes in the EVENTS section.
-- Set the billboard effect.
on but_setBBEffect pressed do
(
)
This declares the event that will occur when the button is pressed. All event code goes between the parentheses.
bbObjsArr=#() -- Initialize billboard objects array to null array.
laObj=undefined -- Initialize lookat object variable to 'undefined'.
With the local commands you created earlier, these two variables were declared, meaning they were established as future placeholders for data. However, no data was put in them at that time. In the two previous lines, the two variables are initialized, meaning a set of starting data is placed in them.
If you use the script properly by selecting a camera and other objects then clicking the Set Billboard Effect button, these variables will get filled with the names of the objects.
Initializing these variables now, rather than in the part of the script that sets the billboard effect, provides a means for error-checking later in the script. For example, if laObj is still “undefined” after you click Set Billboard Effect, it means no camera was selected, and the script should not try to perform the billboard effect.
Next, you will create a loop. A loop executes a series of instructions multiple times. In this case, the loop goes through each selected object and tests to see whether it is the camera or another type of object. It also tests whether the object is a target such as a camera target, and does not add these to the list of objects that will look at the camera.
-- Note: User must manually select objects in viewport, or via 'Select by Name' dialog.
-- Selection should include the billboard objects AND one camera.
-- Loop through selected objects.
for obj in selection do
(
if superClassOf obj==camera -- Check if object is the camera.
then laObj=obj -- Assign camera object to 'laObj' variable.
else if classOf obj!=targetObject then append bbObjsArr obj -- Append object to billboard objects array, but exclude target objects.
)
When the loop has finished going through the selection, the objects that will look at the camera are all in the array bbObjsArr. The only task left is to set up a loop to go through the bbObjsArr array and call the makeBillboard function for each object in the array. Just before the second loop, you need to test that there was a camera in the selection, and at least one object to look at the camera. If the camera variable and object array pass this test, the code goes on to call the makeBillboard function for each item in the array.
-- Finally, set billboard effect: loop through billboard objects and call 'makeBillboard' fn.
-- This assigns a script controller to the billboard objects' rotation.
if bbObjsArr.count!=0 AND laObj!=undefined then -- Check to ensure objects have been selected.
(
for obj in bbObjsArr do makeBillboard obj laObj
)
This loop should be run only if a camera and billboards are detected. Recall that bbObjsArr was initialized to the null array #(), so it had no elements in it at the start of the script. The value of bbObjsArr.count tells you the number of elements in the array. If no billboard objects were detected in the selected objects (bbObjsArr.count is 0), then this check will prevent the loop from being run. And if no camera object is detected, then the loop will also not be run.
This completes the creation of the script.
Test the script:
If the script is working properly, the Billboard dialog appears.
Select the billboards and the camera, and click Set Billboard Effect.
The billboards should rotate to face the camera. If you move the camera, the billboards should continue to face it.
If the Billboard dialog did not appear, or if you see an error message, this means the script has an error. Check your script against this tutorial to see if you can spot the problem. You can find a finished version of the script by clicking the tut_billboard_01.ms tab in the script editor window.
Modify the script:
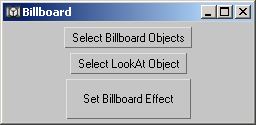
Now you will modify the script to make object selection more flexible. You will add two buttons to aid in the selection process. One button will allow selection of the billboard objects with the Select By Name dialog. The other will allow selection of the look-at object with the Select By Name dialog. In addition, the look-at object will not be restricted to a camera object as in the previous script.
Saving the file now will prevent you from accidentally saving over the previous version.
-- UI CONTROL ITEMS.
button but_bbObjs "Select Billboard Objects"
button but_laObj "Select LookAt Object"
button but_setBBEffect "Set Billboard Effect" width:125 height:40
Now you will add the event that will occur when you press the first button.
-- Select billboard objects, and put into array.
on but_bbObjs pressed do
(
bbObjsArr=selectByName title:"Select Billboard Objects"
)
This button event displays the Select By Name dialog, then accepts the selections from this dialog and places them in bbObjsArr, the billboard objects array. If you click Cancel or close the dialog without making a selection, a value of “undefined” is returned.
Now you will add the functionality for the second new button.
-- Select lookat object, and put into variable.
on but_laObj pressed do
(
laObj=selectByName title:"Select LookAt Object" single:true
)
This button event displays the Select By Name dialog, accepts the selection from this dialog, and assigns it to laObj, the look-at object. If you click Cancel or close the dialog without making a selection, a value of “undefined” is returned.
Next, you must remove the existing code that identifies the objects and places them in the variable and array.
The modified script is complete.
You can find a finished version of the modified script in the file tut_billboard_02.ms.
Test the modified script:
A dialog appears with three buttons: Select Billboard Objects, Select LookAt Object, Set Billboard Effect.
If an error occurs, check the instructions in this tutorial against your script to see if you can find the problem. Correct as necessary.
The Select By Name dialog appears.
The Select By Name dialog appears again.
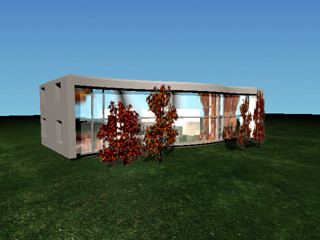
The planes continually face the camera throughout the animation.
You can find this scene in the file tut_billboard_facing.max.
Fix the shadows:
When the billboards turn, the shadows change. You can fix this problem by using individual lights to cast shadows for each billboard. This approach has the benefit of taking less time to render than ray traced shadows.
First, you will remove the shadows cast by the direct light on the tree billboards.
If you render the camera view, you will find that the trees no longer cast shadows.
A spotlight has been placed at the center of each billboard, pointing in the same direction as the direct light. The lights are currently turned off. All the spot lights are instanced, so you only have to turn on one of them to turn on all of them.
All four of the spot lights are now turned on. In the Intensity/Color/Attenuation rollout, you can also see that the light has a negative Multiplier value. This will cause the light to remove light wherever it hits, creating a shadow effect.
On this rollout, you can see that a Noise map has been applied to the lights as a projector map. This will project a noisy black-and-white pattern to simulate a pattern of leaves. If you press M to open the Material Editor, you can see this map in the first slot.
The shadows are not as crisp as the ray-traced shadows, but they are sufficient to fool the eye in a fly-by. You can see the resulting animation in the animation file tut_billboards.mov. The stationary shadows contribute to the illusion that the trees are not turning billboards, but three-dimensional objects.
You can find the finished scene in the file tut_billboard_shadows.max.
View the script in the script controller:
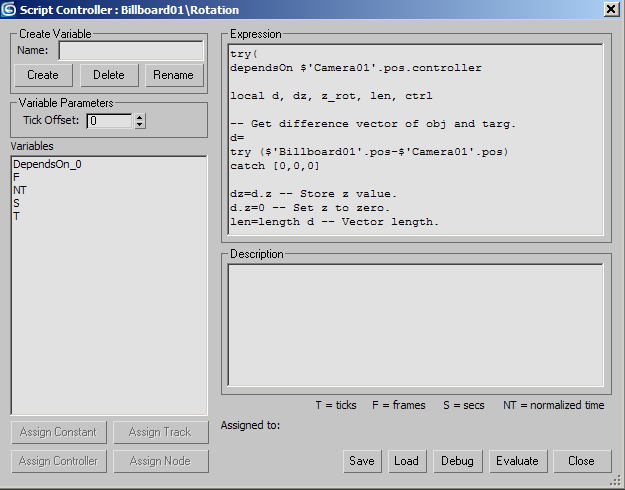
The billboard script writes a script which it places in a script controller for the Rotation track.
The Script Controller dialog displays, showing the script generated by the makeBillboard function.
Paste the script into a new window:
Now you will paste the script into a new window to see its color-coding. The colors will make it easier to see the various script functions.
The body of the script is wrapped in a try...catch... clause. This provides error handling. If there are no errors, the last expression evaluated is (eulerAngles 90 0 z_rot) as quat. If an error occurs, the last expression evaluated is (eulerAngles 90 0 0) as quat. The script calculates using Euler angles, but casts them as (converts them to) quaternions using the command as quat. For information on quaternion rotations, consult the MAXScript documentation.
The script is evaluated every time the frame changes, but not necessarily when object controllers change. The command dependsOn causes the script to be evaluated when any of the referenced objects change. In this case, when Camera01 changes position, the script is re-evaluated to cause the planes to look at the camera in real time. On the dependsOn line, the camera’s object name is surrounded by single quotes to prevent an error if the name contains spaces, dashes, or other problematic characters.
The rest of the code uses basic trigonometry to calculate the rotation angle required to achieve the billboard effect. The vector from the billboard object to the target object is projected onto the world XY plane. A right triangle is constructed with the projected vector as the hypotenuse. The angle between the hypotenuse and the X axis is the required world Z rotation angle.
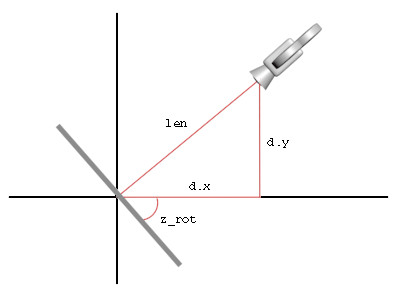
The sine of the angle is positive if the end point of the projected vector is in the third or fourth quadrant, and negative if it is in the first or second quadrant. But the plane’s local axes are not aligned to the world axes, so a factor of –90 degrees must be included, and the X axis must be rotated by 90 degrees.
In this tutorial, you learned how to create a custom MAXScript from a template using a predefined function. You also learned how to create a dialog with buttons for controlling the script.
If you are interested in learning more about MAXScript, you can:


