


Clothe a Biped
To accomplish our task, we must slow down the character’s pose. The idea here is that motion-capture data imported into both products will position a character at frame 0, which can cause problems for Cloth because it wants to simulate over at least 30 to 90 frames before motion begins, generally in a neutral pose.
Clothe an animated biped:
This scene has a biped standing in the “Da Vinci” pose.
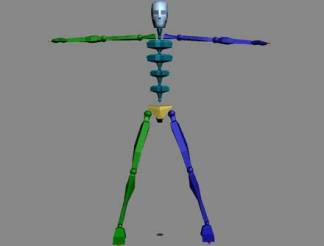
Biped in Da Vinci pose
 On the
Copy/Paste rollout, click Copy Posture.
On the
Copy/Paste rollout, click Copy Posture.Now this posture is saved for you to get later.
 On the
Motion Capture rollout, click Load Motion Capture File, and then
load the file backkick.bip from your \tutorials\cloth folder.
Click OK through the dialogs that follow, accepting the default
settings.
On the
Motion Capture rollout, click Load Motion Capture File, and then
load the file backkick.bip from your \tutorials\cloth folder.
Click OK through the dialogs that follow, accepting the default
settings.This will give you 30 frames of transition between the copied pose and the first motion-capture frame.
 At frame
0, on the Motion Panel > Copy/Paste rollout, click Paste Posture.
At frame
0, on the Motion Panel > Copy/Paste rollout, click Paste Posture. On the
Key Info rollout, click Set Key.
On the
Key Info rollout, click Set Key.Now when you scrub the time slider your animation should show a smooth transition between the Da Vinci pose and the first frame of the motion capture.
This sets the initial state of the shirt to be in sync with the first frame of the motion capture. Because Cloth requires some pre-roll for the simulation, it provides you with the tools needed to copy the cloth at any stage back to frame 0.
This removes the simulation after frame 0.
This removes all animation from the scene.
This tutorial gave you a method for "staging" your Cloth simulation.