


Rendering Still Images
In some ways, 3ds Max is like a photography studio. You arrange and manipulate three-dimensional objects, lights, and a camera, with the ultimate goal of producing an image that illustrates your message. The act of creating that image is called rendering. In this lesson, you'll learn some of the different ways you can use 3ds Max to render.
Set up the lesson:
The scene contains a textured model of an apple, plus a shadow-casting spotlight, a fill light, and a ground plane.
Render the scene:
 Press Shift+Q or click the Quick Render
button on the main toolbar to render the viewport.
Press Shift+Q or click the Quick Render
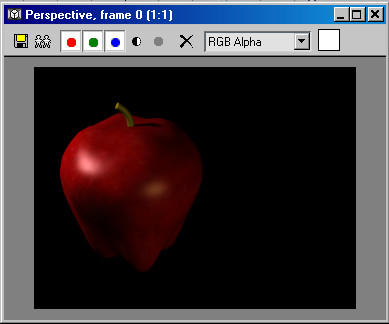
button on the main toolbar to render the viewport.In a few moments, a default rendering of the apple scene appears on the screen.
This rendering has several characteristics, all of which you can change:
The most efficient way to work with 3ds Max is to use keyboard shortcuts whenever possible. The default shortcut for the Quick Render command is easy to remember.
The scene is rendered again, exactly the same as before.
Use the rendered frame window tools:
The rendered frame window has a number of tools you can use to work with the image and view it in different ways. Most of these are available as buttons in the toolbar, which is highlighted in the illustration above. In this procedure, you'll try out a few of the other, mouse-related functions. You'll find detailed descriptions of all of the controls in the Rendered Frame Window topic .
If you're not using a wheel mouse, you can zoom the window by pressing and holding the Ctrl key and then clicking the left mouse button to zoom in, or the right mouse button to zoom out.

The rendered frame window zoomed in
This zooms the image in and out about the mouse cursor position. The current zoom ratio appears at the right end of the text in the window title bar. You can zoom between 1/8 and 64 times actual size.
You can change the window size using standard Windows methods, such as by dragging the lower-right corner.
If you're not using a three-button mouse, pan the image by pressing and holding Shift and the left mouse button, and then dragging in the window.

A temporary window appears, showing general image data such as the resolution, as well as specific information about the pixel currently under the mouse cursor.
The color swatch at the right end of the toolbar changes visibly to a light red color. This color remains when you release the mouse button.
Render with a different keyboard shortcut:
Did you notice that the apple is off-center? There are different ways to fix this; you'll do so by moving the apple. You'll also learn about using the Render Last command.
 On the toolbar, click the Select
And Move button, and then move the mouse cursor into the Top viewport.
On the toolbar, click the Select
And Move button, and then move the mouse cursor into the Top viewport.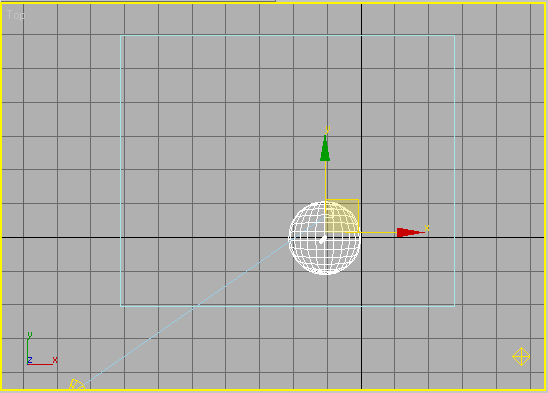
Because you were working in the Top viewport, it is now the active viewport.
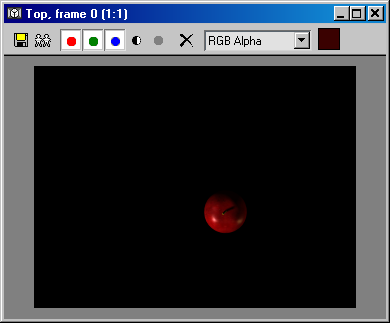
The program renders the view from the Top viewport. The Quick Render command always renders the active viewport. However, you probably wanted to see the Perspective-viewport image. This is a common error in 3ds Max. Fortunately, the program offers a way around it, called Render Last.
The new image replaces the previous one in the rendered frame window.
This executes the Render Last command, which renders the same viewport that you rendered most recently in the current session, no matter which viewport is active. It's not available from the toolbar, but if you remember the keyboard shortcut, you can save time when working in different viewports.
Explore rendering options and presets:
In this procedure, you'll try a couple of options for rendering objects that don't normally appear. The scene you loaded contains a hidden object and an object that faces away from the camera. Neither has shown up in the renderings so far.
The dialog opens to the Common panel. Available here are controls for changing output size, rendering to disk, and more. You'll look at some of these shortly. Right now, we're interested in the rendering options.


A second, green apple appears in the rendered image. If your scene contains objects that you want to appear in the rendered image but not in the viewport, you can hide them, and then use this option when rendering.
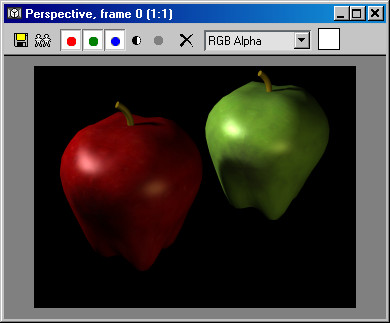
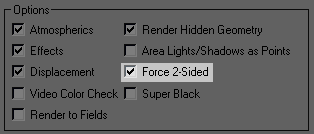
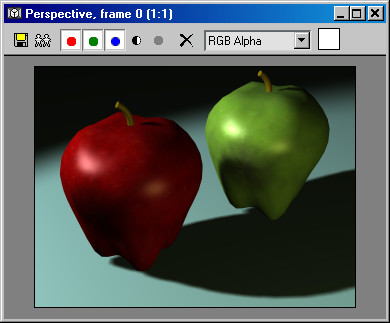
The ground plane appears in the rendering, with the apples casting shadows on it. This object isn't hidden, but because it's facing away from the “camera,” it doesn't normally show up when you render. This option is a handy way to make sure all objects in the scene show up in the rendered image, no matter which way they're facing.
A handy feature in 3ds Max lets you save a custom rendering setup as a preset for use with other scenes. You'll try it now.
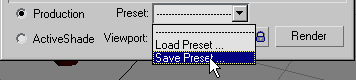
The Render Presets Save dialog appears.
The Select Preset Categories dialog appears, with a list of the different panels on the Render Scene and Environment And Effects dialogs. You can store any combination of panel settings in a preset. By default, all are highlighted, but for this exercise, you're interested in saving only the settings on the Common panel.

The preset is saved, and then appears in the Preset list.
The Select Preset Categories dialog appears, showing only the Common item. If you save a preset with multiple panels, you can choose specific ones for selective loading.
The software loads the preset, and according to its settings, turns on both Render Hidden Geometry and Force 2-Sided again.
Change the output size:
Until now, you've been rendering to the screen at a relatively small size: 320 x 240. 3ds Max lets you render at any size up to 32,768 x 32,768, however, and in a number of different file formats.
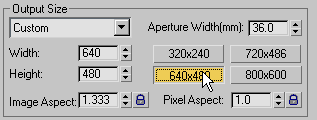
The new output resolution appears in the Width and Height fields.
The software renders the image at the new, larger size. It takes a bit longer, but is much easier to see.
The Image Aspect value, below the Width and Height fields, is currently 1.333. This is the ratio of width to height. You can alter it by changing one of the dimensions.
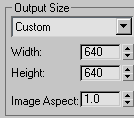
The Image Aspect is now 1.0, which means that the width and height are the same, resulting in a square image.
The software divides the added height evenly between the top and bottom of the image, so there are now 80 additional pixels both above and below the original image.
You can also change the dimensions by adjusting the Image Aspect value; this always affects only the Height value. If you try it now, be sure to set Image Aspect back to 1.0 when you're done.
You can lock the aspect ratio so that changing one dimension automatically adjusts the other.
Image Aspect becomes a read-only field.
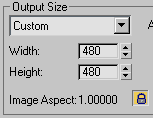
Both Height and Width change to 480.
The output image is still square, but smaller.
Change the output location:
Until now, you've been rendering only to the screen. In this procedure, you'll learn about rendering to a disk file, and find out how to turn off screen output.
The Render Output File dialog appears.
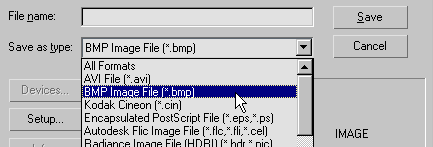
This is the Windows Bitmap file format, commonly used for image files in Windows.
The dialog closes. Nothing has rendered yet, but in the Render Output group, Save File is now available and enabled, and the read-only field below it shows the output path and file name. These features become available only after you specify file output properties with the Files button.
The software renders the image both to the rendered frame window and the specified file. You can see the latter with the View Image File command.
A new window opens showing the rendered image. It's exactly the same as the rendered frame window, except that its title bar shows the name of the file rather than the rendered viewport.
The software automatically appended the .bmp filename extension when you specified the file type. You can also specify the file type explicitly by including the extension in the file name.
The software renders the image to the specified file, but not the rendered frame window. You can see the Targa image file with the View Image File command.
 If you
click the Display Alpha Channel button on the window toolbar, you
can see a tiny bit of transparency (black) in the upper-right corner.
This is where the ground plane ends, showing the background, which
is usually transparent.
If you
click the Display Alpha Channel button on the window toolbar, you
can see a tiny bit of transparency (black) in the upper-right corner.
This is where the ground plane ends, showing the background, which
is usually transparent.
Use a different renderer:
Included with 3ds Max is a powerful, sophisticated renderer called mental ray. Full exploitation of its capabilities is beyond the scope of this tutorial, but basic usage is straightforward.
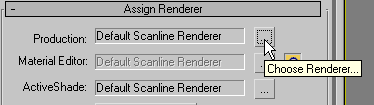
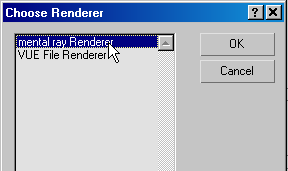
The Choose Renderer dialog appears.
”mental ray” appears as the production renderer.
The software renders the image to the rendered frame window. During the rendering process, you can see the small rectangles, or “buckets,” into which mental ray subdivides the image, appear one by one.
In the final image, the red and green apples and the ground plane all appear, because mental ray supports the same options as the default scanline renderer.
Other renderers are available as plug-ins; after installation, they appear on the Choose Renderer dialog.