


Autodesk 3ds Max Tutorials > Special Effects > Particle Animation Tutorials > Non-Event-Driven Particle Systems >
Creating Cigarette Smoke
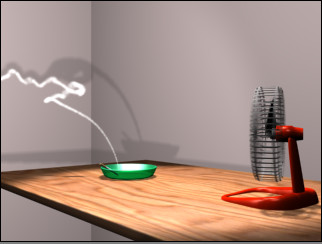
In this lesson, you use a particle system to create a stream of cigarette smoke trailing from an ashtray. The animation relies on space warps to affect the movement of the smoke. For example, you use a Wind space warp to model the fan in the scene blowing the smoke around.
Animation techniques used in this lesson:
Set up the scene:
All the files necessary for this tutorial are provided on the program disc in the \tutorials\simple_particle_effects directory. Before starting the tutorials, copy the \tutorials folder from the disc to your local program installation.
The scene contains a simple table, an ashtray, and a fan. To make the animation easier to adjust, the fan’s geometry (except for the fan motor) is frozen.
Create the particle system:
 If you
need to, select the ashtray and click Zoom Extents Selected to fit
the ashtray in the viewport.
If you
need to, select the ashtray and click Zoom Extents Selected to fit
the ashtray in the viewport.
 In the
Create panel, make sure Geometry is active, and choose Particle
Systems from the drop-down list.
In the
Create panel, make sure Geometry is active, and choose Particle
Systems from the drop-down list.
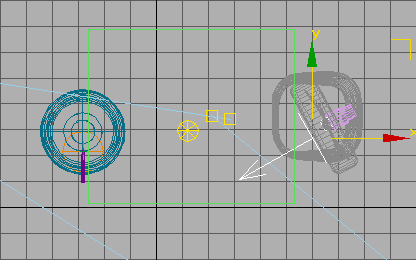
Super spray particle system in the Top viewport
Super spray particle system in a user view
You have now created a Super Spray particle system. The icon you see is called the emitter. The emitter doesn't render, but it shows the location in the scene where particles will be emitted. The arrow points up, indicating that initially particles will move upward out of the center of the icon.
When you create a Super Spray system, the particles are emitted toward you in the viewport you click. That is, they move along the Z axis in the positive direction. This is why we used the Top viewport to create the system.
(Different kinds of particle systems have differently shaped emitters, and different emission behavior.)
 Activate
the Camera02 viewport, and then click Play.
Activate
the Camera02 viewport, and then click Play.A burst of particles leaves the emitter rapidly, moving in a vertical line. Each particle is displayed as a plus sign or “tick.” By frame 40, all of the particles have moved out of the frame. This doesn't look much like smoke.
You are seeing the default behavior and settings for Super Spray. To get a more smoke-like effect, the first thing to do is adjust the Super Spray parameters.
Slow the particles down and make them easier to visualize:
 With
the Super Spray particle system selected, go to the Modify panel.
With
the Super Spray particle system selected, go to the Modify panel.For the purpose of working in viewports, especially when particles are very close together, Dots give a better preview than the plus-sign Ticks.
(This is the Spread spinner immediately below the Off Axis spinner, and not the Spread value associated with Off Plane.)
Now if you play the animation, you see the particles stream upward more slowly. The slight increase in the Spread value means they don't move in a completely straight line. (Spread is measured in degrees. Higher Spread values create a more fan-like pattern.)
However, the particles stop emitting at frame 30 and completely disappear from the scene at frame 100. To get a smoke effect, you also need to change the default values that govern particle generation and lifetime.
Adjust particle generation:
This increases the number of particles generated per frame from 10 to 30.
The animation is 300 frames long. Setting Emit Stop to 300 means that particles continue to be emitted throughout the animation. Setting Display Until to the same value means that all particles that haven't died remain in the scene until the end of the animation.
A particle in this system dies 180 frames after it is emitted. Not all of the particles will last until frame 300.
Now the particles emerge in a denser cloud that doesn't move right out of the scene. This is more reminiscent of smoke. But the movement of the particle system still looks artificial.
Adding Wind, Turbulence, and Drag
Particles are not smart. Like sheep, you need to herd them. Space warps such as Wind and Gravity add directional fields that affect particle motion. In this simulation of cigarette smoke, you'll associate the fan with a Wind space warp that models the breeze from the fan.
Create a wind space warp to simulate a breeze from the fan:
 Go to
the Create Panel and turn on the Space Warps button.
Go to
the Create Panel and turn on the Space Warps button.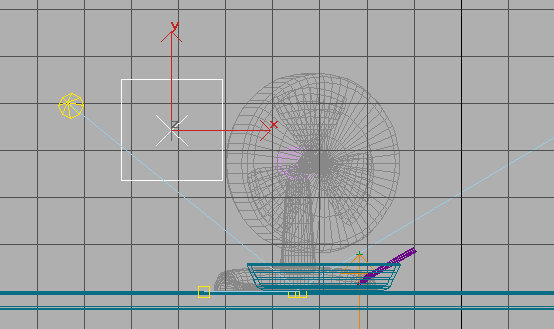
Wind space warp created in Left viewport (facing away from user)
Position the wind space warp:

 Activate
the Top viewport. Using Rotate and Move transforms, align the Wind
space warp roughly to that of the fan. The arrow should point in
the direction of the particles.
Activate
the Top viewport. Using Rotate and Move transforms, align the Wind
space warp roughly to that of the fan. The arrow should point in
the direction of the particles.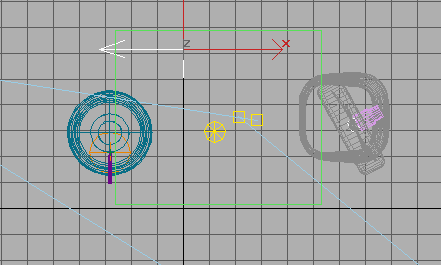
Wind space warp in Top viewport, before aligning to fan
Wind space warp in Top viewport, after aligning to fan
You don't have to be too accurate about aligning the Wind icon with the fan motor. The wind direction, and linking it to the motor's motion, are the important things.
Link the wind to the fan so their motion is coordinated:
 With
the Top viewport still active and the Wind space warp still selected,
click Select And Link, then drag from the Wind space warp to the FanMotor object.
With
the Top viewport still active and the Wind space warp still selected,
click Select And Link, then drag from the Wind space warp to the FanMotor object.Now if you play the animation, the Wind space warp rotates with the oscillating fan. Nothing has changed the animation of the particles. They are unaffected by the Wind space warp until you explicitly bind them to it.
Bind the wind space warp to the smoke particles:
Select
the Super Spray particle system. Click
Bind To Space Warp, then click the Super Spray system, and hold
the button down as you drag to the Wind space warp.
Click
Bind To Space Warp, then click the Super Spray system, and hold
the button down as you drag to the Wind space warp.When Bind To Space Warp is active and the cursor is over a selected object, the cursor changes to the space warp icon to inform you that this object can be bound to a space warp. Then when you drag from the object to the space warp, a line is drawn to show which object is being bound. Once off the object, the cursor changes again until it’s over a suitable space warp. Then it reverts to the space warp icon to inform you that this binding is legal. When you release the mouse, the bound space warp briefly highlights to indicate the binding is complete.
Activate
the Camera02 viewport, then play the animation.The effect of the wind is much too strong. The smoke is whipped around dramatically.
Adjust the strength of the wind:
By default, the Wind space warp’s Strength value is 1.0. Reducing the Strength value makes the effect of the fan look more realistic.
Select
the Wind space warp. In the
Modify panel, set the Strength value to 0.03. Activate
the Camera02 viewport, then play the animation.The smoke is more gently wafted now. But you can make the smoke's appearance more realistic still, by giving it a bit of inertia. To do so, you use another space warp.
Add a drag space warp:
Go to
the Create panel and click the Space Warps button.
Drag space warp created in the Top viewport
Set the drag space warp parameters:
The Drag space warp has a large number of parameters. For the purposes of this animation, you need to set only a few of them: Time Off, and the Axis percentages for Linear Damping.
With
the Drag space warp selected, go to the Modify panel. Set Time Off
to 300.By default, the Time Off value is 100, but you need Drag to be active for the duration of the animation.
As with Wind, the Drag space warp doesn't affect the particles until you bind them to it.
Bind the drag space warp to the smoke particles:
Click
Bind To Space Warp, then in the Top viewport click the Super Spray
system, and hold the button down as you drag to the Drag space warp.Now a drag force is applied to the particles. The force is non-uniform: there is more drag along the Z-axis (up and down in the scene) than in other dimensions.
Activate
the Camera02 viewport, then play the animation.The effect of the Wind space warp is decreased. The Drag warp slows down the particles.
Add turbulence to the wind:
The smoke looks better, but its motion is still unnaturally uniform. The solution is to make the Wind more turbulent.
Select
the Wind space warp. On the
Modify panel, go to the Wind group box in the Parameters rollout.
Set Turbulence to 0.03, Frequency to 0.12,
and Scale to 0.1.The Turbulence value controls how much the particles are perturbed from their position. Frequency causes random variation in the turbulence, and Scale adjusts the size of the turbulence field.
Why such low values? Actually, a good rule of thumb for turbulence settings is to start very low and work your way up. Turbulence creates a fractal noise field that is localized to the Wind space warp icon. The scale of this field needs to match the scale of your scene. The easiest way to do this is to start with low values and then increase them as needed.
Activate
the Camera02 viewport, then play the animation.The particles move much more like cigarette smoke, with wispy sways and curls.
Also, the particles are blown in the current direction of the Wind space warp on a given frame. The effect is not conical with attenuation as it would be for an actual fan; instead, the effect of the wind and its turbulence is parallel.
While the movement of the smoke is now good, the particle geometry needs some adjusting.
Preview the particle system:
When the preview completes, use Animation > View Preview to view it as an AVI movie.
The particles still appear as a bunch of solid-looking dots (by default, they render as 3D triangles). To make them more convincing as smoke, first you adjust the particle geometry, then you apply an appropriate material to them.
Change the particle geometry:
Select
the Super Spray particle system. Go to
the Modify panel.Facings are square particles that are constantly oriented towards the camera. If you rendered them as solid, they wouldn't appear realistic, either. But facing particles are meant to have a material applied to them. When facings are clumped together and a material gives them a degree of transparency, you can achieve a fairly realistic smoke.
The size of the particles is uniform. In general, when you want realistically to model natural phenomena, you want to avoid uniformity.
Make the particle geometry more random:
Ideally, the particles should increase in size after they are born, and then fade out as they die. The Grow For and Fade For parameters let you do this. Also, to break up the unrealistic uniformity of the particle size, you need to add some variation to the size.
In these last steps, you have increased the overall size of the particles and randomized this size by plus or minus 30 per cent. Each particle now grows for 90 frames, from an initial size of zero to the full size it will achieve. Thirty frames before it dies, it begins to shrink back down to a size of zero. (Remember that you have set each particle to live for 180 frames.)
Now that you've adjusted the particle geometry, you can shade the particles to look like smoke. The trick to this is to use a soft, partially transparent material that allows the particles to blend together and form a wispy smoke pattern. Because the particles are rendered as square facing geometry, a radial gradient with transparent edges can accomplish this.
Set up the material:
 Open
the Material Editor.
Open
the Material Editor.The Self-Illumination control changes from a spinner to a color swatch.
Use Face Map shading with Facing particles, so that each rendered particle displays the entire map.
You now have a material that is pure white, partially self-illuminated with a medium gray color, and face mapped for particles.
Assign the material to the smoke particles:
 Click
Assign Material To Selection, or drag from the sample slot to the
Super Spray particle system.
Click
Assign Material To Selection, or drag from the sample slot to the
Super Spray particle system.A rendering would show that the smoke is now more smoke-colored, but has hard, jagged edges from the square facing particles.

Smoke particles without transparency appear too solid and jagged.
To soften the smoke, you create a radial gradient with transparency at its edges.
Make a radial gradient map for the smoke particles:
 Click
Go To Parent to return to the base level of the material.
Click
Go To Parent to return to the base level of the material.The Gradient map determines only five per cent of the opacity. Ninety-five percent of the opacity is still controlled by the base Opacity parameter. For smoke, make the particles as soft and semi-transparent as possible, especially with high particle counts. So the Gradient map should be the only thing that sets the Opacity of the particles, but you also want the overall Opacity to be very low. For this animation, you turn off the base Opacity value completely.
The rendered scene now has very soft smoke that rises up, grows gradually in size, and is blown around and perturbed by the wind from the fan.
You are now ready to activate the Camera02 viewport and render the entire animation. Even at low resolution, this can take about half an hour. Alternatively, you can play the file cigarette_smoke.avi, provided on the Tutorial Files CD.