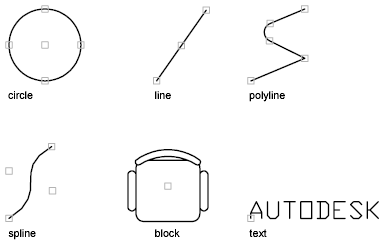
You can drag grips to perform any stretch, move, rotate, scale, or mirror operations. The editing operation you choose to perform is called a grip mode.
Grips are small, solid-filled squares that are displayed at strategic points on objects that you have selected with a pointing device. You can drag these grips to stretch, move, rotate, scale, or mirror objects quickly.
When grips are turned on, you can select the objects you want to manipulate before entering a command, and then you can manipulate the objects with the pointing device.

To use a grip mode, select a grip (base grip) to act as the base point for the action. (A selected grip is also called a hot grip.) Then select one of the grip modes. You can cycle through these modes by pressing Enter or Spacebar. You can also use shortcut keys or right-click to see all of the modes and options.
For quadrant grips on circles and ellipses, distance is measured from the center point, not the selected grip. For example, in Stretch mode, you can select a quadrant grip to stretch a circle and then specify a distance at the Command prompt for the new radius. The distance is measured from the center of the circle, not the selected quadrant. If you select the center point to stretch the circle, the circle moves.
Select and Modify Multiple Grips
You can use more than one grip as the base grips for the action. When you select more than one grip (also called multiple hot grip selection), the shape of the object is kept intact between the selected grips. To select more than one grip, press and hold the Shift key, and then select the appropriate grips.
You can limit the display of grips on selected objects. The GRIPOBJLIMIT system variable suppresses the display of grips when the initial selection set includes more than the specified number of objects. If you add objects to the current selection set, the limit does not apply. For example, if GRIPOBJLIMIT is set to 20, you can select 15 objects and then add 25 objects to the selection, and all objects display grips.
You can stretch an object by moving selected grips to new locations. Grips on text, block references, midpoints of lines, centers of circles, and point objects move the object rather than stretching it. This is an excellent method for moving block references and adjusting dimensions.
You can move objects by the grip selected. Selected objects are highlighted and are moved the direction and distance of the next point location you specify.
You can rotate selected objects around a base point by dragging and specifying a point location. Alternatively, you can enter an angle value. This is an excellent method for rotating block references.
You can scale selected objects relative to a base point. Increase the size of an object by dragging outward from the base grip and specifying a point location, or decrease the size by dragging inward. Alternatively, you can enter a value for relative scaling.
You can mirror selected objects across a temporary mirror line. Turning Ortho on helps you specify a vertical or horizontal mirror line.