


Draw Arcs |
|
Draw Arcs |
|
To create an arc, you can specify various combinations of center, endpoint, start point, radius, angle, chord length, and direction values.
You can create arcs in several ways. With the exception of the first method, arcs are drawn counterclockwise from the start point to the endpoint.
Draw Arcs by Specifying Three Points
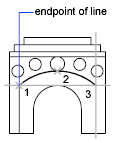
You can create an arc by specifying three points. In the following example, the start point of the arc snaps to the endpoint of a line. The second point of the arc snaps to the middle circle in the illustration.
Draw Arcs by Specifying Start, Center, End
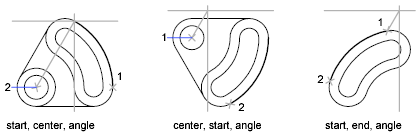
You can create an arc using a start point, center, and a third point that determines the endpoint.
The distance between the start point and the center determines the radius. The endpoint is determined by a line from the center that passes through the third point. The resulting arc is always created counterclockwise from the start point.
Using different options, you can specify either the start point first or the center point first.

Draw Arcs by Specifying Start, Center, Angle
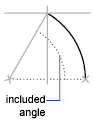
You can create an arc using a start point, center, and an included angle.
The distance between the start point and the center determines the radius. The other end of the arc is determined by specifying an included angle that uses the center of the arc as the vertex. The resulting arc is always created counterclockwise from the start point.
Using different options, you can specify either the start point first or the center point first.
The included angle determines the endpoint of the arc. Use the Start, End, Angle method when you know both endpoints but cannot snap to a center point.
Draw Arcs by Specifying Start, Center, Length
You can create an arc using a start point, center, and the length of a chord.
The distance between the start point and the center determines the radius. The other end of the arc is determined by specifying the length of a chord between the start point and the endpoint of the arc. The resulting arc is always created counterclockwise from the start point.
Using different options, you can specify either the start point first or the center point first.
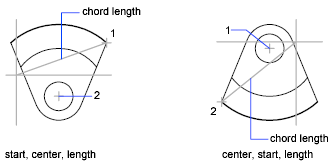
The length of the chord of the arc determines the included angle.
Draw Arcs by Specifying Start, End, Angle
You can create an arc using a start point, endpoint, and an included angle.
The included angle between the endpoints of the arc determines the center and the radius of the arc.
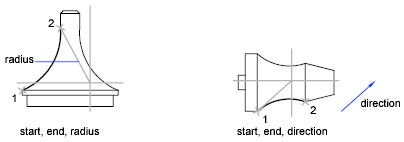
Draw Arcs by Specifying Start, End, Direction
You can create an arc using a start point, endpoint, and a tangent direction at the start point.
The tangent direction can be specified either by locating a point on the desired tangent line, or by entering an angle. You can determine which endpoint controls the tangent by changing the order in which you specify the two endpoints.
Draw Arcs by Specifying Start, End, Radius
You can create an arc using a start point, endpoint, and a radius.
The direction of the bulge of the arc is determined by the order in which you specify its endpoints. You can specify the radius either by entering it or by specifying a point at the desired radius distance.
Draw Contiguous Tangent Arcs and Lines
Immediately after you create an arc, you can start a line that is tangent to the arc at an endpoint by starting the LINE command and pressing ENTER at the Specify First Point prompt. You need to specify only the line length.
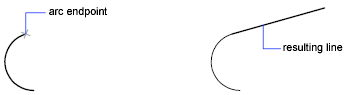
Immediately after you create a line or an arc, you can start an arc that is tangent at an endpoint by starting the ARC command and pressing ENTER at the Specify Start Point prompt. You need to specify only the endpoint of the new arc.
 Expand All
 Collapse All


