Previous Next


Inventory > Purchasing > Managing Purchase Orders

Managing Purchase Orders
You can view (look up), select, or delete any existing (unconverted) purchase order from the Order Selection screen. This screen appears when you:
Click the Browse Button_Sm-Search button when copying an order.
Click the Browse Button_Sm-Search button when converting an order to invoice.
An example Order selection screen is shown next.
MenuLink Client displays purchase orders whose purchase order dates are on or between the Start Date and End Date. You can change this date range as necessary or you can change the criteria to include closed orders by clicking Show Closed Orders.
If there is a long list of purchase orders, you can search by the following areas (click the Search Drop-down arrow, then enter the text you want to match in the ‘for’ field):
See Searching for Information in MenuLink Client for more information on searching.
You can do the following in the Order Selection screen:
Create a new purchase order. Click New, and a blank Purchasing – Purchase Orders screen appears.
View a purchase order. Select a row, and then click Lookup. You can make changes to the purchase order if necessary.
Select a purchase order to copy or convert to invoice. Select a row, and click Select. (This button is not available when you click Orders from the Orders pop-up screen.)
Delete a purchase order. Select a row, and then click Delete. MenuLink Client prompts you to confirm that you want to delete the purchase order.
Entering a Manual Purchase Order
To Enter a New Purchase Order:
1.
In the Purchasing Switchboard click Orders. In the Orders dialog box, click Orders again. The Order Selection screen appears (below).
2.
Click New to create a new order to access the Purchasing – Purchase Orders screen:
 
Each element of the Purchasing – Purchase Orders screen is defined below.
Find hyperlink
Button_MaximizeDetails
Button_RestoreDetails
Button_Print
Previews the purchase order printout on screen, where you can choose to print a hard copy.
Button_Save
Button_SendOrderNow
 
To enter a new purchase order, continued:
3.
Select the Vendor Name.
4.
Enter the Purchase Order Date. This field defaults to the current date but can be changed.
5.
Enter the Due Date. This field defaults to the next day but can be changed to reflect the true delivery date.
6.
Using the Vendor Code field: Enter the number the vendor assigned to the item. If the item in the Item Name field is not the correct item, this may indicate that the desired item does not have that number assigned to it in Item Lookup.
Using the Item Name: Click the Item Name or the Vendor Code field and click Arrow 
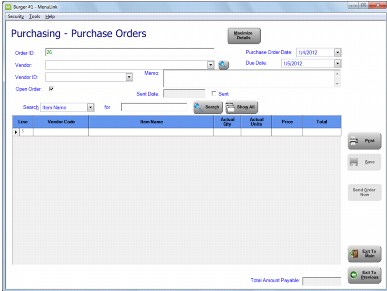
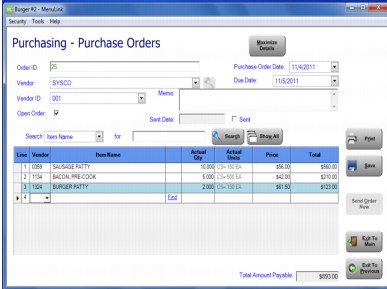
to select the drop-down selection box. Type the first few letters of the item name in the field to show the items in the selection list that match what was entered. You can also use the scroll bar to the right of the selection list to search the list for the item you want.
Note: Your Administrator controls access to the Items Names and Vendor Codes available for selection and to the ‘FIND’ hyperlink. If access has not been granted to the current user, some selections may not be displayed.
7.
Click Print to print the purchase order
8.
Click Save to save the purchase order.
9.
Adjusting an Existing Purchase Order
When you are viewing the Order Selection screen, click Lookup to view a selected order. The Purchasing– Purchase Orders screen appears:
CL_Orders_OrderbyVendor_Adjust
Click the Item Name or the Vendor Code field and click Arrow to access the drop-down list. Type the first few letters of the item name in the field to show the items in the list that match. Adjust the quantity and price as needed. Note: Your Administrator controls access to the Items Names and Vendor Codes available for selection and to the ‘FIND’ hyperlink. If access has not been granted to the current user, some selections may not be displayed.
Copying a Purchase Order
You can create a new purchase order by copying a previously entered purchase order, including purchase orders that have been converted to invoices. When you use this option, you are prompted to provide a new order and due date. All of the other information from the old purchase order appears in the new purchase order. You can make changes or add to the new purchase order as necessary.
To Create a New Purchase Order by Copying:
1.
From the Purchasing Switchboard, click Orders. Click Copy in the Orders dialog box.
The Copy Purchase Order pop-up screen appears.
2.
Click Arrow in the Purchase Order ID field to select a purchase order number, or
Click Button_Sm-Search to change the view to the order selection screen
 
3.
Select an order, then click Select to access the selected order in the Purchasing – Purchase Orders screen:
CL_Orders_CopyPurchaseOrder2
 
4.
5.
Click Copy.
The Purchasing – Purchase Orders screen appears. The purchase order has a new ID, purchase date, and due date, but all other information is identical to the copied purchase order.
6.
Make changes as needed, and then click Save, Print, and/or Send the order.
 
Submitting the Purchase Order
Electronic Ordering
If the vendor you are ordering from is set up to accept electronic orders, simply select Send Order Now from the Purchase Orders or the Order by Vendor screen.
Manual Ordering
If you need to submit the order manually, you can print the order out (or view the order on the screen) and follow your normal procedures.
 

MenuLink Online Help
Copyright © 2012 Radiant Systems, Inc. All rights reserved.