Previous Next


Inventory > Inventory System > Entering Spoilage and Loss Information

Entering Spoilage and Loss Information
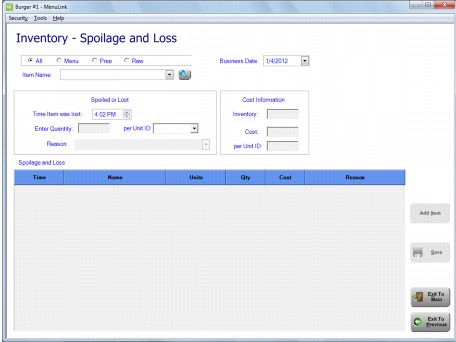
In the Inventory – Spoilage and Loss screen, you can enter and track your waste on a daily basis. Waste can include raw materials, prep items, as well as menu items. You can also track spoilage and loss history for a specific item. This history shows you when the spoilage/loss was entered, who entered it, and the quantity wasted.
The waste that you enter in Spoil and Loss does not affect your theoretical usage versus actual usage variances that you see on most of your item use variance reports. It is used as a tool in understanding why you have those variances. However, your system administrator can activate reports that include waste as a separate column to show the amounts included in the calculations.
There are two types of entry screens available. The first example is the classic waste entry where you are able to enter items and give a reason for the waste and it is managed at a store level. The second example is similar to entering an inventory and is managed by your system administrator.
To Enter Spoil and Loss Information Example 1:
1.
2.
In the Inventory – Spoilage and Loss screen, select an item type by clicking the circle next to Menu, Prep or Raw. You can also select All to view a list of all items if you are not sure of the category. The Waste option on the Inventory tab of Item Lookup determines if an item will appear in these lists.
Note: Use the filter options at the top of the screen to limit the type of item displayed in the list, All, Menu, Prep, or Raw, to make locating a specific item easier.
 
3.
Verify the date and time the item was lost. By default, MenuLink Client displays the current date in the Business Date field and the current time in the Time Item was lost field. The default time and date reflect current system time and date. You can change these to reflect the actual time and date of the loss.
4.
Select an item from the Item Name drop-down list. Items in the drop-down list match the category selected in step 2.
Click the Browse button Button_Sm-Search 
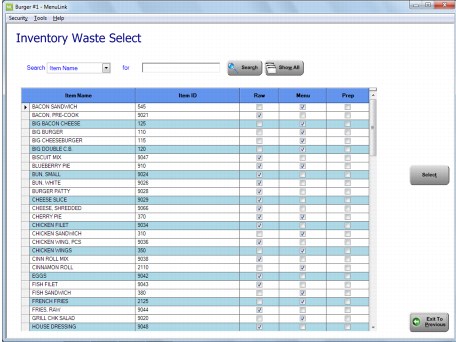
to access the Inventory Waste Select screen. The items available in the screen match the category selected in step 2. Select an item, then click Select.
5.
In the Enter Quantity field, enter the amount of the item that was wasted based on the corresponding per Unit ID (the unit of measure) that can be selected to the right.
6.
In the Reason field, enter a brief reason as to why the waste occurred. Note: This field, if defined by your administrator, may have a drop-down list of possible waste reasons to choose.
7.
When the information entered is correct, click Add Item to add the item to this spoilage and Loss list.
MenuLink Client calculates and fills in the Cost Information for the waste.
8.
Repeat steps 3 through 6 until all wasted items have been entered.
9.
Click Save when the list is finished.
To Enter Spoil and Loss Information Example 2:
This type of spoil and loss is different from our first example in several ways:
To enter spoil and loss:
1.
2.
The Inventory- Spoilage and Loss screen appears.
The Waste is divided into types: Raw items, Prep Items, and Menu Items. The type of item is identified in the Item Type field in the top left area of the screen. To move from type to type within the waste screen, use the navigation arrows above the Unit columns.
The five Unit columns to the right of the item name is where you can enter the quantity based on the units of measure listed below that field. If the item has more than 5 counting units assigned, the system adds an additional line below the item to display those additional units.
Tip: Use the Tab key to quickly navigate between fields. (Shift+Tab to go backward)
Note: After entering a number in a field, it cannot be left blank. (A zero can be entered.)
3.
Click Save when you have entered all of the waste items for all types.
Spoil and Loss Tips
MenuLink Client does not save waste information in the database until you click Save. If you haven’t clicked Save yet, you can change the quantity wasted or reason by making the correction in the Qty or Reason fields in the Spoilage and Loss grid.
If you entered the wrong amount for an item and have clicked Save, you can modify the quantity and/or reason by going to that item’s entry in the spoil and loss detail area and making changes. You cannot make changes to the item name or the units.

MenuLink Online Help
Copyright © 2012 Radiant Systems, Inc. All rights reserved.