Previous Next


Inventory > Sales > Reconciling Sales

Reconciling Sales
The Reconcile (also called Daily Sales Reconciliation, or DSR) function is primarily used to reconcile your restaurant’s sales for a selected date. The Sales - Reconcile screen shows information that was imported from your POS system. You may be required to enter information in certain fields based on your company requirements. This screen also gives you access the Deposits screen as well as the Allocation of Paid Ins and Paid Outs screen. When reconciling sales, you can access and print the Sales Journal for Entire House report which contains all the information that is displayed in the Reconcile screen.
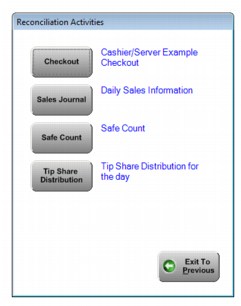
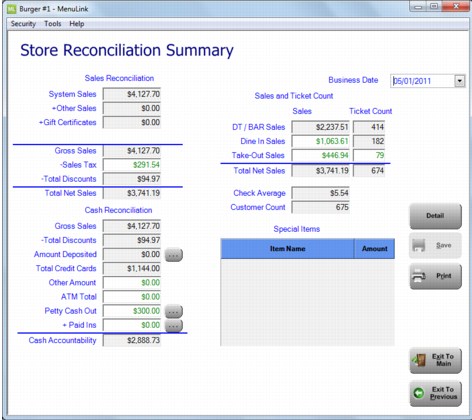
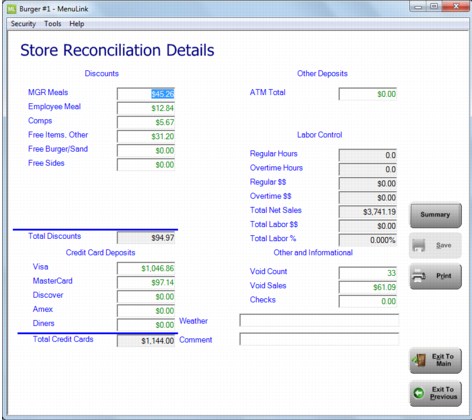
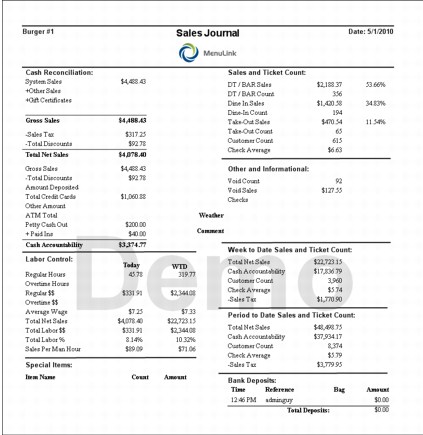
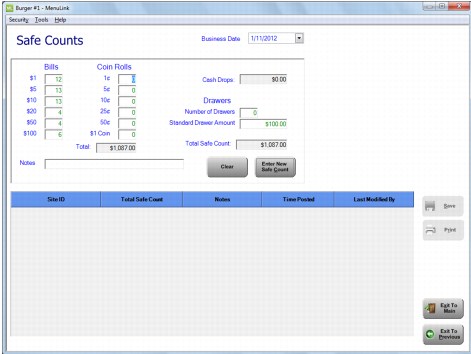
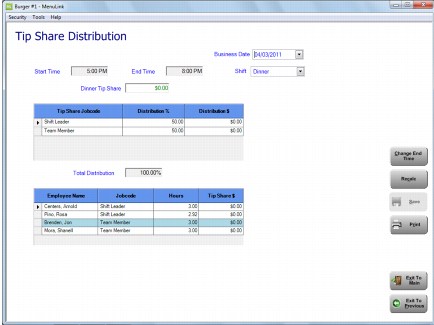
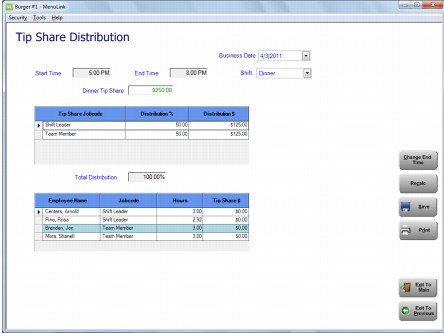
Note: The instructions and screen examples shown in this section are for general reference only. This area in MenuLink Client is customizable, and you can capture or enter information based on your company’s particular requirements. Therefore, the screens and instructions may not exactly match the process that you follow at your location. Contact your system administrator or company management if you have questions on how to reconcile sales.
The Sales Journal
1.
2.
This screen may also contain additional buttons that, when activated by your System Administrator, give you access to the following features:
Cashier Checkout: A feature to reconcile a cashier’s sales for a specific date and shift. Cash pulls can also be entered through this button.
Sales Journal: Accesses the Sales – Cash Reconciliation Summary screen, in which you will find detailed summary information about sales and cash reconciliation, and ticket counts.
Safe Count: Used to audit the safe or back up bank.
Tip Share Allocation: You can use the Tip Share allocation to distribute tips among eligible employees by shift
 
3.
4.
To access detailed information on sales, discounts, and tender information, click Detail. The Sales – Cash Reconciliation Details screen appears.
5.

Petty Cash Out
As part of the cash reconciliation process, you can allocate items purchased on Petty Cash Out for the selected day to the appropriate category. This feature is similar to the invoice process. If your POS system tracks petty cash, the Petty Cash Out field is populated during the POS Import process. For others, the field is unlocked, and you can enter the amount directly.
1.
To enter petty cash amounts, click the Button_Ellipsis button next to the Petty Cash Out field.
2.
3.
In the Purchasing – Invoices screen, enter the invoice number, select the vendor and verify the Invoice Date.
Tip: Click the blue box in the middle of each line for immediate access to the Inventory Lookup screen. Use the Inventory Lookup screen to add an item to the selected line.
4.
Click in the Item Name field to enter the first item. Click Arrow 
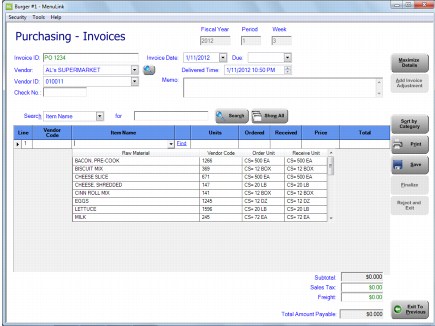
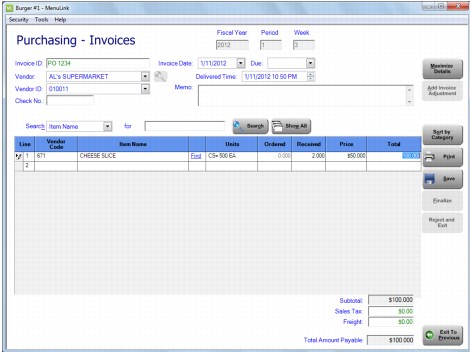
to view the selection list. Select the appropriate item in the item name field.
5.
If necessary, select the unit of measure for the item received in the Units field.
6.
In the ‘Rec Qty’ field, enter the quantity that you received.
7.
In the Price field, enter the price of the item. The price you enter here must be based on the unit you selected in the Units field.
8.
In the Total field, you can verify the total value of the item received, or you can enter the total value and the system calculates the Price based on the Units selected.
9.
Repeat steps 4 – 8 until all items have been entered.
10.
Click Save, and then click Exit to Previous.
The Invoice Selection screen appears. Verify that the Total and Match fields in the lower right corner balance leaving a difference of zero ($0.00). If there is a difference, you may need to adjust a Paid Out, or enter in additional Paid Outs.
11.
Click Exit to Previous to return to the Cash Reconciliation Summary screen.
Paid Ins
As part of the cash reconciliation process, you can allocate monies received for various items or services (e.g., pay telephone income) with the Paid In feature. This feature is similar to Petty Cash Out. If your POS System tracks Paid Ins, the Paid In field is populated during the POS Import process. For others, the field is unlocked, and you can enter the amount directly.
To Manage Paid Ins:
1.
2.
3.
In the Purchasing – Invoices screen, enter the invoice number, select the vendor and verify the Invoice Date.
4.
In the field below Item Name, click Arrow to view the selection list. Select the appropriate item in the item name field, and then press Enter on your keyboard to move to the next field.
5.
In the Units field, select the unit of measure for the Paid In item.
6.
In the Quantity field, enter the Negative quantity for the Paid In item then Press Enter on your keyboard to move to the next field.
7.
In the Price field, enter the price of the item. The price you enter here must be based on the unit you selected in the Units field. Press Enter on your keyboard to move to the next field.
Note: Do not enter a negative amount in this field. If a negative amount is entered, it will distort the weighted average cost of the item. MenuLink Client will calculate the Total as a negative value because a negative quantity was entered in the quantity field.
8.
In the Total field, you can verify the total value of the item received, or you can enter the total value and the system calculates the Price based on the Units selected. Press Enter on your keyboard to move to the next field.
9.
Repeat steps 4 – 8 until all items are entered for this Paid In item.
10.
Click Save, and then click Exit to Previous.
11.
12.
Click Exit to Previous to return to the Cash Reconciliation Summary screen.
Deposits
You can enter deposits as part of the cash reconciliation process. To enter deposits through the Cash Reconciliation Summary screen:
1.
Click the Button_Ellipsis button to the right of the Cash Deposit field.
2.
In the Deposits screen, enter the deposit(s).
3.
Click Save, after entering the deposit(s).
4.
Click Exit to Previous to return to the Cash Reconciliation Summary screen.
Note: The behavior of this function is dependent upon configuration in Site Properties.
Print the Sales Journal
After you’ve verified the figures in the Cash Reconciliation Summary and Cash Reconciliation screens (making adjustments as necessary), entered Paid Ins and Paid Outs, and entered deposits, you are ready to print the Sales Journal.
To Print the Sales Journal:
1.
The Sales Journal Report previews on screen.
CL_SalesJournalExample
2.
Click Print on the Reports Toolbar to print the report. When the Printer Selection box appears, click OK.
3.

Safe Count
Safe count is a feature used to audit the Safe or back up bank. If this feature is not available on your system and you would like to use it, please contact your system administrator.
1.
2.
3.
Enter the quantity for each of the denominations.
4.
Enter the number of cash drawers.
5.
Enter any notes regarding the safe count.
6.
7.
Click Save to save the safe count.
8.
Click Print to print the Safe count.
9.
Click Exit to Main to return to the main switchboard or Exit to Previous to return to the Sales Switchboard.

Tip Share Distribution
Tip Share allocation is where you can distribute tips among eligible employees by shift. The system distributes the tips according to the following calculation: AM/PM Tip Share $ * Job’s Distribution % = Job Tip Share Pool. If this feature is not available on your system and you would like to use it, please contact your system administrator
1.
2.
3.
Select Business Date.
4.
Select Shift.
Note: User can not select a current or future shift or select a day beyond what is defined by your system administrator.
5.
Enter the Tip to be Shared for the shift selected in step 4.
6.
Click Recalculate button
7.
You then see that the Tip Share amount has been distributed to each employee that worked any job code with a setup of Indirect Tips in Jobs Maintenance.
8.
You can then edit the Distribution % for each job code by changing the percent in the Distribution % fields.
Note: The Total Distribution must be 100%.
9.
Recalculate button to update the employee Tip Share $.
10.
Click Save.

MenuLink Online Help
Copyright © 2012 Radiant Systems, Inc. All rights reserved.