Previous Next


Labor > Scheduling > Daily Schedule View


Daily Schedule View
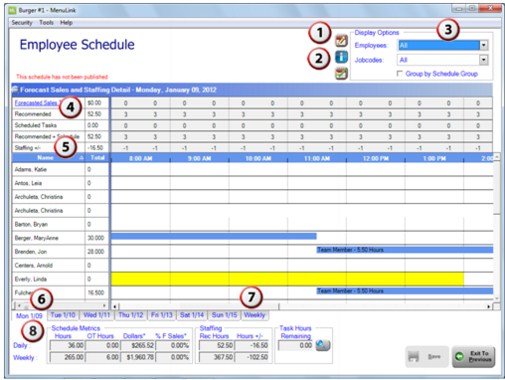
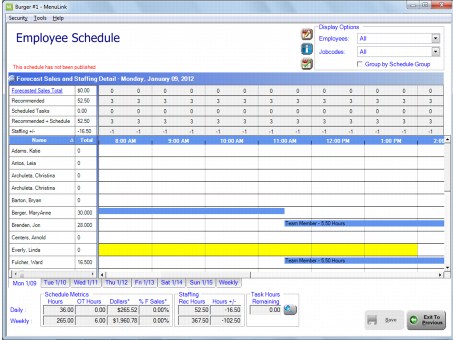
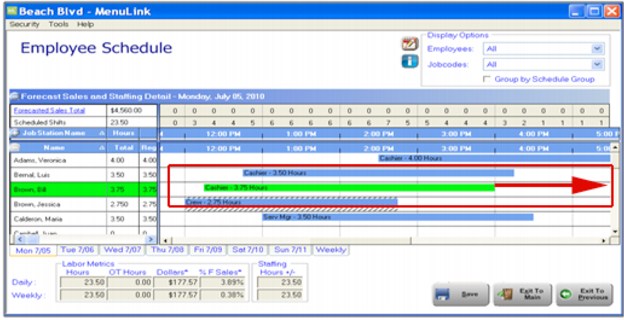
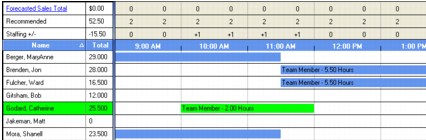
The Daily Schedule View displays each day of the week on a separate page for ease of use. In contrast with the Weekly Schedule View, the daily view shows forecasted sales, recommended staffing, and the variance between recommended and scheduled staffing levels per interval.
daily_sched_view copy.png
 
2LgTrnsp.png
3LgTrnsp.png
4LgTrnsp.png
5LgTrnsp.png
6LgTrnsp.png
7LgTrnsp.png
8LgTrnsp.png
Note: When clicking the column heads to sort by name, job code, or data in the column, the manager’s sorting preference will be maintained the next time the manager goes back into the Employee Schedule screen.
 
1.
Select Group by Schedule Group to display employees assigned to the same schedule group together, as configured by your MenuLink Administrator.
2.
The Forecasted Sales Total (or Forecasted Guests Total) row displays the forecasted data by the time interval set up in your system (typically half or quarter hours). ‘Forecasted Sales Total’ is a hyperlink, providing immediate access to the forecasting screen, so you can make adjustments to the sales or guest forecasts. The forecast is created through the Forecasting function.
3.
The Recommended row displays the staffing number recommended based on sales forecast and the Staffing Matrix.
4.
The Staffing + / - row displays the variance between what is scheduled and what was recommended.
5.
The Rec Peak Shift Coverage row displays the staffing number recommended based on sales forecast and the Recommended Matrix. See your MenuLink Administrator to configure the Recommended Peak Shift Coverage.
Note: To maintain your company scheduling standards, your MenuLink Administrator can setup an alert for both over-scheduled or under-scheduled threshold, that will color code the scheduled intervals where it did not meet the company’s standard.
6.
The Employee Name section lists all employees, or filters them by job code, based on your selection in the Display Options section in the upper right corner of the screen. Use the scroll bar at the bottom of the employee name section to expose more information about each employee and the current schedule, such as the total, regular, and overtime hours as currently scheduled. Move the separator bar left or right to control the amount of information visible at one time.
Note: Your selection in the Display Options section affects which employees appear on this list.
CL_Sched_EmplSchedDailyView2
 
The Daily and Weekly Schedule Metrics displays information about the current schedule, including total scheduled hours, scheduled overtime hours, scheduled labor dollars, and scheduled labor dollars as a percent of forecasted sales. Your selection in the Display Options area also affects the information displayed here.
The Daily and Weekly Staffing hours + / – shows the variance between actual staffing and recommended staffing. A positive number indicates that more hours are scheduled than recommended; a negative number indicates that fewer hours are scheduled than recommended.
NOTE: The Daily and Weekly Staffing will only show when the recommended staffing matrix has been setup by your MenuLink Administrator for your site.
7.
Click Button_I at the top of the screen to access the legend. The legend explains the meaning of rows and columns that appear in different colors, and also explains other notations you may see.
Adding a Shift
1.
Select the day to which you would like to add the shift from the row of tabs beneath the list of employee names.
2.
Select the Jobcodes and Employees you would like to see in the list in the Display Options section.
3.
Locate the name of the employee to be scheduled.
4.
The area to the right is where the shift will be created. Using the time line at the top of the schedule screen, locate the time the shift will begin in this area. Schedule intervals, 15, 30, or 60 minutes, are set by the MenuLink Administrator.
5.
Click the area that represents that time to start the shift.
6.
7.
Release the mouse button to add the new shift for the selected employee.
Note: When drawing a line bar at that extends past the window view, the vertical scroll bar will slowly scroll towards the end of the schedule bar for ease of use.
Untitled-1.png
 
The new schedule bar and the employee name both appear in green to indicate the shift currently being created.
CL_Sched_AddEmplShift_Detail
Deleting a Shift
8.
9.
Press the delete button on your keyboard.
Modifying a Shift
10.
11.
12.
Adding a Task to a Shift
Your MenuLink Administrator can configure a set of tasks or assignments per job type that can be assigned to employees on the schedule. These tasks can be a position, side work, routine cleaning projects, etc.
13.
Note: You can access Time-off Requests directly from this dialog by clicking the ‘ Time-off Requests’ button.
14.
Select a station to assign to the employee to. ( The station is assigned to the entire shift.)
15.
Select a task that you would like to assign to the employee. (A task is assigned to specific time within the employee’s scheduled shift)
16.
Enter a duration (based on your 15, 30, or 60 schedule intervals) and the start time for the employee to begin the task.
17.
Click Save to keep your changes.
18.
Note: You can add a Task for a part of the shift, or for the entire shift. You can also add a Station to an employee shift, but this change is for the entire shift.


MenuLink Online Help
Copyright © 2012 Radiant Systems, Inc. All rights reserved.