Previous Next


Labor > Scheduling > Weekly Schedule View

Weekly Schedule View
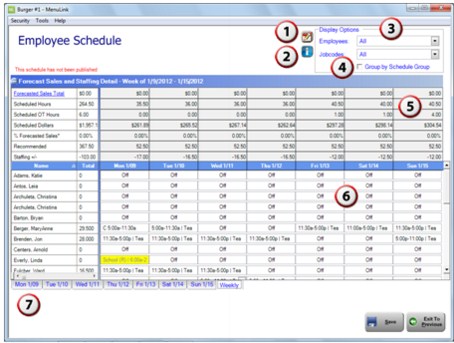
The Weekly Schedule View displays each day of the week on a separate page for ease of use. In contrast with the Daily Schedule View, the weekly view shows shifts for the entire week, but does not show forecast sales dollars or recommended staffing.
Weekly_sched_view copy.png
 
2LgTrnsp.png
3LgTrnsp.png
4LgTrnsp.png
5LgTrnsp.png
6LgTrnsp.png
7LgTrnsp.png
 
Display Options — Select employee and jobcode types to filter the employee list as desired. Use ‘Group by Schedule Group’ to group listed employees by scheduled job codes.
Hours — The labor hours as currently scheduled for the day.
Dollars — The labor dollars currently scheduled for the day.
% Forecasted Sales — Scheduled labor % of forecast sales.
Employee Name — Employee list, affected by sorting and filtering options. The columns to the right of the employee's name shows total, regular, and overtime hours. Use the scroll bar at the bottom of the Employee Name section to view these columns.
Staffing hours +/– Shows the variance between actual staffing and recommended staffing. A positive number indicates that more hours are scheduled than recommended; a negative number indicates that fewer hours are scheduled than recommended.
Adding a Shift
1.
Locate the employee and day for which you would like to add a shift.
2.
CL_Sched_EmplSchedWeeklyView_Det1
3.
Type in the desired shift. (ex. ‘3:00pm-8:00pm’).
Note: MenuLink may adjust the formatting of this text after you enter it. If MenuLink cannot determine the start and end times if your entry, try using the above format.
4.
Press the Enter key to insert the new shift for the selected day.
5.
Click Save to keep your changes.
Note: You can access Time-off Requests directly from this screen by selecting it from the drop-down menu.
Deleting a Shift
1.
Locate the employee and day you would like to delete a shift for.
2.
CL_Sched_EmplSchedWeeklyView_Det2
3.
Press the Delete key to remove the shift.
Modifying a Shift
1.
Locate the employee and day you would like to change a shift for.
2.
CL_Sched_EmplSchedWeeklyView_Det3
3.
Type the new time for the shift, using the keyboard.
4.
Press Enter to make the new shift effective in the schedule.
Copying a Shift
1.
2.
3.
4.
Note: You can also use the keyboard shortcuts CTRL+C to copy and CTRL+V to paste.
5.
Press Enter to make the new shift effective in the schedule.
 
Adding a Task to a Shift
1.
Locate the employee and day you would like add a task for.
2.
Right click the shift. The Shift Detail Assignment dialog appears.
3.
Select a station to assign to the employee to.
4.
Select a task that you would like to add.
5.
Enter a duration (based on your 15, 30, or 60 schedule intervals) and the start time for the employee to begin the task.
6.
Click Save to keep your changes.
Note: Stations are noted by a character to the left of the shift. In this example, Christina has been assigned to the Expediter station, and an ‘E’ appears in front of her shift.
Weekly Task Assignment
7.
Click Save to keep your changes.
 
Adding Time-off Requests
1.
Locate the employee and day you would like add a Time-off Request.
2.
Right click the shift. The Shift Detail Assignment dialog appears.
3.
Select the Time-off requests button.
Refer to Time-off Request for more details.


MenuLink Online Help
Copyright © 2012 Radiant Systems, Inc. All rights reserved.