
Contents
Previous Topic: Active Channels
Next Topic: Active Desktop Items
| ||
| ||
| ||
Adding an Active Channel to the Desktop
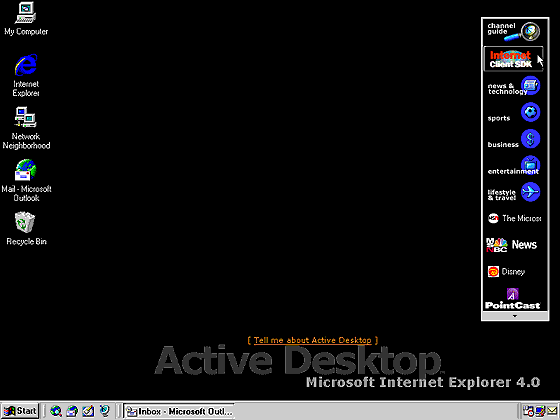
Microsoft® Internet Explorer 4.0 includes a special Active Desktop item called the desktop Channel Bar. This item contains the 32W x 80H logos for all channels currently available on the user's computer. The desktop Channel Bar appears on the right side of the desktop by default and is visible only when the Active Desktop is enabled. The user can enable the Active Desktop by right-clicking the desktop and selecting the View as Web Page option from the Active Desktop menu. The desktop Channel Bar is pre-populated with channels and category folders containing groups of channels on related topics. The channel guide appearing in the desktop Channel Bar (shown below) contains a list of Active Channels and is maintained by Microsoft.

As the user moves the cursor onto a LOGO image in the desktop Channel Bar, the image is presented as a 3-D button and displays the channel's ABSTRACT description in a ToolTip, if one is specified in the CDF file.
Users can add channels from three sources—a publisher's Web page, the Channel Guide, and preinstalled channels in the desktop Channel Bar. While browsing a Web site or a category in the Channel Guide, the user will encounter a link or image button that can be clicked to add the Active Channel to the desktop Channel Bar and optionally subscribe to the channel. Information on how to place an Add Active Channel logo button is available in the Creating Active Channels documentation.
The Add Active Channel button is shown here.
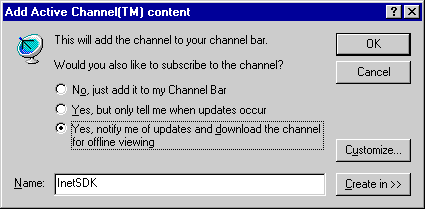
Invoking the Add Channel Dialog Box
Immediately after users click the Add Active Channel button, the Add Channel dialog box is displayed. This gives users three options for how the channel will be set up on their computer, as follows:
- Add the channel to the Channel Bar.
This option simply adds the channel to the desktop Channel Bar. When the user clicks the channel logo, the browser launches into full-screen view and loads the URL specified by the CHANNEL element in the CDF file. Adding a channel with this option is similar to creating a favorite. The user can view the channel while he or she is online, but no content is available for offline viewing, and the content is not updated on the user's computer. Therefore, users are not notified when changes occur on this site.
- Subscribe to the channel, but only notify the user when updates occur.
This option updates the channel's CDF file according to a schedule set by the publisher with the SCHEDULE element in the CDF file, unless overridden by the user with a custom schedule. The user is notified that content has been updated by a "gleam" placed over the logo in the desktop Channel Bar and on the icons representing the individual content items. A user can optionally be notified of changes through e-mail. With this option, the channel's navigable hierarchy, or sitemap, is available for offline viewing, if one exists. However, clicking any of the channel's content requires a connection to the Internet because the content wasn't previously downloaded into the cache.
- Subscribe to the channel, download the content for offline viewing, and notify the user when updates occur.
A channel with this option set will place the channel's sitemap (if one exists) and the actual content of the channel in the user's cache. Similar to the second option, this type of subscription is updated according to the publisher's schedule unless the user overrides it. Therefore, the user can browse through the entire channel at any time, even when not connected to the Internet, and view the latest information since the last channel update. However, some content may not be available for offline viewing if the publisher has specified the PRECACHE="No" attribute on one or more items.
The Add Active Channel dialog box is shown below.
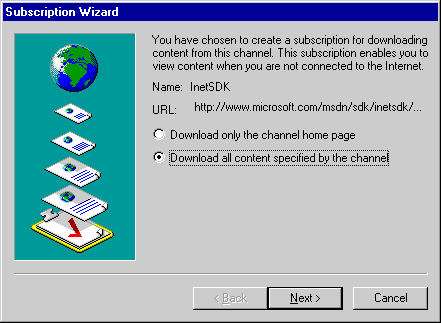
Running the Channel Subscription Wizard
If a channel subscription is selected, the user can click the Customize button to run the channel Subscription Wizard. This allows the user to modify the settings for the channel subscription. The first dialog box allows the user to specify whether the entire contents referenced in the CDF file should be downloaded, or just the main channel page. If the user chooses the latter, clicking any item exposed in the sitemap other than the main channel page would require a connection to the Internet, as the resources will not be available in the local cache.
The channel Subscription Wizard content selection is shown below.
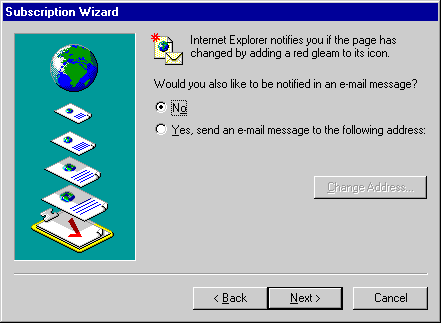
Next, the user can select how content update notifications will be handled. By default, Internet Explorer uses the visual "gleams" to indicate new content. However, e-mail notification can also be sent to the user when the content is updated.
The final property set in the channel customization wizard is the update schedule for the CDF file and/or content, depending on the type of subscription selected. The user can select either daily, weekly, monthly, or the publisher's recommended update schedule option. If no recommended schedule exists in the CDF file, the default schedule is "Daily".
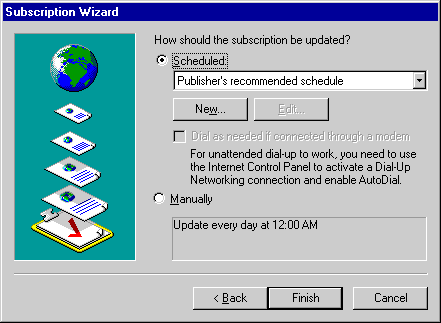
If the user connects to the Internet through a modem, the user must check the "Dial as needed..." box to enable the automatically scheduled updates when the user is offline. Modem users who don't enable the "Dial as needed..." option will receive channel updates only if the update occurs while they are online. Channels can be manually updated at any time by performing one of the following actions:
- Right-click the channel logo in the desktop Channel Bar and select Update Now.
- Select the Manage Subscriptions option from the Favorites menu and either right-click the item and select Update Now, or click the Update or Update All button in the toolbar.
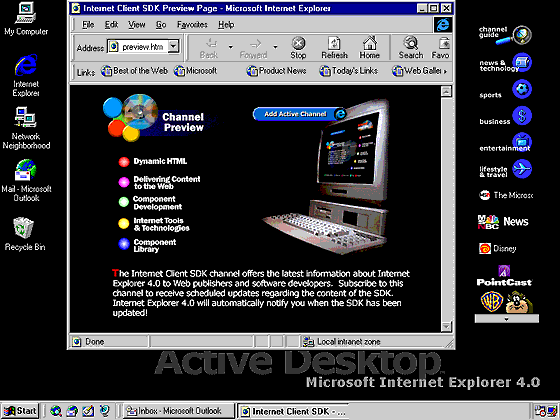
Viewing the Active Channel Content
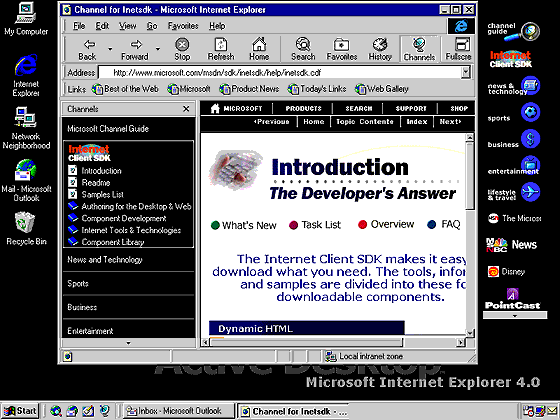
At this point, the user will return to the original Add Channel dialog box presented after the initial Add Active Channel button was clicked. When the user clicks the OK button, the channel subscription is updated, if one exists, and the browser opens the channel in full-screen view, as shown below.

The full-screen view of the browser includes a toolbar at the top of the screen with a smaller set of navigational controls and a status bar. The autohiding Channels Explorer Bar is displayed on the left side of the screen when the channel is initially loaded and whenever the user places the cursor at the left edge of the screen. On screens 1024 x 768 and larger, the Channels Explorer Bar is continuously displayed by default. This behavior can be achieved on smaller screens by clicking the "pin" icon in the right side of the bar. This disables the autohide feature until the pin is clicked again. Note that when viewing a channel in a normal browser window without full-screen view enabled, the Channels Explorer Bar does not autohide.
The ToolTip shown in the following picture is specified in the channel's CDF file using the ABSTRACT element, and it is displayed when the user pauses the mouse over that item.
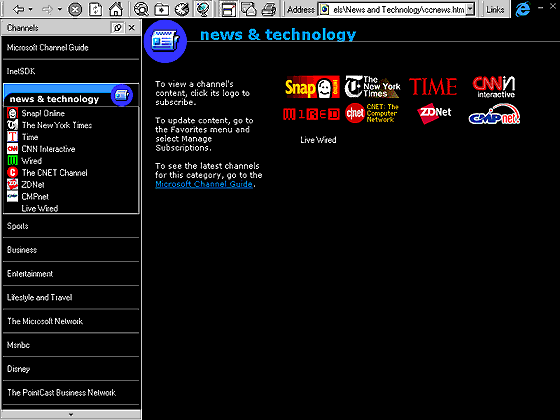
Notice that the hierarchy of the channel just added is now expanded to show the first level of subchannels and items. Clicking a subchannel further expands the current channel hierarchy displayed in the sitemap to show its contents. The user can select any of these exposed items to navigate to the associated Web page, similar to using the Favorites menu. When the user selects a different channel, the previously selected channel hierarchy contracts in the channel pane, and the newly selected one expands to show any items and subchannels it contains. The Channels Explorer Bar also replaces the previous channel's logo with the title of the channel in plain text, and it now displays the logo of the newly selected channel. The first example below shows the user switching to the News and Technology category folder, and in the second example switching back to the Internet Client SDK channel.
Although the full-screen view shown above is the default viewing mode for Active Channels, users can navigate through a channel in a normal browser window. To toggle the full-screen view on or off, users can either click the Full Screen button located on the standard button toolbar or select Full Screen on the View menu.
The following illustrates the channel in normal view.
Active Channel Screen Savers
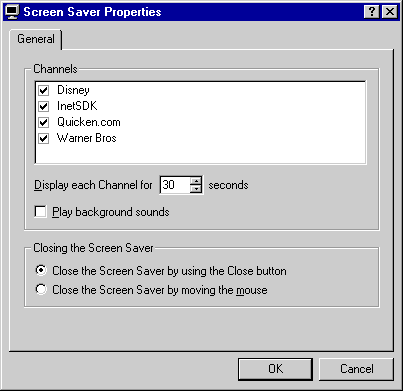
Channel publishers can designate Web pages as screen saver pages in CDF files by setting the VALUE="ScreenSaver" attribute on the USAGE element. These pages rotate through the Internet Explorer screen saver with equal display times while the computer is idle. By default, the screen saver page from each channel is shown for 30 seconds before moving on to the next channel.

The user can move the mouse without closing the Channel Screen Saver page. This allows users to navigate to a URL by clicking HTML links displayed on the screen saver page. Web publishers can use the Channel Screen Saver page to provide users with all the latest information because the screen saver is a URL that is downloaded to users' computers on a regular basis. To close the Channel Screen Saver, the user can press any key or click the "x" appearing in the autohide toolbar in the upper-right corner of the screen. This toolbar also allows users to change the screen saver properties as shown below.
Note If the Channel Screen Saver is not enabled when subscribing to a channel containing a screen saver page, users will be asked if they would like to enable it.
Accessing Installed Channels
Now that the channel has been added to the user's computer, a logo image representing a shortcut to the Internet Client SDK channel has been placed just below the channel guide in the desktop Channel Bar, as shown below.
When the user clicks the Internet Client SDK logo button, the browser launches the channel's associated URL into the Internet Explorer full-screen view. Channels can also be accessed by clicking the "View Channels" icon in the quick-link launch bar located in the task bar next to the Start button. Clicking this icon opens the browser in full-screen view and loads the most recently viewed channel.
Removing an Active Channel
To remove a channel, the user simply right-clicks an icon or logo image representing the channel and selects Delete from the context menu. Items representing a channel can be found in the following places:
- The desktop Channel Bar
- The Channels Explorer Bar
- The \WINDOWS\Profiles\username\Favorites\Channels folder
This will remove the logo images from the desktop Channel Bar and the Channels Explorer bar, as well as remove the channel's subscription (if any) from the \WINDOWS\Subscriptions folder.
Managing an Active Channel Subscription
Channel subscriptions provide a way for users to automatically receive updated information about a channel. Users can choose to subscribe to just the hierarchy of the channel or to have the content delivered as well. The Subscription tab provides a summary of the channel subscription information and offers the option of unsubscribing from the channel. If the user chooses to unsubscribe, the channel remains in the desktop Channel Bar as a link to the main channel page, but no content is updated in the local cache with a CDF file. This is equivalent to selecting the first option, "Just add to my channel bar," when adding a channel.
To view or modify a channel subscription, hold down the right mouse button on an icon or logo image representing a channel and select Properties from the context menu. Channel icons can be accessed by selecting the "Manage Subscriptions..." option from the Favorites menu, and logos can be accessed from the desktop Channel Bar or Channels Explorer Bar.
The following is an example of subscription properties.

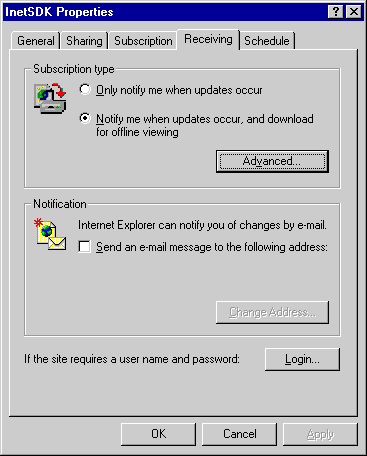
The Receiving tab on the subscription properties allows users to modify the type of subscription (with or without content), e-mail notifications, and login information for the associated Active Channel.
The following is an example of receiving properties.
When channels with full subscriptions are actually updated, the default behavior is to download all content specified in a channel to the local cache, along with designated screen saver files specified in the CDF. The type of content downloaded by default includes the HTML page (or URL) indicated in the ITEM element of the CDF file and any image files it displays. However, users can manage the amount and type of data being sent to their computer by selecting the "Advanced..." button on the Receiving tab. The Advanced Download Options dialog box, shown below, allows users to enable and disable whether images, sounds, video, Java applets, and ActiveX™ Controls used in an HTML page automatically get downloaded to their local cache.
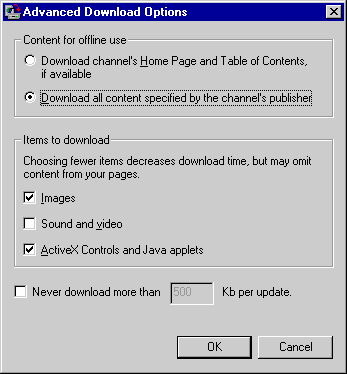
Web publishers can require files to be downloaded as part of the channel by specifying each one in an ITEM element, regardless of the Advanced Download Options settings. If the required resource is not intended to be exposed in the hierarchy displayed in the Channels Explorer Bar, the USAGE element should be included as a child element of the item with its value set to "None".
The Schedule tab allows users to modify the schedule on which the channel's CDF file and content (for full subscriptions) is updated. Besides the publisher's recommended schedule, users can select a standard daily, weekly, or monthly schedule. The "New..." and "Edit..." buttons are provided for creating custom schedules.
The following is an example of schedule properties.

Note Modem users must check the "Dial as needed..." check box to use the publisher's recommended schedule.
Top of Page
© 1997 Microsoft Corporation. All rights reserved. Terms of Use.