 To set up mixed security
In mixed login security mode, SQL Server allows both trusted connections (as used by Integrated login security mode) and nontrusted connections (as used by Standard login security mode). For more information about mixed login security mode, see Chapter 8, Security Concepts.
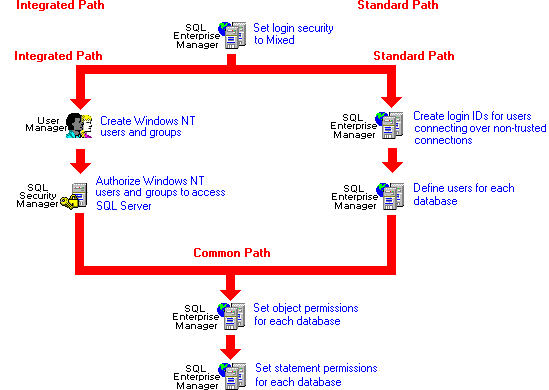
The following procedure summarizes the tasks performed to set up mixed security. Only the system administrator can perform steps 1, 3, and 4. Only a Windows NT administrator, domain administrator, or account operator can accomplish step 2. Steps 5 through 7 can be performed by either the system administrator or the database owner.
 To set up mixed security
Use SQL Enterprise Manager to set the login security mode to Mixed. Also set the other security options: Default Login, Default Domain, Set HostName to Username, Audit Level, and Mappings.
For information on setting these options, see Setting the Server Security Options.
Use Windows NT User Manager. If you have not been granted access to use User Manager to administer Windows NT groups and users, have a Windows NT Administrator perform this task for you. For more information, see Managing Access for Windows NT Groups and Users,
Use SQL Security Manager to map Windows NT groups and users to SQL Server login IDs. You will decide whether each user will use a separate SQL Server login ID or will access SQL Server through the default login ID. You will also choose a default database for the users. For more information, see Managing Access for Windows NT Groups and Users.
Note that the setup program, by default, grants SA access for the local Windows NT Administrators group on the server.
Use SQL Enterprise Manager to create a login ID and password and specify a default language, for each user. For more information, Managing SQL Server Logins.
Use SQL Enterprise Manager to specify the databases that can be accessed by each login ID. For more information, see Managing Database Users.
Use SQL Enterprise Manager to grantūto users or groupsūselect, insert, update, or delete permission for tables and views; reference permissions for tables; and execute permission for stored procedures. You can optionally specify column-level permissions for tables and views. For more information, see Managing Object Permissions.
Use SQL Enterprise Manager to assign permissions that allow users or groups to perform various database tasks, such as creating rules and defaults on a database, creating tables and views on a database, creating stored procedures, and backing up a database. For more information, see Managing Statement Permissions.
The following illustration depicts the tasks performed to set up mixed security.
