 To transfer objects and data using the SQL Transfer Manager window
Before using SQL Transfer Manager to transfer data, the destination database must exist, and it must be large enough to contain all objects and data that you will transfer.
To transfer data, you must have SELECT permission in the source database, and you must be the database owner of the destination database. If the source server is a non-Microsoft-based SQL Server, and you have not run the OBJECT42.SQL script on that server, you must also have CREATE PROCEDURE permission in the source database.
If your source server is Microsoft SQL Server version 6.0, the OBJECT60.SQL script must have been run on the server if you are including dependencies. Otherwise, SQL Transfer Manager will try to create the 4.21 dependency-evaluator stored procedure, which will fail due to parser changes in version 6.0.
The following procedure assumes you have started SQL Transfer Manager and have connected to a source and destination server.
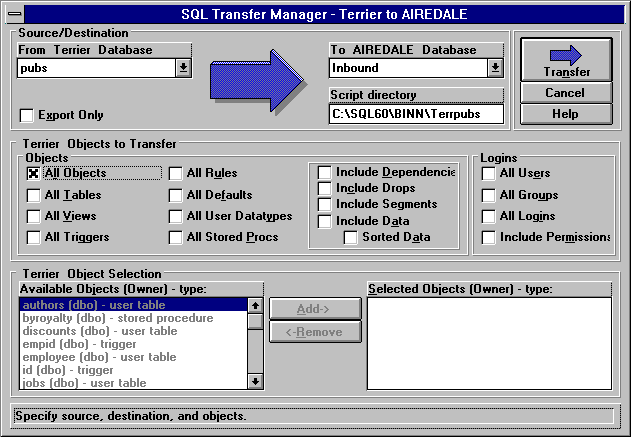
To transfer objects and data using the SQL Transfer Manager window
The destination database must already exist and have enough space to contain the objects and data you are transferring.
To change the location where the files will be saved, in the Script directory box, type a new path and/or directory name. If this directory does not already exist, when the transfer occurs, SQL Transfer Manager will create it.
For information about the scripts and other files saved in this directory, see Files Created by SQL Transfer Manager, later in this chapter.
You can select one or more object types: tables, views, triggers, rules, defaults, user-defined datatypes, and/or stored procedures.
To also transfer the data from the source database to the destination database, select the Include Data check box.
If this box is not selected, unique clustered indexes are created prior to data transfer. Nonunique clustered indexes are always created prior to data transfer, whether or not this box is selected. Creating the clustered indexes prior to data transfer is slower during the actual data transfer process, but it eliminates the full table sort that is required if the clustered index is created after the transfer. Nonclustered indexes and triggers are always created after the data is transferred.
If the destination server's sort order does not match that of the source server, using the SORTED DATA clause is likely to fail. If this happens, there will be an error message in the .LOG file, and after the transfer you must build the indexes yourself without the SORTED DATA clause.
If you select this option and the source server is Microsoft SQL Server version 6.0, the OBJECT60.SQL script must have been run on that server. Otherwise, SQL Transfer Manager will try to create the 4.2 dependency-evaluator stored procedure, which will fail due to parser changes in version 6.0. For information about running the OBJECT60.SQL script, see Appendix A, Interoperation with Microsoft SQL Server 4.2.
Segments must already exist at the destination database. There must be sufficient space on the segment(s) to accommodate the tables you will be transferring. If you are not sure of the segment space requirements, you can check them by selecting the Export Only option, choosing the Transfer button, and then reading the generated .TAB file. For more information about .TAB files, see Files Created by SQL Transfer Manager, later in this chapter. For more information about segments, see Chapter 7, Managing Drives.
You can interrupt a transfer once it has begun by pressing CTRL+C.