 To define an article
A published table is called an article. You have a number of options for controlling the way a table is published. An article can be the entire table or a subset of columns and/or rows from the table.
For each article, you can set the article name, article description, and destination table name; exclude rows and columns from those published (horizontal and vertical partitioning); customize the synchronization schema script; and customize the data replication mechanism. You accomplish these tasks by using the Manage Article dialog box.
To define an articleFor information about how to access the Edit Publications dialog box, see Creating Publications, earlier in this chapter.
The Manage Article dialog box appears.
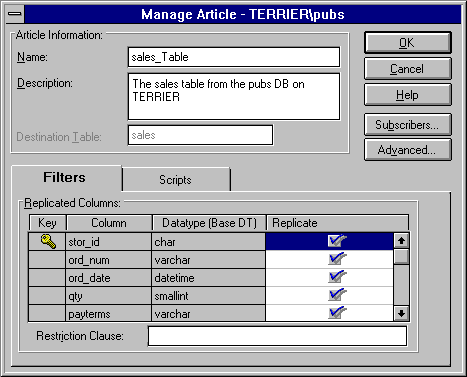
A description can be up to 255 characters.
If you do not modify the default settings, all columns are replicated. You must replicate the primary key column.
For example, if you have published the authors table from the pubs database and are editing the authors article, you could replicate only those rows containing authors from California by typing:
state = 'CA'
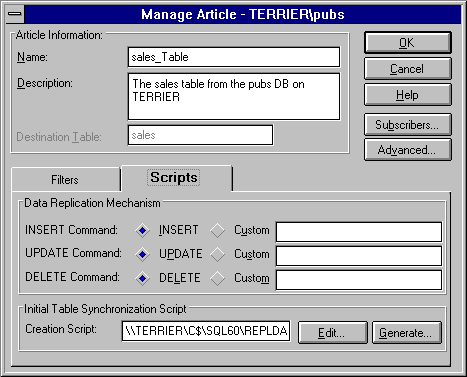
Usually, you will not change this from the default. The data replication mechanism determines the action SQL Server takes when the log reader process encounters transactions (INSERT, UPDATE, or DELETE) that are marked for replication in the transaction log of the publication database.
When the log reader process encounters a transaction of one of these types (INSERT, UPDATE, or DELETE) that is marked for replication in the transaction log of the publication database, the SQL statement will be reconstructed and applied to the destination database. This is the default data replication mechanism used by SQL Server replication.
If you enter NONE, transactions of that type will not be replicated. For example, if for DELETE you choose the Custom option, and type NONE, then DELETE commands will not be replicated.
If you enter CALL stored_procedure_name (for example, if you type CALL MYPROC), when the log reader encounters a command of that type (INSERT, DELETE, or UPDATE) in a transaction marked for replication, it will pass column parameters from that transaction to the referenced stored procedure. The referenced stored procedure must exist in the destination database of each subscriber.
For information about creating your own stored procedures to be called when INSERT, DELETE, or UPDATE statements are encountered by the log reader, see Chapter 15, Advanced Replication.
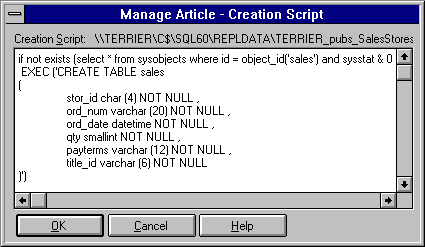
When you edit a new article, this box is empty. When you edit an existing article, this box contains the full path to the schema script in the distribution working directory. For example:
\\TERRIER\C$\SQL60\REPLDATA\terrier_sales_receipts_charges.sch
Schema scripts are automatically generated when a publication is created or modified (by choosing the Add or Modify button from the Edit Publications dialog box).
The Manage Article dialog box returns.
When the options are set, choose Auto-Generate. The initial table synchronization schema script is created. The Manage Article dialog box returns.
\\TERRIER\C$\SQL60\REPLDATA\terrier_sales_receipts_myschema.sch
Note that you enter the full UNC path even if this is a combined publisher/distributor using its own local distribution working directory. Use the administrative share name (ending in "$") for the drive, rather than the drive letter.
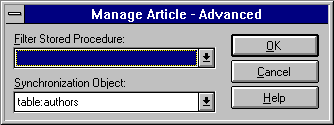
This is a filter stored procedure that you have previously created in the publication database. This stored procedure must take the form:
IF sql_statement RETURN 1, ELSE RETURN 0
where sql_statement is a Transact-SQL statement that accomplishes filtering. For example:
IF exists (select * from authors where city = 'Oakland')
   return 1
else
   return 0
Because the filter is executed against every log record for the replicated table, the filter should be as simple as possible. This will minimize overhead.
Any reference to the table will represent only a single log record value.
The Synchronization Object is the database object that is used as the source of the data for the initial synchronization of the destination table. In most cases, this is handled automatically by SQL Server and you do not need to change from the default. By default, the synchronization object is the article's base table. If the article has been horizontally and/or vertically partitioned, SQL Server automatically creates a view of the partitioned table, and by default that view becomes the synchronization object.
The Synchronization Object list includes all the tables and views in the publication database.
When the options are set, choose OK. The Manage Article dialog box returns.
The Edit Publications dialog box returns.
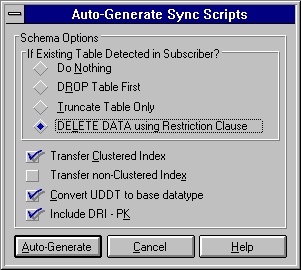
If you create an auto-generated script that does not support the creation of indexes, then the synchronization task will use fast bcp as the initial synchronization method if the Select Into/Bulk Copy option is set in the destination database.