Here you'll create a sphere primitive, color it orange, and name it. Then you’ll add a realistic orange peel material to it, so the rendering will have the speckled appearance of fruit skin.
Create a sphere:

 On the
Create panel, click the Geometry tab, then in the Object Type rollout,
click Sphere.
On the
Create panel, click the Geometry tab, then in the Object Type rollout,
click Sphere.The button highlights to show that it is active and ready to use. Before you make the sphere, you'll make two changes in the Create panel.
Base To Pivot lets you create a sphere with its pivot point at its bottom.
To create the sphere so the orange is resting on the wooden slab, like the rest of the objects in the scene, you'll use the AutoGrid function.
AutoGrid creates a grid on the surface of any object, so you can create another object directly in contact with the surface.
After a moment, a tooltip appears showing you which object the cursor over. The tooltip should read wooden board.

Create a sphere using AutoGrid.
The sphere changes size in the viewport. In 3ds Max, it’s typical practice to rough out an object with the mouse, then reset its parameters to your specific requirements.
Change the color and name of the sphere:
By default, 3ds Max chooses colors at random for new objects, so the sphere is probably not orange. You can change the color of the sphere in the viewport to simulate an orange.
The Object Color dialog is displayed.
The sphere in the viewport turns orange.
Move the orange:
You might want to move the orange so it is slightly in front of the apple. To do that, you'll use the Transform gizmo.
 On the
main toolbar, click the Select And Move button.
On the
main toolbar, click the Select And Move button.A tripod of red, blue, and green arrows appears. This is the transform gizmo. As you move your cursor over the arrows, each axis label and arrow stem turn yellow. When one is yellow, you can press and drag to move the object in a single direction. If you move your cursor over the inner corners of the transform gizmo, the plane turns yellow. This lets you move in a single plane.
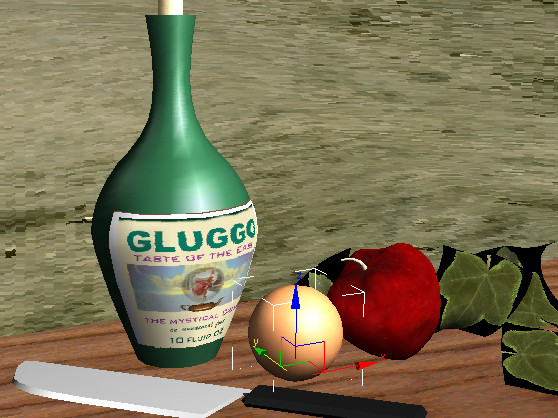
Transform gizmo used to move the orange
The rendering looked interesting because of the materials that were already applied to the geometry. Next you'll apply a material to your orange using the Material Editor.


