Designing a Shirt, Part 2

Designing a Shirt

Tailoring and Fine-Tuning

Designing a Shirt, Part 3
Now that you've had a taste of adding detail
to a garment, it's time to look at some of the more advanced attributes
within Cloth. In this tutorial, you'll add a collar and cuffs to
a simple shirt design, and change their seams to create creases
within the garment.
Add
a collar:
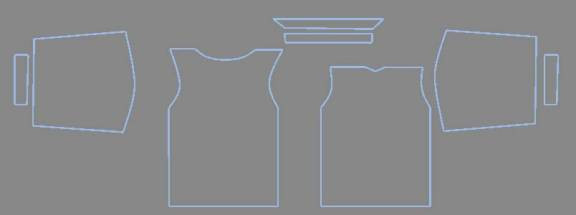
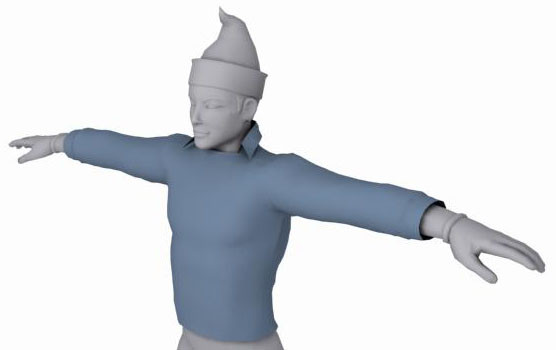
- Load tutorial_4.max from your \tutorials\cloth folder.
This scene contains a character and the shirt
from the previous lesson. This shirt has some additions to it as
shown in the following illustration. Two extra pieces have been
added for the collar, and one extra piece per arm for a cuff. The
cuff is a bit narrower than the sleeve.
- Select
the shirt in the Top viewport, and on the Modify panel, turn on
the Garment Maker modifier so the panels move into place.
The shirt is set up as in the previous lesson,
with most of the seams created for the arms, back and front of the
shirt. You'll adjust the curve of the cuffs and the collar, and
apply seams to them.
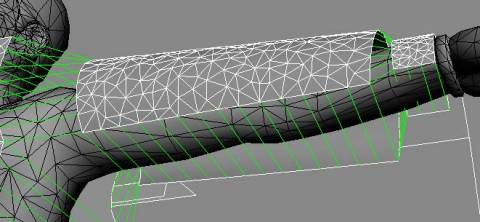
- Go
to the Panels sub-object level of Garment Maker, and select one
of the cuffs. In the Deformation group on the Panels rollout, choose
Curved, and set the curve to –5.0 around
the Y-axis.
Now that the cuff is curved around the arm,
you can add its seams.
- Go
to the Seams sub-object level of Garment Maker, and create a seam between
the sleeve and the cuff. Then create the seams for under the sleeve
and under the cuff. Create your seams in this order, or you might get
topology dependency errors.
Now that you have made the seams for the cuff,
you will edit the seam, attaching it to the sleeve to get a cuff-like
result. Where the cuff meets the sleeve, there should be a clear
crease and a bunching of the sleeve.
- At
the Seams sub-object level, select the seam that joins the cuff
and the sleeve. (In other words, click the green sewing springs
that connect the cuff and the sleeve.) On the Seams rollout, set
Crease Angle to 90.0 and Crease Strength to 100.0.
This will make the seam try to maintain an angle
of 90 degrees.
- Complete
steps 3 to 5 for the other side of the body.
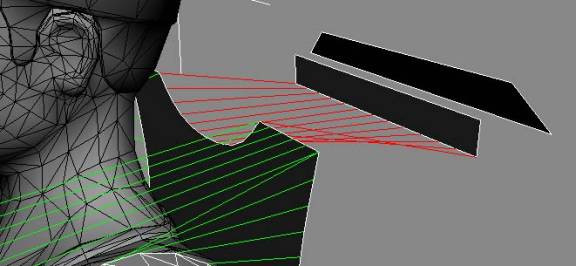
Now you'll take a look at the collar. It is
best to make the seams for the collar first, and then change its
curve afterward.
- At
the Seams sub-object level, create a seam between the back of the
shirt and the bottom of the closest collar piece (the curved segment
at the back of the shirt).
- Next,
create a seam between the tops of the two collar pieces.
If necessary, click the Reverse Seam button to straighten out the
seam.
Next you'll bend the collar panels and move
them into place.
- At
the Panels sub-object level, select the base of the collar and apply
a curvature of –3.0 around the X-axis. Select
the other piece of the collar and apply a curvature of –2.0 around
the X-axis.
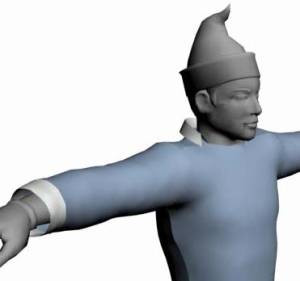
- Select
each of the collar places and move them into place around the neck and
above the shoulders, as shown below.
Next, you'll edit the seam of the collar as
you did the cuffs. This will let the folded part of the collar stand
out a bit.
- At
the Seams sub-object level, select the seam between the top of the
two collar pieces. Set Crease Angle to –75.0 and Crease
Strength to 25.0.
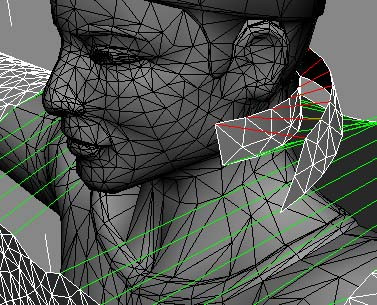
Now you are ready to add the Cloth modifier
and run a simulation.
- Apply
the Cloth modifier to the shirt.
- On
the Object Properties dialog, set the shirt to be cloth, and choose
the Cotton preset from the drop-down list.
- Add
the Jester to the simulation, and
make the Jester a collision object. Close
the Object Properties dialog by clicking OK.
- On
the Simulation Parameters rollout, turn off Gravity. Make sure Use Sewing
Springs is turned on. Then on the Object rollout, in the Simulation group,
click Simulate Local to bring the panels together.
- Stop
the simulation and then, on the Simulation Parameters rollout, turn off
Use Sewing Springs.
Turning off Use Sewing Springs tells Cloth to
compute the seam angles and strength for the cuffs and collar.
- Turn
Gravity back on, and then Simulate Local again with Use Sewing Springs
off to further refine the garment's position and fit.
If you don't get the right result the first
time, you might want to turn Use Sewing Springs back on and Reset
State. This will allow you to perform the local simulation again.
This lesson has provided you with additional
ways to control how your fabric behaves and is joined together.
In the next lesson you'll look at how you can further refine the
look and behavior of your clothing by assigning different cloth
properties to the panels of garments.
Apply
various cloth settings to different parts of the shirt:
In the previous section you looked at different
controls that help define how your fabric behaves. In this section,
you'll apply different cloth settings to various parts of the shirt
to create a more convincing look.
The concepts that will be covered in this section
are as follows:
- Assigning
separate Cloth properties for panels
- Assigning
different materials for panels
- Assigning
separate Cloth properties with a material
- Load tutorial_5.max from
your \tutorials\cloth folder.
This scene contains a character and the shirt
from the previous lesson. You'll add some different properties to
the cloth panels themselves.
- Select
the shirt and then, on the Cloth modifier Object rollout, click Object
Properties to open the Object Properties dialog. Highlight the Shirt entry
in the left column, and then turn on Use Panel Properties. Click
OK to exit the dialog.
This will let you set the cloth properties for
the entire shirt on a panel-by-panel basis.
- Go
to the Panel sub-object level of the Cloth modifier (not the
Garment Maker modifier!) and select one of the cuffs. It will turn
red to indicate that it's selected.
You can change all of the parameters for how
the fabric reacts here on the Panel rollout.
- From
the drop-down list in the Presets group, choose Generic Heavy.
This sets the cuff to deform like a heavy or
stiff piece of fabric.
- Select
the different panels of the collar and the other cuff and set them
to the Generic Heavy preset.
Important
Be sure
to choose the preset even if it is already displayed in the list.
- Select
each of the other shirt panels, and set the preset to Cotton.
This will make most of the shirt behave like
cotton except for the collar and cuffs, which will be heavier and
less flexible, as if they were starched.
Now it's time to rerun the simulation.
- Exit
the Panel sub-object level and go to the Simulation Parameters rollout of
the Cloth modifier. Turn on Use Sewing Springs, then go to the Object rollout.
In the Selected Object Manip group, click Reset State.
This resets the state of the shirt so you can
run the local simulation again.
- Run
the local simulation again, first with Use Sewing Springs on for
a bit, and then run the local simulation with Use Sewing Springs
turned off. You might also use Simulate Local (Damped), which adds
a heavy damping to the fabric as it simulates.
- If
you are not satisfied with the results, click Erase Simulation and
then rerun the simulation until you like the positioning and drape
of the shirt.
Fine-tune
the fabric settings:
Now that you have different fabric properties
for the cuffs and the collar, you'll set up some different materials
and densities. If you take a look at the end of the cuff, you will
see it seems a bit low-poly and chunky.
- Select
the shirt (if it isn’t selected already), and then go down the modifier stack
to the Garment Maker modifier. Click Yes to dismiss the warning that
appears.
- Go
to the Panels sub-object level and select one of the cuffs. On the
Panels rollout, change Density to 3.0 and set
the Mat ID to 2.
- Repeat
the previous step for the other cuff as well.
Changing the material ID lets you apply a different
material to the cuffs only.
- Select
each panel of the collar and change its Density to 2.0 and
its Mat ID to 2.
- Go
back to the Cloth modifier, click Reset State, then run the local
simulation again to fit the shirt to the torso once more.
- Open
the Material Editor. Create a Multi/Sub-Object material with two sub-material
slots. Change the two sub-materials to any colors you like, apply
the material to the shirt, and then render.