


Designing a Shirt, Part 2
In this next lesson, you'll take the patterns you built in the first tutorial, and you'll apply Cloth to begin the process of turning the panels into a shirt.
Apply cloth to the shirt:
This scene contains the Jester character and the shirt pattern with seams in place from the previous lesson. Now that all the seams are in place on the pattern, you will add the Cloth modifier to form the pieces into the shirt. The first task is to decide on the scale of the scene.
If you use the Measure utility, you can see that the Jester character is about 77 3ds Max units tall. If we set one unit to one inch, what would make him 77 inches (6 feet, 5 inches) tall, including the hat, which seems reasonable. Since we want to use 1 3ds Max unit=1 inch, that means 1 unit=2.54cm, so the cm/unit setting in Cloth will be set to 2.54; this is the default.
Since we want cm/unit=2.54, there is no need to change this value, but please keep in mind that it is very important to set this value correctly before attempting a simulation.
The Object Properties button on the Object rollout opens the Object Properties dialog, where you add objects to the simulation and assign them different properties.
This sets the shirt to be a cloth object in the simulation.
Take note of all the Cloth Properties parameters that can be adjusted when an object is set to be cloth. You can use these parameters to get the fabric type you want, or you can use a preset.
This sets all of Cloth Properties to simulate cotton.
If you were to simulate now, the shirt would simply fall to the floor because it's the only object in the simulation currently. You'll add an object for the cloth to collide and interact with.
This opens a list of objects in the scene.
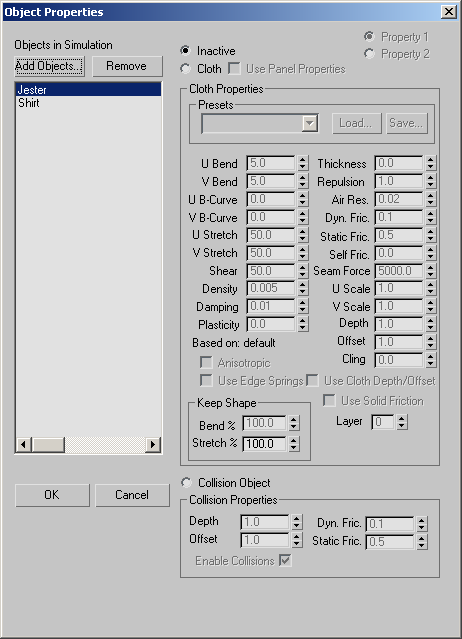
When you add objects to the simulation, it is the same thing as instancing the Cloth modifier to those objects. Each object that is part of the Cloth simulation will have a Cloth modifier assigned to it. Be aware of this as you set up your own simulations.
At this point, you have set the shirt to react like cloth, and the Jester's body to collide with it. You are now ready to convert the panels into a shirt. You do this with a local simulation.
Before you simulate sewing the garment together, you'll turn gravity off.
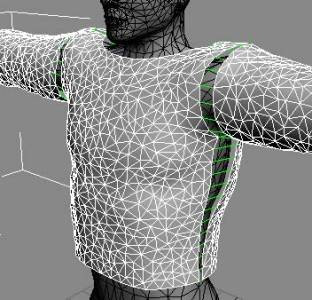
As you can see in the image above, the panels have pulled together and are draped over the Jester character. However, the seams have not come together to form a single garment and the green sewing springs are still visible. In order to get the seams to snap together completely, you will need to perform one more operation.
The green lines disappear.
The sewing springs are a way for the Garment Maker modifier to tell the Cloth modifier where seams should be. But sometimes, as in this case, the spring tension isn’t strong enough to pull the seams all the way together. Turning off the springs fixes this problem.
Now the shirt is complete. Next, you can animate the character and simulate the cloth over the animation. But before you animate your character, you're going to give the shirt a pocket to add some detail to it.
Add a pocket:
Now that the shirt is coming together, you'll add a pocket to it in order to give it some more detail. This section will introduce you to the idea of attaching one cloth object to another as well.
The following concepts are covered in this section:
This scene contains the Jester character and the shirt simulated from the previous lesson. If the scene opens with the panels apart and the garment looking stretched out, there's an easy fix. Occasionally you will see a scene file with the panels not together and the triangles distorted. To fix this, just turn on Use Sewing Springs, click Reset State, and then use Simulate Local to rebuild the shirt as it was at the end of the previous tutorial.
Now that the shirt is in place, you will add a pocket to it to make it look like a fancy T-shirt.
You'll start by creating a pocket to add in the same way you made the shirt pattern.
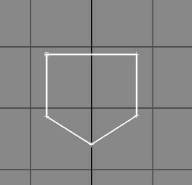
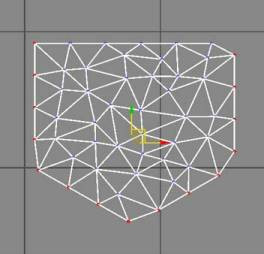
Spline pocket in the Top viewport
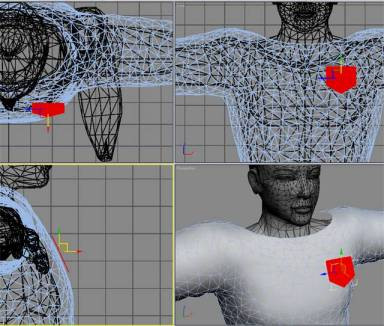
Pocket positioned at the Panels sub-object level
Now that the pocket is in place, you will need to add it to the simulation.
Before attaching the pocket to the shirt, it's advisable to make the mesh densities of the two objects similar. Right now, the mesh density of the pocket is higher than the shirt, which can cause crumpling at simulation time.
Next you'll attach the pocket to the shirt. You can do this at the Group sub-object level of the Cloth modifier.
Pocket vertex selection
You'll see a new group in the Group rollout list named “PocketEdge (unassigned).”
Now the Group should be named “PocketEdge (cloth to Shirt).” This lets you know that you have attached the group of vertices to the shirt object as a piece of cloth.
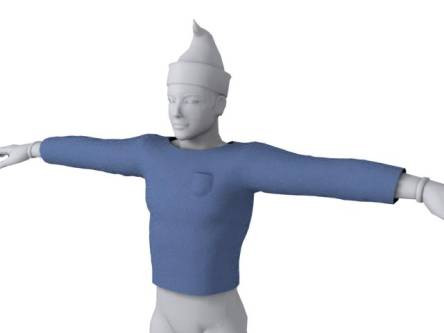
Pocket conformed to the shirt
As you have seen, adding extra detail to a piece of clothing is not a very difficult process. Attaching one cloth object to another is simply a matter of creating a group of vertices and choosing the other cloth object to attach it to. In the next lesson you will expand on this knowledge to create a collar and cuffs for the shirt, as well as assign different material properties to them.