


Changing Footsteps Using IK Keys
Footstep and Freeform modes both use the same underlying inverse kinematics (IK) to animate the biped skeleton. Footstep gizmos are a method for manipulating sequences of IK keys.
With inverse kinematics, you animate a hierarchy, such as a biped’s leg, by animating a lower link in the hierarchy: for example, the biped’s foot. Inverse kinematics is the opposite of forward kinematics. Forward kinematics doesn’t use the hierarchy; for example, you might animate a leg by rotating the thigh.
In this lesson, you’ll learn how making changes to the IK keys affects the footsteps.
Set up for this lesson:
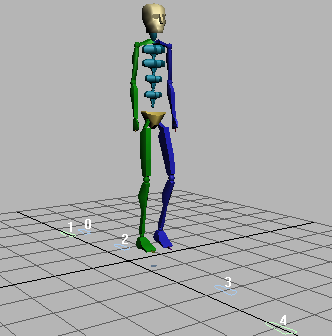
A biped is displayed with four footsteps in the viewport.

Set IK Keys to create footsteps:
The biped hops on his right foot. Notice that there is no footstep for the right foot between footsteps 2 and 3.
 In the
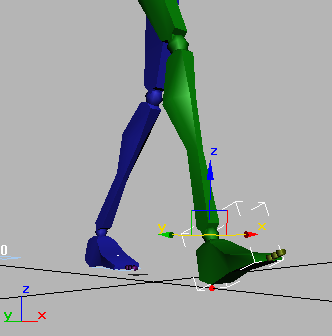
Key Info rollout on the Motion panel, click Set Planted Key.
In the
Key Info rollout on the Motion panel, click Set Planted Key.The pivot point is displayed in the viewport. If you can't see it, change to Wireframe viewport shading, or navigate the viewport so you can see beneath the heel.
 On the 3ds Max status
bar, turn on Key Mode Toggle.
On the 3ds Max status
bar, turn on Key Mode Toggle. Click
Next Key to go to frame 48, and then click Set Planted Key.
Click
Next Key to go to frame 48, and then click Set Planted Key.The pivot point shifts to the toe.
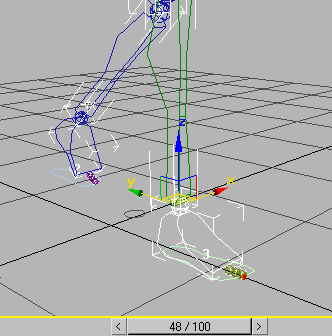
Note that the lowest IK pivot is selected by default for cases where IK is applied to new keys.
At frame
54, click Set Planted Key. 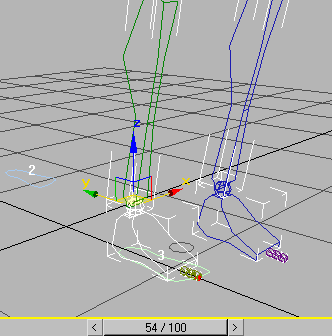
The biped is moved back to the ground. A footstep is displayed beneath the biped’s foot.
A footstep has been created, because there is now an interval of time where IK is applied between the two planted IK keys. However, if you drag the time slider to play the animation, you will see that the walk still needs work.
Change the duration of footsteps using IK keys:
At frame
60, click Set Planted Key.  On the
Dope Sheet tool bar, turn on Edit Keys if it is not on already.
On the
Dope Sheet tool bar, turn on Edit Keys if it is not on already. In the
Biped rollout, turn on Footstep Mode to easily locate the track
in Dope Sheet.
In the
Biped rollout, turn on Footstep Mode to easily locate the track
in Dope Sheet. Turn
off Footstep Mode.
Turn
off Footstep Mode.The keys for the foot are displayed in the Dope Sheet
At frame
63, set another planted key. Turn
on Footstep Mode.The Dope Sheet editor again displays the Footsteps track.
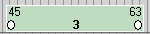
The duration of the footstep now is 18 frames, from frames 45 to 63.
Turn
off Footstep Mode.Remove footsteps using IK keys:
By editing IK keys, you can remove footsteps as well as add them.
 At frame
45, select the Bip01 R Foot object in the viewport,
then set a free key. At frame
48, set a free key. At frame
54, set a free key. At frame
60, set a free key.
At frame
45, select the Bip01 R Foot object in the viewport,
then set a free key. At frame
48, set a free key. At frame
54, set a free key. At frame
60, set a free key. The footstep disappears.
There is only one IK key left. With no IK interval defined, there is no duration, and therefore no footstep. The result is that the biped hops between footsteps 2 and 3.
The animation could be made more realistic by adding arm movement to the hopping steps, or by creating a freeform period for the hop, then adding poses for a crouch, spring and landing. The point of this lesson, however, has been to demonstrate that footsteps can actually be created or removed by changing the IK keys.

In this tutorial, you learned how to animate a biped using footsteps, add upper-body freeform animation, and how to modify the footsteps to make the biped, walk, run, and jump. You also learned how to change the duration of a footstep animation using IK keys.