The first constraint you'll be using is known as a hinge constraint which, as you might guess from the name, behaves like a hinge. A simple, everyday example of this kind of constraint is a door. A door can only swing around the points at which it is attached to the frame; you can think of this as the axis around which the door rotates. It can't rotate around the other two axes, because the connection points to the frame prevent it from doing so.
In fact, the door is actually a special type of hinge constraint in that it is a limited hinge constraint. This means that although it can rotate around the hinge axis, it can do so only until it bumps in the wall of the car. In reality, it cannot swing a full 360 degrees: The constraint's range of motion is limited (to 120 degrees, for example).
Furthermore, the hinges that connect the door to the frame can take only a measured amount of stress before giving way (think of hitting the door with a rather large sledge hammer). Since you can break the constraint, you would call this a breakable hinge constraint, or more precisely a breakable limited hinge constraint. The good news is that reactor can simulate all of these features, giving you free rein over the movement and the stresses and strains that the constraints in you scene can undergo.
Add a hinge constraint
 On the
Create panel, click Helpers, and choose reactor from the dropdown
list.
On the
Create panel, click Helpers, and choose reactor from the dropdown
list.The Properties rollout displays.
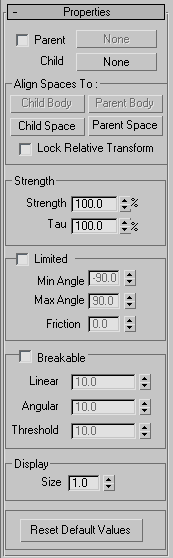
As you can see, Hinge has quite a few parameters, but the only ones that you will be concerned with for this tutorial are the Parent, Child, and Limited settings. You use the Parent and Child controls to specify the objects in your scene that serve as the two components of the constraint; for example: the upper arm and forearm. The Limited group parameters let you control the extents of the hinge's motion.


