Adding a Spotlight

Creating and Animating a Flying Logo

Adding a Flare Effect

Adding a Volume Light and Volume Fog
You'll
now add a fog effect to the spotlight and create a light foggy haze
around the planet. Volume Light provides light effects based on
the interaction of lights with atmosphere, such as fog.
Set
up:
- Continue
from before or open tut_wwdesigns_globe_add_vol_lite.max.
Create
a Camera from View
If you're continuing from before, you'll notice
that there is no camera in the scene yet. You can create one by
doing the following:
- Activate
the Perspective Viewport. Adjust it as you like to frame your shot.
- On
the Views menu, click Create Camera from View.
The Perspective
viewport label changes to Camera01.
Add
another spotlight
Now you'll create another spotlight shining
from underneath the globe.
- Activate
the Front Viewport, and zoom back so you have more room.
-
 On the
Create panel click the Lights button. Turn on Target Spot and drag
out a Spotlight below the planet. Set the target slightly above
the planet object in the Front Viewport.
On the
Create panel click the Lights button. Turn on Target Spot and drag
out a Spotlight below the planet. Set the target slightly above
the planet object in the Front Viewport. - Adjust
the hotspot so it is wider than the planet, but not a wide as the
ring of text.
You'll
use this spotlight to creating a halo of light beams behind the
planet. You'll turn on a few options for the lights to give a good
result for the effect.
On the
Modify panel turn on Shadows > On.
- On
the Intensity/Color/Attenuation rollout, increase the Multiplier
to 4.0.
Add
a volume light:
You can assign the volume light directly in
the modify panel, or you can assign it using Rendering menu >
Environment.
- Activate
the camera viewport.
- Go
to the Rendering menu > Environment.
The Environment
and Effects dialog appears.
- In
the Atmosphere rollout, click Add.
- In
the Add Atmospheric Effect dialog, select Volume Light and click
OK.
- In
the Volume Light Parameters rollout, click Pick Light.
- Click
on the Spot02 light in the viewport or
press the H key and pick
the Spot02 object from the list.
Spot02 appears
in the field next to the Remove Light button.
- Press F10 to do a test render.
TipAs you repeat the process of entering values
and rendering, you will find that the field cannot be active for
the rendering keyboard shortcut to work.
After you
enter a value in a numeric field, click on the rollout outside the
field to remove the keyboard focus from the field, and then press F9 to render the same viewport as
before (no matter which viewport is currently active).
By playing
individual values you can adjust the effect.
- In
the Volume group change the Density to 20. Press F9 to Render Last.
Turn on
Exponential and press F9
- You
can also see the changes you've made, in the Exposure Control rollout,
by clicking the Render Preview button.
- Press H on the keyboard and select Spot02, if
it isn't selected already. On the Modify panel, open the Advanced
Effects rollout.
- In
the Projector Map group click the button marked None. Double-click
Bitmap in the Material Map Browser and then choose Droplets.tga.
Adding
a projector map will dramatically add detail to the volume effect.
- Press F10 to render.
- On
the Modify panel turn on Decay, setting it to Inverse.
In the
Near Attenuation group turn on Use and Show. Set the Start to 11.0 and
the End to 32.0
In the
Far Attenuation group turn on Use and Show. Set the Start to 33.0 and
the End to 43.0
NoteThese are suggested values, yours may vary.
- Press F9 to render again.
- For
a more dramatic effect you can exclude the globe from the Spotlight.
On the General Parameters rollout, click Exclude. In the Include/Exclude
dialog, highlight the Planet object name and use the right-pointing
arrow to move it to the right window, then click OK.
- On
the Intensity/Color/Attenuation rollout adjust the Near and Far
Attenuation values so the effect tapers off within the viewport.
- If
you'd to hide the effect below the globe, reposition the Spotlight
and Spotlight target. Move it in small increments and repeatedly
render until you have found a location you like. By tilting the
spotlight slightly, rather than using it straight up, you can get
a more interesting effect.
- Save
your work as mywwdesign07.max
Add
volume fog:
You'll now create an additional fog effect
around the earth. But first, you need to create a type of helper
object called an Atmospheric Apparatus that will serve as a container
for the fog.
- On
the Create panel, click Helpers, and select Atmospheric Apparatus
from the drop-down list.
- Click
SphereGizmo.
- In
the Top viewport, select the center of the earth and drag outwards
to create the SphereGizmo. Make it a little bit larger that the
size of the earth.
-
 With
the SphereGizmo still selected, click the Modify tab. In the Atmospheres
and Effects rollout, click Add. In the Add Atmosphere dialog, highlight
Volume Fog and click OK.
With
the SphereGizmo still selected, click the Modify tab. In the Atmospheres
and Effects rollout, click Add. In the Add Atmosphere dialog, highlight
Volume Fog and click OK.Now you
need to setup the volume fog parameters.
- In
the Atmospheres and Effects rollout window, select Volume Fog. Click
Setup.
- In
the Volume Fog Parameters rollout, click Pick Gizmo. Select the
SphereGizmo, if it doesn't already appear in the dialog.
SphereGizmo01
appears in the field next to the Remove Gizmo button.
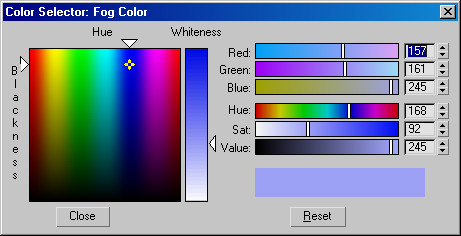
- In
the Volume group, click the white color swatch. In the Color Selector,
dialog, pick a light bluish purple color. Drag the whiteness selector
to lighten the color. Click OK.
The color
you selected is now displayed in the Color swatch.
- In
the Volume group turn on Exponential and increase the Density to 100.0.
- In
the Noise group, select Fractal. This gives the fog a less uniform
appearance.
- In
the Noise group change the High Threshold to 0.1.
Change
the Levels to 6.0.
Change
the Size to 1.0.
- Press F9 to render.
- Make
more adjustments to get the look of a cloud cover.
- On
the toolbar click Select and Link. Link the SphereGizmo to the globe.
Play the animation.
The fog spins with the globe.
- Save
your work as mywwdesigns08.max