Using DWF Export

Publishing to DWF


Overcoming the Limitations of DWF Export
In
the previous lesson, you learned how you can export 3D scenes to
the DWF format preserving geometry, materials and layers. You have
also learned that by default, the DWF file format does not recognize
lighting effects and shadows.
In this lesson, you learn how to overcome these
limitations by using Render to Texture.
Set
up the lesson:
Using
Render to Texture
- From
the Rendering menu, choose Render to Texture.
The Render to Texture dialog opens.
- Press Ctrl+A to select all objects in the
scene.
On the Objects To Bake rollout, all the object
names display in the Objects to Bake list.
- On
the Output rollout, click Add.
The Add Texture Elements dialog opens.
NoteIf you don't see the Add button, resize
the dialog or use the pan cursor to drag the panel upwards.
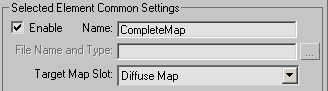
- Choose
CompleteMap, and then click Add Elements to close the dialog.
NoteAs the name implies, a complete map contains
all subset maps like diffuse, shadows, specular highlights and others.
- In
the Selected Element Common Settings group, click the button labeled
512.
NoteThis value defines the resolution of the
output bitmap in pixels. 512 is a good compromise between image
quality and display speed. The higher the value, the better the
quality but be aware that increasing texture resolution increases
display speed and render time.
- In
the Baked Material rollout, click the Create New Baked radio button
below the Save Source (Create Shell) radio button.
- From
the Create New Baked drop-down menu, choose Architectural.
NoteThe
Architectural material type is in this case is favorable as the
baked material is automatically set in self illumination mode. This
ensures that the baked material is no more dependent on lighting
setups in the scene and makes it a good candidate for DWF Export.
- Go
back to the Output rollout. In the Selected Element Common Settings
group, click the Target Map Slot drop-down menu and set it to Diffuse
Map.
NoteSetting
the Diffuse map as a target ensures the newly created map goes into
the Diffuse map channel, which will now contain color information,
highlights, shadows and other elements
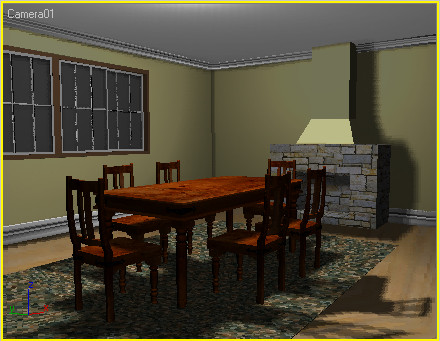
- At
the bottom of the dialog, click Render.
Rendering the textures may take a few minutes,
depending on system performance. When the textures are rendered,
you should be able to see the end result in the Camera viewport.
- From
the File menu > Save As and name the finished model dining_room_baked.max.
- From
the File menu, choose Export.
Ensure the Save as Type drop-down is set to
Publish to DWF. Name your file dining_room-shadows and click
Save.
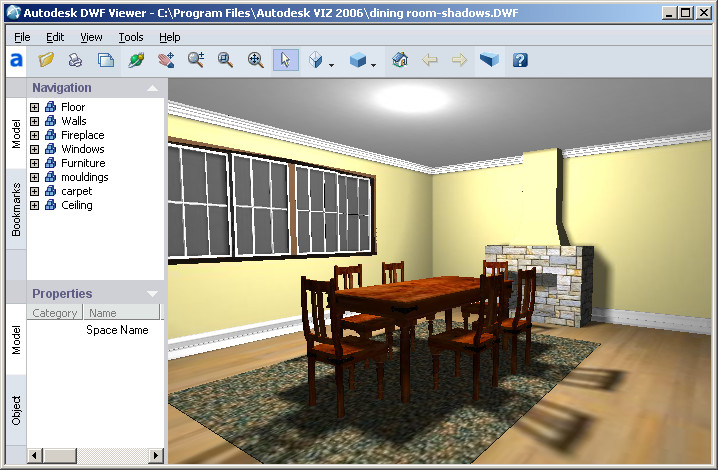
- In
the DWF Publish Options dialog, turn off Use Default DWF Lights,
and then click OK.
You won't need to use the DWF Viewer's lighting
because the lighting effects in your scene will now be published.
The file takes a little longer to load in the
DWF viewer but when it does, you notice that lighting effects and
shadows are now included in the file.
TipAll the materials in the 3ds Max scene
have now been replaced with a Shell material type. To reassign the
original materials, in the Baked Material rollout, select Keep Source
Materials, then click the Clear Shell Materials button.
Summary
In this tutorial, you learned how to access
the DWF Publish Options dialog, export your 3D scene in DWF format,
and how to set up Render to Texture for baking textures in order
to see the lighting effects and shadows in the Autodesk DWF Viewer.