


Autodesk 3ds Max Tutorials > Special Effects > Particle Animation Tutorials > Working with Particle Flow > Visualizing Flow Through Tubes >
Applying Final Touches
The scene is nearly complete. The particles appear as colored arrows that branch along different spline paths and change colors depending on which path they follow. One issue remains: The particles collect at the ends of the paths when they complete the Speed By Icon animation. Since this is a visualization scene and a constant flow is required, you’d ideally just want to delete particles as they arrive at the end of the paths. There are several different ways to do this, but one simple one is to just define a condition where particles are deleted when they come to a stop. While there isn’t a test that’s designed specifically for this, you can use the Speed Test operator and pass the result to a Delete operator. Here’s how you do it:
Apply finishing touches:
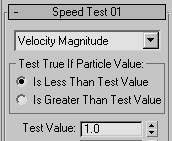
By default, the Speed Test tests Velocity Magnitude, which is a fancy way of saying “speed in any direction.” If necessary (not in this case), you can make it more specific by testing velocity along a specific axis. By setting it to “Less than 1” it will direct particles that slow to a stop to a new event.
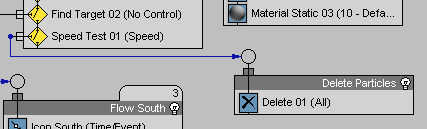
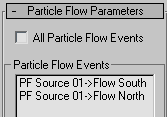
You’ve created a test for the Emit Particles event, the result of which can be seen in the animation now. The Red particles moving along the center tube disappear when they reach the end. Ideally you’d want this for the other events as well. There are several ways to accomplish this, but the easiest is just to apply the test globally.
The test's wiring (to the Delete operator) moves along with it.
Now every particle disappears as soon as it comes to the end of its path.
The only potential drawback with this method is a loss of flexibility. By applying a test globally, all particles within the system, regardless of any other parameters or conditions, will be tested for speed and sent to the Delete Particles event. If you need to test for different conditions, you can include the test in each event instead.
Apply BlobMesh
Suppose your goal is not so much an abstract visualization with arrow indicators, but something more realistic. BlobMesh is a special compound object in 3ds Max that you can use to simulate fluids. It works something like the MetaParticles effect in the non-event-driven particle systems.
In this procedure, you'll use BlobMesh to simulate the flow of liquids in the upper and lower tubes.
The BlobMesh object references objects in the scene, placing user-definable metaballs at each vertex in the object. When of sufficient size and density, the metaball’s surface features blend together to form a continuous blob.
You first have to assign an object for the BlobMesh to reference: in this case, the particle system you’ve been working on during this tutorial.
This applies to the system as a whole, however, so next you'll define which events to include in the blobby mesh.
If you scrub the time slider now, you'll see blobs forming around the particles as they branch off into the north and south tubes. The flow doesn't look very liquid because there aren't enough particles. If you like, try increasing the Viewport % setting until you get enough particles for the blobs to flow together. You can find this setting by clicking the PF Source 01 event and then going to the parameters panel > Emission rollout > Quantity Multiplier group.
You can find the final scene, without an increased Viewport % setting, in the file VizGasFlow_finished.max.
An important consideration when using BlobMesh with Particle Flow is that the size of the blob is determined by the size of the particles; the BlobMesh Size parameter is ignored. You can see this by adjusting the Scale value in the Shape Instance operator. In some cases you’ll need greater quantities of smaller particles. But as you increase the volume of particles, performance tends to decrease. This is because BlobMesh analyzes the particles at every frame. For faster feedback during setup of the particle system, you can turn on the BlobMesh Off In Viewport option to restrict its calculations to render time.
Use a particle system for simulating the flow of gaseous or liquid substances through pipes or tubing. With Particle Flow, use a Speed By Icon operator to make the particles follow a path, and use a Find Target test to divert the flow into different branches of the tubing. Use arrow-shaped particles to indicate flow direction, or to make the flow look more realistic, apply the BlobMesh compound object.