


Autodesk 3ds Max Tutorials > Special Effects > Particle Animation Tutorials > Working with Particle Flow > Visualizing Flow Through Tubes >
Creating Branching Paths
Create branching paths:
One of Particle Flow's unique capabilities is that it lets you create branching events that are controlled by conditions. You do this with a type of action called a test, which defines a true or false condition against which the software continually checks each particle. When a test returns False, the particle stays in the current event, but if the result is True the particle can move to another event that specifies different behavior.
In this procedure you’ll use Find Target tests to cause some particles to change course and flow along different paths.
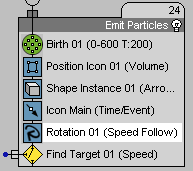
The Find Target test is used primarily to set a goal for particles. Its options include moving particles to the goal based on speed or time. In addition, you can use it as a simple proximity test, without affecting particle motion at all, as you'll do next.
This disables most of the test's parameters.
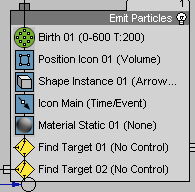
When you created the Find Target test, it added a helper object to your scene called Find Target 01. This is now the target for the particles within this event; the software will test each particle based on its distance from the helper object.

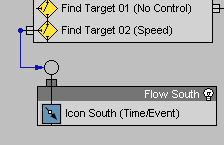
One visible difference between tests and operators is that tests have a little “nub” that sticks out to the side. You use this to wire the output of the test to the input of another event. The result is that particles that test True will go to the next event.
You’ve created a new event containing a single operator. This is what you will connect the output of the Find Target test to. But first you'll take some simple but important organizational steps.
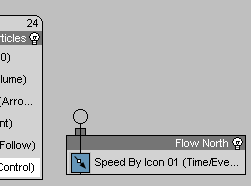
You’ve given the new event a more descriptive name, and you’ve also moved the output connector on the Find Target test operator to the opposite side so that the wire can travel in a more direct path.

Set up the Flow North event:
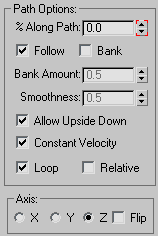
The output of the Find Target test is set up correctly, but the Flow North event isn’t. The only operator within the event is a Speed By Icon operator that isn’t animated. You’ll animate its icon along a new path so that particles that enter this event move to that path.

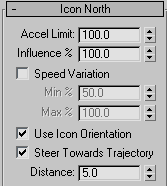
Select the Icon North helper object.
When you use a Path constraint, the software sets default keys at the first and last frames of the animation. For this animation, you’ll need to adjust the keys for both the Icon Main and the Icon North helper objects.

This effectively increases the speed of each icon along its path.
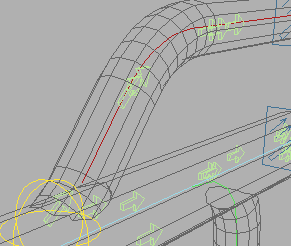
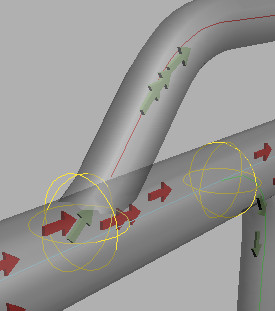
Because of the way the scene was originally set up, the Find Target icon is created close to the correct position to determine whether particles should switch to the upper tube. In the next step you'll move it upward slightly, but in many cases you'll need to reposition the target by a greater amount.
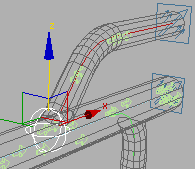
Some of the arrows now move upwards.
If you play the animation now, you see some of the arrows change direction and move upwards along the second path. All of the particles continue to point in the same direction because the Flow North event doesn’t have a Rotation operator to define their orientation. To resolve this, you could add another Rotation operator using identical parameters, or you could instance the first one. Even better: All particles in this system should point in the direction they’re traveling, so you can just move the Rotation operator from the Emit Particles event to the global event.
The upward-moving arrows now point in their direction of motion.
This resolves the orientation issue. We still need to address some other areas, but first you'll add one more path.
Add a third path:
Most of the following steps will probably be familiar to you.
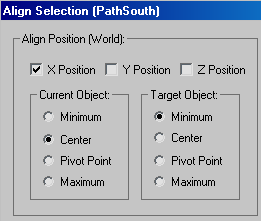
In order for the particles to move correctly on the third path, the Find Target icon's pivot should coincide with the path's starting point.
This latter step helps to smooth out the motion when the particles are moving directly downward.
You now have icons moving down all three splines and particles following them. You might want to adjust the locations of the Find Target icons slightly so the particles branch properly.
Change colors:
What if you want to change the color of the arrows based on which path they are moving along? This is a common need in AEC visualization when showing how fluids move through pipes, with the colors differentiating the types of fluid. Because you have a different event defining each path, it’s easy to assign different materials to particles within each event. You'll use three materials that have already been prepared for you.
If you play or advance the animation in a shaded viewport, you can see that all of the main particles are now red. The color of the particles in the other events is determined by the Display operator in the global event.
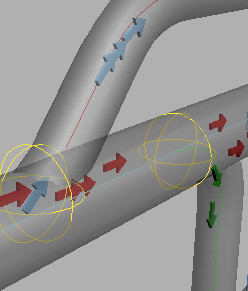
Now all three colors appear in the viewports.