After you install Visual FoxPro, you might want to customize your development environment. Environment settings include the main window title, default directory, project, editor, debugger and form tool options, temporary file storage, field mappings for drag and drop operations, and many other options.
You can configure Visual FoxPro either interactively or programmatically. You can also establish configuration settings that are loaded when you start Visual FoxPro. For information on optimizing your system once it is configured, see Chapter 4, Optimizing Your System. For information on optimizing your Visual FoxPro applications, see Chapter 15, Optimizing Applications in the Programmer’s Guide.
This chapter discusses:
The Visual FoxPro configuration determines how your copy of Visual FoxPro looks and behaves. For example, you can establish the default locations for files used with Visual FoxPro, how your source code looks in an edit window, and the format of dates and times.
Changes you make to the Visual FoxPro configuration can be temporary (for the current session only) or permanent (they become the default settings the next time you start Visual FoxPro). If the settings are temporary, they are stored in memory and are discarded when you quit Visual FoxPro. If you make permanent settings, they are stored in the Windows registry. The registry is a database maintained by Windows that stores configuration information about the operating system, all Windows applications, OLE, and optional components such as ODBC. For example, the registry is where Windows stores the associations between file name extensions and applications, so that when you click a file name, Windows can launch or activate the appropriate application. Similarly, Visual FoxPro stores its application-specific configuration information in the registry.
For an example of how to do this, examine Registry.prg in the Visual Studio …\Samples\Vfp98\Classes directory, which contains numerous methods, based on Windows API calls, that allow you to manipulate the Windows registry.
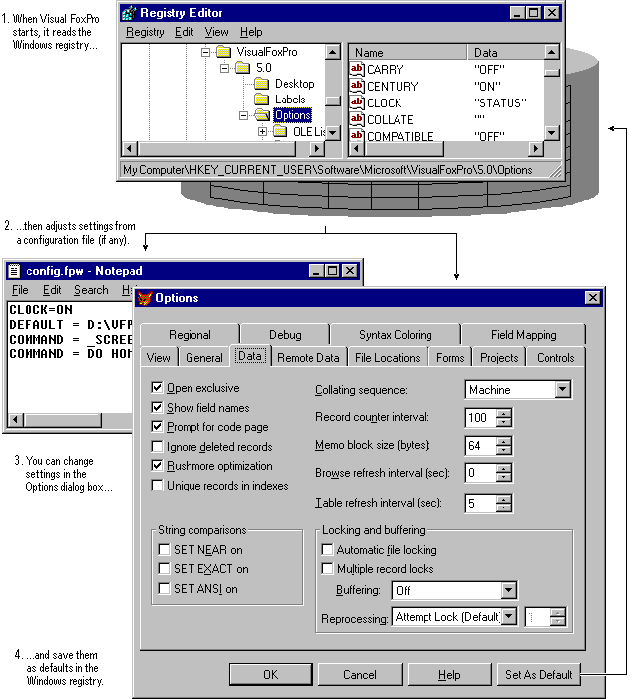
When you start Visual FoxPro, the program reads the configuration information in the registry and sets the configuration according to those settings. After reading the registry, Visual FoxPro also checks for a configuration file, which is a text file, in which you can store configuration settings to override the defaults stored in the registry. After Visual FoxPro has started, you can make additional configuration settings using the Options dialog box or SET commands.
Setting configuration using the Windows registry, configuration file, and Options dialog box
Note The run-time version of Visual FoxPro does not read the Windows registry when starting up, as registry settings are designed primarily to configure the development environment. If you intend to distribute your Visual FoxPro applications using a run-time library, you can establish configuration settings in two ways: with a configuration file, or with a program that manipulates the Windows registry on the user’s computer.
Finally, Visual FoxPro also maintains a resource file, Foxuser.dbf, which stores information about the current state of the program when you quit. For example, the resource file contains information about the location and size of the command window, current keyboard macros, which toolbars are displayed, and so on. The Foxuser.dbf file is an ordinary Visual FoxPro table, which you can read and change as required by your application.
You can set configuration options interactively by using:
To view and change environment settings, you can use the Options dialog box.
The Options dialog box
To display the Options dialog box
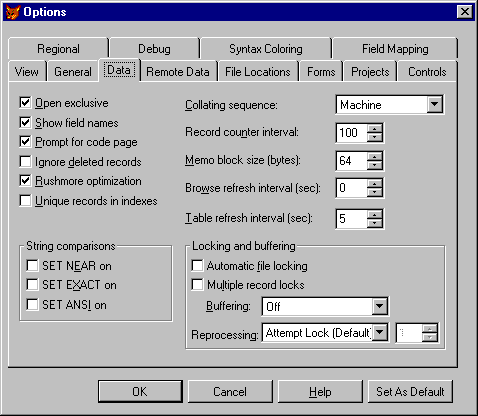
The Options dialog box has a series of tabs representing different categories of environment options, as shown in the following table. For details about options you can set using each tab, see the Options dialog box.
Tabs available in the Options dialog box
| Use this tab | To access these features |
| View | Interface options, such as whether to display a status bar, clock, command results, or system messages. |
| General | Data entry and programming options, such as setting the warning sound, whether to log compilation errors, whether to automatically fill new records, what navigation keys to use, what color palette to use, and whether to warn before overwriting files. |
| Data | Table options, such as whether to use Rushmore optimization, whether to enforce uniqueness using indexes, the memo block size, the record counter interval for searches, and what locking options to use. |
| Remote Data | Remote data access options, such as connection timeout values, the number of records to fetch at once, and how to use SQL for updates. |
| File Locations | Locations for the default Visual FoxPro directory, where Help is stored, and where auxiliary files are stored. |
| Forms | Form Designer options, such as the grid spacing, the scale units to use, the maximum design area, and what template classes to use. |
| Projects | Project Manager options, such as whether to prompt for wizards, whether to run or modify files when double-clicking, and options for source control. |
| Controls | Options for what visual class libraries and ActiveX controls to make available from the View Classes button on the Form Controls toolbar. |
| Regional | Formats for dates, times, currency, and numbers. |
| Debug | Debugger display and trace options, such as what font and color to use. |
| Syntax Coloring | Font and color options for identifying elements of programs, such as comments and keywords. |
| Field Mapping | Options for what controls to create when dragging tables or fields to a form from the Data Environment Designer, Database Designer, or Project Manager. |
You can save the settings you make in the Options dialog box for the current data session, or as default (permanent) settings for your copy of Visual FoxPro.
To save settings for the current session only
When you save settings for the current session only, they remain in effect until you quit Visual FoxPro (or until you change them again). To save changes permanently, save them as default settings; this stores them in the Windows registry.
To save current settings as default settings
Note The Set as Default button is disabled until you make a change to the current settings.
You can override default settings by issuing SET commands or by specifying a configuration file when you start Visual FoxPro. For details, see Setting Configuration Options at Startup later in this chapter.
Most options displayed on the tabs in the Options dialog box can also be modified programmatically by using a SET command or by assigning a value to a system variable. For example, to use a year-month-date format for dates, you can change the Date Format setting in the Regional tab of the Options dialog box, or you can use the SET DATE command:
SET DATE TO ANSI && Sets format to yy.mm.dd
If you configure the environment using SET commands, the settings are in effect only for the current session of Visual FoxPro. When you quit the program, your settings are discarded, and you must reissue the SET commands. However, you can automate this process by issuing SET commands at startup or using a configuration file. For details, see Setting Configuration Options at Startup later in this chapter.
Tip You can also save a configuration made with SET commands by displaying the Options dialog box and saving your settings there. For details, see Saving Configuration Settings earlier in this chapter.
You can make changes directly in the Windows registry to set the Visual FoxPro configuration.
Visual FoxPro configuration settings in the Windows registry
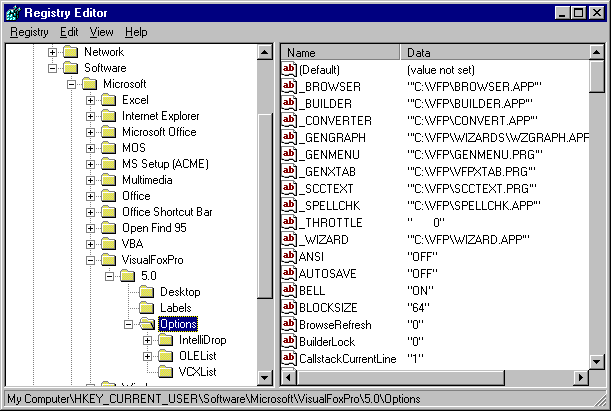
To change the Windows registry, use the Registry Editor, a utility provided with Windows.
Note Exercise caution when changing the Windows registry; changing the wrong registry entry or making an incorrect entry for a setting can introduce an error that prevents Visual FoxPro from starting or working properly.
To change configuration settings in the registry
Software\Microsoft\VisualFoxPro\6.0\Options
Your change will be in effect the next time you start Visual FoxPro.
You can also make changes to the registry by calling Windows APIs from a Visual FoxPro program.
When Visual FoxPro is running, you can verify environment settings by using the Options dialog box or the DISPLAY STATUS command, or by displaying the values of individual SET Commands.
To display multiple environment settings
– or –
To display individual environment settings
For example, to view the current status of SET TALK, type:
? SET("TALK")
Note Because settings are valid only for the current data session, you must capture your settings and place them in a program or a form’s Init event code for every private data session.
To echo Options dialog box settings to the Command window
The settings are echoed to the Command window.
In addition to making changes to the Visual FoxPro environment interactively, you can establish configuration settings when you first start the program. Doing so allows you to override default settings.
This section describes you how can:
One way to establish configuration settings is to issue one or more SET commands when your application starts. For example, to configure your system to use display a clock in the status bar when the application starts, you can issue this SET command:
SET CLOCK ON
The exact point at which you issue the SET command depends on your application. In general, you would issue SET commands from your application’s main program file, which is the program or form that controls access to the rest of your application. For details about specifying a main file for an application, see Chapter 13, Compiling an Application, in the Programmer’s Guide.
For example, if your application begins by displaying a form, you can issue SET commands in the code for the Load or Init events of the form. If your application begins with a menu, you can add the SETUP commands by entering them in the menu’s Setup option. For details, see “Adding Setup Code to a Menu System” in Chapter 11, Designing Menus and Toolbars, in the Programmer’s Guide.
Tip An efficient way to manage SET commands for startup is to create a procedure that contains all the commands that you want to issue. You can then call the procedure from the appropriate point in your application. Keeping all the SETUP commands in a single procedure makes it easier to debug and maintain your configuration settings.
In addition to setting the Visual FoxPro environment using the Options dialog box or SET commands, you can establish preferred settings and save them in one or more configuration files. A Visual FoxPro configuration file is a text file in which you can specify values for SET commands, set system variables, and execute commands or call functions. Visual FoxPro reads the configuration file when starting up, establishing the settings and executing the commands in the file. Settings made in the configuration file override default settings made in the Options dialog box (and stored in the Windows registry).
Using a configuration file provides several advantages. You can:
To create a configuration file, use the Visual FoxPro editor (or any editor that can create text files) to create a text file in the directory where Visual FoxPro is installed. Earlier versions of Visual FoxPro created the file Config.fpw in the startup directory. Config.fpw became the default configuration file. You can create any program file and use it to establish default settings and behaviors by starting Visual FoxPro using that file either by double clicking the file or using a command line reference.
If you are creating a new configuration file, you can save it using any name you want. By convention, configuration files have the extension .fpw.
When you start Visual FoxPro you can use a default configuration file in the following locations (in order):
If the default configuration file is not found in these locations, Visual FoxPro uses only the default settings established in the Options dialog box.
Note For details about specifying an alternative to the default file name or location for the configuration file, see Specifying the Configuration File to Use later in this chapter.
Enter configuration settings using one of these methods:
To enter SET commands in a configuration file
For example, to set a default path type, use this format:
DEFAULT = HOME()+"\VFP"
To add a clock to the status bar, use this command:
CLOCK = ON
To enter a setting for a system variable, use the same syntax you would use in the Command window or in a program.
To set system variables in a configuration file
For example, the following command sets the caption of the main Visual FoxPro window:
_SCREEN.Caption = "My Application"
The following command specifies an alternative spelling checking program:
_SPELLCHK = "SPLLCHK.EXE"
You can also call functions or execute programs from within a configuration file by using the COMMAND command. For example, you can start an initialization program as part of the startup process.
To call functions or execute commands in a configuration file
For example, to include the Visual FoxPro version number in the caption of the main Visual FoxPro window, use this command:
COMMAND =_SCREEN.Caption=;
"Visual FoxPro " + SUBSTR(VERS(),25,3)
The following command launches a specific application when Visual FoxPro starts:
COMMAND = DO MYAPP.APP
You can also use special terms in a configuration file that do not correspond to SET value, system variables, or commands.
To use special terms in a configuration file
For example, to set the maximum number of variables available in Visual FoxPro, use this command:
MVCOUNT = 2048
For a complete list of special terms for configuration files, see Special Terms for Configuration Files.
You can insert commands into a configuration file that automatically launch programs when Visual FoxPro starts. You can use these commands either to start an entire application, or just to start a program, such as one that initializes system variables.
To start applications from a configuration file
_STARTUP = MYAPP.APP
– or –
COMMAND = DO MYAPP.APP
When Visual FoxPro starts, you can specify a configuration file or bypass all configuration files, allowing Visual FoxPro to use its default settings.
When Visual FoxPro loads a configuration file, the settings in that file take precedence over corresponding default settings made in the Options dialog box.
To specify a configuration file
For example, the following command specifies the file Myapp.fpw as the configuration file:
C:\Program Files\Microsoft Visual ;
Studio\Vfp98\Vfp6.exe -CC:\MYAPP\MYAPP.FPW
– or –
If you want to avoid using any configuration file, including the default file Config.fpw, you can suppress all configuration files. This causes Visual FoxPro to use only the default settings established in the Options dialog box.
To suppress a configuration file
For example, to avoid any configuration file found in the startup directory or the system path, use this command line:
Vfp6.exe -C
In addition to using the SET command and a configuration file, you can specify startup options by including a command-line switch. For example, using command-line options, you can suppress the display of the Visual FoxPro sign-on screen or specify a non-default configuration file. The following table lists the command-line switches available in Visual FoxPro.
Command-line switches for Visual FoxPro
| Switch | Description |
|
Ignores the default configuration file and Windows registry settings. |
|
Specifies a configuration file (including path if necessary) other than the default (Config.fpw). |
|
Specifies a runtime .DLL file (including path if necessary) other than the default. |
|
Specifies a resource file (including path if necessary) other than the default, which allows you to use Visual FoxPro in a language other than the current language specified by Windows. |
|
Refreshes the Windows registry with information about Visual FoxPro, such as associations for Visual FoxPro files. |
|
Suppresses the display of the Visual FoxPro sign-on screen (banner). For details, see Preventing Display of the Sign-On Screen later in this chapter. |
|
registers an OLE component. |
|
Removes an OLE registry entry. |
|
Registers a .DLL component. |
|
Removes a .dll component. |
For more information, see Command-Line Switches.
If the command switch requires arguments such as a file name, do not put a space between the switch and the argument. Separate multiple options with single spaces. For example, to specify a configuration file, use a command such as:
C:\Vfp98\VFP6.EXE -CC:\MYAPP\MYAPP.FPW
By default, when Visual FoxPro starts, it displays a sign-on screen that shows the Visual FoxPro logo, version number, and other information. If you prefer that users of your application not see this sign-on screen, you can prevent Visual FoxPro from displaying it.
To prevent the display of the sign-on screen
Note For compatibility with earlier versions of Visual FoxPro, you can also set switches using the FOXPROWCFG DOS environment variable, but this method is not recommended.
For example, use a command such as:
VFP6.EXE -T
Visual FoxPro includes the following customizable toolbars.
| Tool | Associated Toolbars | Command |
| Database Designer | Database | CREATE DATABASE |
| Form Designer | Form Controls Form Designer Color Palette Layout |
CREATE FORM |
| Print Preview | Print Preview | |
| Query Designer | Query Designer | CREATE QUERY |
| Report Designer | Report Controls Report Designer Color Palette Layout |
CREATE REPORT |
By default, only the Standard toolbar is visible. When you use a Visual FoxPro designer tools (for example, the Form Designer), the designer displays the toolbars that you commonly need when working with that designer tool. However, you can activate a toolbar any time you require it.
To activate a toolbar
– or –
To deactivate a toolbar
– or –
The easiest way to create custom toolbars is by modifying the toolbars already provided with Visual FoxPro. You can:
You can also define custom toolbars by creating a custom toolbar class using code. For details, see Chapter 11, Designing Menus and Toolbars in the Programmer’s Guide.
You can modify any of the toolbars provided with Visual FoxPro. For example, you might want to remove a button from an existing toolbar, or copy buttons from one toolbar to another.
To modify a Visual FoxPro toolbar
Tip If you change a Visual FoxPro toolbar, you can restore it to its original configuration of buttons by selecting the toolbar in the Toolbar dialog box and then choosing Reset.
You can create your own toolbars comprised of buttons from other toolbars.
To create your own toolbar
Note You cannot reset buttons on a toolbar you create.
To delete a toolbar you created
Note You cannot delete toolbars provided by Visual FoxPro.
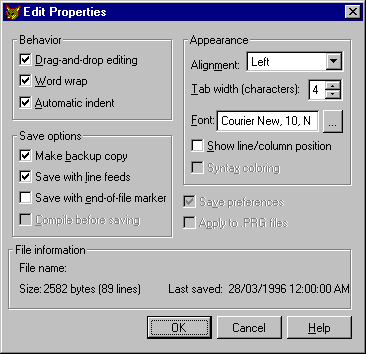
You can configure the Visual FoxPro editor to display text the way you want by setting the font and text alignment. You can also make the editor easier to use by setting your preferences for indentation, wordwrap, automatic backup copies, and other features.
To configure the editor, use the Edit Properties dialog box.
The Edit Properties dialog box
For details about editor settings, see Edit Properties dialog box.
To display the Edit Properties dialog box
Tip You can display the Font dialog box directly by right-clicking the edit window and then choosing Font from the shortcut menu.
By default, settings that you make in the Edit Properties dialog box apply only to the current edit window. For example, if you change the font, the font for all text in the current window is changed. If you open another edit window, or if you close the current file and then reopen it, the default settings apply.
If you prefer, you can save your settings permanently, or so that they apply to all files of a similar type. If you apply options to similar file types, Visual FoxPro uses the settings you make when you edit files with the same extension (for example, all .prg files, or all method code in the Form Designer).
To save editor options permanently
To apply editor options to similar files
You can also set the color and font that the editor uses to identify keywords, comments, and other elements of programs. For details, see Syntax Coloring Tab, Options dialog box.
If you want to close down all operations and return Visual FoxPro to its state at startup, issue the following commands, in the following order, in the Command window or in a program called just before you quit Visual FoxPro.
CLEAR ALL
CLOSE ALL
CLEAR PROGRAM
CLEAR ALL removes all objects from memory which, in turn, closes all private data sessions and cursors.
CLOSE ALL, after CLEAR ALL has completed successfully, closes all databases, tables, and cursors in data session 1, the default Visual FoxPro data session.
CLEAR PROGRAM clears the compiled program buffer of the most recently executed programs. CLEAR PROGRAM forces Visual FoxPro to read the programs from disk, rather than from the program buffer.
Cleaning Up During Transactions If transactions are in progress, use the END TRANSACTION command for each level of transaction before issuing CLEAR ALL, CLOSE ALL, and CLEAR PROGRAM.
Cleaning Up During Buffered Updates If buffered updates are in progress, use either the TABLEUPDATE( ) or TABLEREVERT( ) functions for each cursor with buffered updates before issuing CLEAR ALL, CLOSE ALL, and CLEAR PROGRAM.