The Mixer palette allows users to mix any number of colors into a single paint swatch in a manner similar to a traditional artist's palette. With this off-canvas palette, you can mix and experiment with colors just like a real palette, and then use your Art Media brushes to make realistic strokes simulating the rich, expressive results you get with physical pigment media such as paint, pastel, pencil, and chalk.
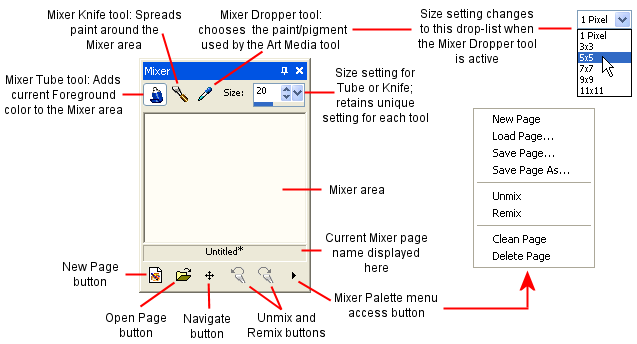
This illustration identifies the elements of the Mixer palette.
Here are the basics steps for painting with the Art Media tools and the Mixer palette:
In the Materials palette, set the Foreground/Stroke property to Color (the Mixer palette only works with the current Foreground/Stroke solid color, not gradients, patterns, or textures), and then use the Materials palette's Frame, Rainbow, or Swatch tab to choose the color you want to start working with.
Note: When any Art Media tool is active, the mode buttons below the Foreground/Stroke and Background/Fill property boxes will be inactive.
In the Mixer palette, select
the Mixer Tube
tool ![]() .
.
In the Mixer area, lay down paint strokes by dragging the cursor. The width of the stroke is determined by the Size setting for the Tube tool.
Optionally, you can set another Foreground/Stroke color in the Materials palette
like you did in Step 1, and again use paint strokes in the Mixer area.
Continue doing this as much as you like. Use the Mixer area as you would
a real-life painting palette. Use the Unmix
button ![]() to undo a Mixer Tube (or Mixer Knife) action; use
the Remix button
to undo a Mixer Tube (or Mixer Knife) action; use
the Remix button ![]() to redo the undone action. You can then save the Mixer area
as a page as described in a section below.
to redo the undone action. You can then save the Mixer area
as a page as described in a section below.
If you have multiple colors applied
to the Mixer area, you'll notice that strokes that pass over another color
will mix the colors just like a real-life palette. At this point you could
also use the Mixer Knife
tool ![]() to smear Mixer area colors together.
Use the Unmix button
to smear Mixer area colors together.
Use the Unmix button ![]() to undo a Mixer Knife (or Mixer Tube) action; use the Remix button
to undo a Mixer Knife (or Mixer Tube) action; use the Remix button ![]() to redo the
undone action. Use the Size setting
to determine the stroke width for the Tube tool and the Knife tool --
be aware that each tool's Size setting can be unique.
to redo the
undone action. Use the Size setting
to determine the stroke width for the Tube tool and the Knife tool --
be aware that each tool's Size setting can be unique.
Note: The Mixer Knife tool and the Mixer Tube tool exchange functionality when dragging with the right mouse button. When using the Tube tool, left-drag to apply paint, right-drag to mix paint. When using the Knife tool, left drag to mix paint, right-drag to apply paint.
When you're ready to begin painting,
select the Mixer palette's Mixer Dropper
tool ![]() and then click the desired color in the Mixer
area. Notice that dragging the cursor around the Mixer area updates the
Materials palette's Foreground/Stroke property in tandem with your current
sampling position. Be aware of the following points:
and then click the desired color in the Mixer
area. Notice that dragging the cursor around the Mixer area updates the
Materials palette's Foreground/Stroke property in tandem with your current
sampling position. Be aware of the following points:
For the Oil Brush and Palette Knife tools, the Mixer palette's Dropper tool's cursor size is determined by the Size setting in the Tool Options palette.
For all the other Art Media tools (Chalk, Colored Pencil, Marker, etc.), the sampling area is determined by the Mixer palette's Size drop-list setting. The drop-list becomes active when using any Art Media tool other than Oil Brush or Palette Knife.
In the Art Media tools group in the Tools toolbar, select the desired Art Media brush to use. The Oil Brush and Palette Knife, by default, create wet paint strokes, while the other tools create dry paint strokes. For details on each Art Media tool, see Using the Art Media Brushes.
Note: When using the Oil Brush or Palette Knife, you can choose to "dry" the Art Media layer, or make it "wet" again by choosing Layers > Dry Art Media layer or Wet Art Media layer. See the Dry and Wet Art Media Layers section below for more details.
Place the Art Media brush cursor inside the image area and begin making paint strokes. The strokes will be applied on an Art Media layer. (If this layer type is not the active layer, one will be created automatically once you begin using the Art Media tool.)
To choose another color, use the Mixer palette's Dropper tool to click the desired color in the Mixer area. Now go back to the image canvas and paint.
To clean the brush tip, click
the Clean button ![]() in the Tool Options palette. You can also mark the Auto Clean check box
in the Tool Options palette. You can also mark the Auto Clean check box ![]() to
clean the brush and start each stroke with fresh paint/pigment. If Auto
Clean is not marked, the brush tip stays "dirty" between strokes.
to
clean the brush and start each stroke with fresh paint/pigment. If Auto
Clean is not marked, the brush tip stays "dirty" between strokes.
Experiment with the Tool Options palette settings to control brush behavior.
Paint strokes applied by the Oil Brush and Palette Knife are, by default, wet in terms of how strokes interact with other strokes by smearing/mixing together. You can, however, choose to dry the Art Media layer at any time. Conversely, you can choose to make a dry Art Media layer wet again:
Choose Layers > Dry Art Media layer (or right click on the Layers palette and choose Dry Art Media layer from the context menu) to dry the strokes applied by the Oil Brush or Palette Knife.
Choose Layers > Wet Art Media layer (or right click on the Layers palette and choose Dry Art Media layer from the context menu) to make dried Oil Brush or Palette Knife strokes wet again.
Note: Both the Dry Art Media layer command and the Wet Art Media layer command can be selectively undone in the History palette.
Use the Navigate button ![]() to pan around the Mixer area
page:
to pan around the Mixer area
page:
Place the cursor over this button and then hold down the left mouse button. This displays a small version of the entire 500 x 500 pixel Mixer page, and a black outline box reflects the current view in the Mixer area.
Drag the mouse to pan the page. Release the mouse button when the desired portion of the page is enclosed in the outline box.
This feature works in a similar manner to the Overview palette.
To empty the mixer area (clean the page), do one of the following:
Choose Clean Page from the Mixer palette's menu access button at the bottom right of the palette; or
Click the New
Page button ![]() , and choose No
when asked to save the current page.
, and choose No
when asked to save the current page.
To save the current Mixer area as a page, choose Save Page or Save Page As in the Mixer palette's menu access button, and then enter a name for the page.
To load a previously saved Mixer area page, click the Load
Mixer Page button ![]() , or choose Load
Page in the Mixer palette's menu access button. Navigate to where
the page resides to select it.
, or choose Load
Page in the Mixer palette's menu access button. Navigate to where
the page resides to select it.
The Mixer palette's Unmix ![]() and Remix
and Remix ![]() buttons allow you to undo Mixer Tube and Mixer Knife actions.
Note the following points about these buttons:
buttons allow you to undo Mixer Tube and Mixer Knife actions.
Note the following points about these buttons:
Unmix allows you to undo the 20 most recent Mixer Tube or Mixer Knife actions.
The following page operations will clear the current history: New Page, Load Page, Clean Page, and Delete Page.
The Unmix/Remix functionality is limited to the current session of Paint Shop Pro; if you exit the application, restart it, and open the same image, the Unmix/Remix buttons are reinitiated.
Closing and opening the mixer palette will not reinitiate the Unmix/Remix states.
Mixer Tube and Mixer Knife actions cannot be undon/redone by choosing Edit > Undo / Redo, nor by clicking the Standard toolbar's Undo and Redo buttons, nor by pressing Ctrl + Z or Ctrl + Alt + Z.
The Mixer pages you work on and save via the Mixer palette are 500 x 500 pixels. You can, however, create larger, custom mixer pages as described below. (Note that Mixer pages cannot be smaller than 500 x 500 pixels.)
Create a new image by clicking
the New button ![]() on
the Standard toolbar, or choose File
> New. The New Image dialog appears.
on
the Standard toolbar, or choose File
> New. The New Image dialog appears.
In the Image Dimensions section, enter the desired dimensions for the Mixer page. Remember that the Width and Height must be at least 500 pixels.
In the Image Characteristics section:
Choose the Art Media Background option.
Choose a texture from the Texture drop list. The texture acts like an invisible surface on which Art Media pigments are applied.
Check the Enable fill color check box if you wish to fill the mixer page with a color. Be aware, however, that you cannot sample this color, nor will the Art Media tools affect the color.
If you marked the Enable fill color option, click the Color box and choose a fill color.
Click OK to create the new image.
*Optional: At this point you can apply Art Media pigment to the image.
Click the Save
button ![]() on the Standard toolbar, or choose File
> Save. The Save As dialog appears.
on the Standard toolbar, or choose File
> Save. The Save As dialog appears.
Navigate to the current directory where your Mixer pages are being read from— this is set in the File Locations dialog. The directory should either be:
...My Documents\My PSP Files\Mixer Pages; or
...Program Files\Jasc Software Inc\Paint Shop Pro 9\Mixer Pages
Save the new image in the .PspImage file format.
When you now choose to load another Mixer page, the custom page will be available.