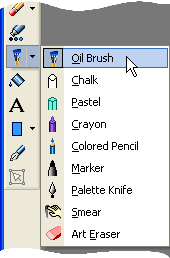
The Art Media brushes and tools in the Tools toolbar are shown here:

Use these tools when working on Art Media layers. Like any other tool, the Art Media tools have their own settings in the Tool Options palette to control their behavior on the image.
The purpose of these tools is to simulate the rich, expressive results you get when working on physical pigment media such as paint, chalk, pastel, and pencil. The tools will appeal not only to creative graphic artists, but also to photo-centric users looking for ways to touch up their images.
Note:
Although the Art Media tools support Presets, they do not support custom brush tips like the Paint Brush and other raster painting tools.
The Oil Brush and Marker tools simulate painting with a wet pigment media. The Oil Brush further simulates wet painting in that it will run out of paint during the stroke. To "get more paint," simply release the mouse button, then hold it down again and drag more paint strokes. You can also get more paint from the Mixer palette's Mixer area.
Note that the Oil Brush and the Palette Knife are the only Art Media tools capable of producing strokes with multiple colors on the brush head. This simulates what you could get using a real-life painting palette with multiple wet pigments on it. Additionally, when the Oil Brush or Palette Knife is active, you can "dry" wet strokes by choosing Layers > Dry Art Media layer; conversely you can make dried strokes "wet" by choosing Layers > Wet Art Media layer. (These commands are also available in the Layer palette's context menu.)
Note: Both the Dry Art Media layer command and the Wet Art Media layer command can be selectively undone in the History palette.
For more details on each of these tools, click its associated link below.
The Chalk, Pastel, Crayon, and Colored Pencil tools simulate artwork created with dry pigment media. Unlike the Oil and Acrylic brushes, these dry tools don't "run out" of their respective pigment media. Additionally, the pigment applied with these tools has less volume than what is applied via the Oil Brush or Acrylic Brush.
For more details on each of these tools, click its associated link below.
The Palette Knife can be used to smear art media pigments with a hard, knife-like edge, or it can be used to apply the pigments.
The Smear tool is to smear art media pigments as though you were using a finger or cloth.
The Art Eraser tool is used to erase pigment from the Art Media layer. When using the Art Eraser over areas covered with multiple paint strokes (such as those applied by the Oil or Acrylic brushes), you'll find that it may take multiple strokes with the Art Eraser tool to clean the area. Conversely, using this tool on strokes applied with the Chalk or Colored Pencil tool will yield quicker results.
For more details on each of these tools, click its associated link below.
While using any Art Media tool, raster painting brush (with the exception of the Warp brush), the Clone brush, the Color Replacer, or the Eraser and Background Eraser, you can quickly adjust the brush size without taking the cursor off the image and into the Tool Options palette. To adjust the brush size via the keyboard:
Press Alt + X to decrease the brush size by one pixel.
Press Alt + C to increase the brush size by one pixel.
Hold down Alt and Shift and press X to decrease the brush size by 20 pixels.
Hold down Alt and Shift and press C to increase the brush size by 20 pixels.
Hold down the Alt key and drag (to drag, hold down the left mouse button and then move the mouse) the left mouse button up or down to rapidly change the brush size.
Hold down the Alt and Shift keys and drag the left mouse button; the size will be set to its lowest value (3 pixels for the Art Media tools, and 1 pixel for the raster painting tools) and then you can drag to increase it from there.
One particular Tool Options setting to be aware of is the Trace check box. When this check box is marked, the current Art Media tool will select the pigment/paint color by sampling the data below the center of the brush regardless of the layer type. (This feature works much the same way the Clone Brush's Sample Merged tool option works). When you hold down the mouse button to begin the stroke, note that a single sample is performed, and the resulting color is used for the duration of the stroke.
This feature allows you to, for example, use the Art Media tools to trace over a photo residing on the Background layer, using colors in the photo as the pigment media source. With careful, detailed use of this feature you could create an impressionistic effect similar to what you can get with some of Paint Shop Pro's own effects or even third party plug-ins such as Virtual Painter.
Be aware that when tracing over elements such as an eye or other small, fine features, you'll get better results if you set your zoom level appropriately as well as the brush size setting in the Tool Options palette.