Creating a Building

Modeling Level Design

Merging the Building into a Neighborhood

Adding Mapping and Materials for the Building
You
are going to use three different mapping and material channels to
create the look of this building. First, you will map the bricks
and windows to the walls. Then you'll hang a sign on the front of
the garage and add a black tar roof.
Drag
materials to box:
You'll drag materials from the Asset Browser
to the box to transform it into a garage.
- From
the menu bar, choose Rendering > Environment. The Environment
dialog appears. In the Global Lighting group click the Ambient color
swatch. Drag the Whiteness slider down to a light grey and click Close.
Close the Render Scene dialog.
This will lighten up the scene so you can see
the results of any change to materials and rendering tests.
-
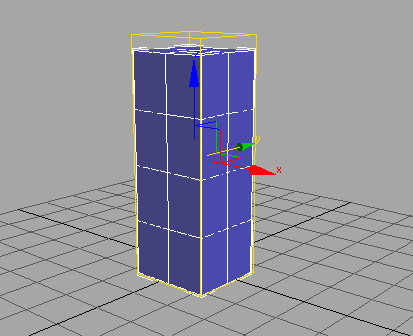
 Select
the box in the viewport if it isn't still selected, and open the
Modify panel. Open the Modifier List and apply a UVW Map modifier.
Select
the box in the viewport if it isn't still selected, and open the
Modify panel. Open the Modifier List and apply a UVW Map modifier. - In
the modifier stack display, drag the UVW Mapping modifier downward,
placing it between the Taper and the Box.
TipYou
can drag and drop modifiers to rearrange them in the stack display.
Hold down the
Shift key to
make a copy; hold down
Ctrl to
make an instance.
- In
the Parameters rollout, change the Mapping style from Planar to
Box.
Now any mapping you apply will appear on each
side of your building.
- Turn
off the Show End Result On/Off Toggle.
- Press
the plus button to expand the UVW Mapping modifier in the modifier
stack and choose Gizmo.
You'll see the original box without the Taper
or Bend.
- From
the Parameters rollout, adjust the Length and Width of the gizmo
so it conforms more closely to the box. If necessary, move the gizmo
to encompass the box.
ImportantThe
gizmo needs to be resized so that it almost has the same dimensions
of the box. If the gizmo isn't fitted properly, the mapping will
not be correct.
-
 On the
Utilities panel, click Asset Browser.
On the
Utilities panel, click Asset Browser. - Navigate
the Asset Browser to the \tutorials\level_design directory.
Minimize the Asset Browser for now. You'll need
it later when you apply a map to your box.
-
Open
the Modify panel and click Bend in the modifier stack display to
select the top of the stack.
- Go
to the Modifiers menu, choose Mesh Editing > Edit Mesh.
The Edit Mesh modifier appears at the top of
the stack.
-
 On the
Modify panel, in the Selection rollout, click Polygon.
On the
Modify panel, in the Selection rollout, click Polygon.TipIf
you expand the Edit Mesh in the stack display, the sub-object levels
are displayed and Polygon sub-object mode is selected.
- Turn
on Ignore Visible Edges.
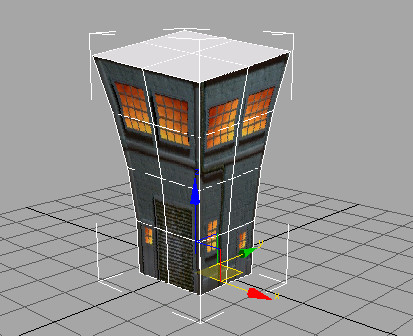
- Click
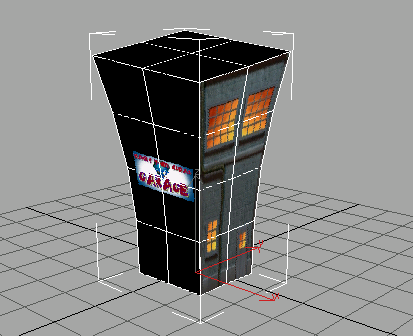
the side of the box that will be the front of the garage. All the
polygons turn red.
- Maximize
the Asset Browser. Drag bfrontgarage.jpg to
the selected polygons.
The box will change to a white color once you
assign the map. This is normal.
- Click
the other side of the box that will be the side of the garage.
Once you select the other side, the previous bfrontgarage.jpg map appears on
the box.
- In
the Asset Browser, drag bsidegarage.jpg to
the selected polygons.
You can now minimize the Asset Browser.
- In
the Selection Rollout, click the Polygon button to deselect it.
TipYou can also choose Edit Mesh from the modifier
stack.
Add
a garage sign texture:
You'll now use the Material Editor to create
a multi/sub-object material that consists of the materials that
will transform the box into a “cartoony” garage.
-
 On the toolbar, click the
Material Editor button.
On the toolbar, click the
Material Editor button. -
 In the
Material Editor, click the Pick Material From Object button and
then click anywhere on the box.
In the
Material Editor, click the Pick Material From Object button and
then click anywhere on the box.The garage materials you applied appear in the
first sample slot.
- The
material is a bit dark. To make it easier to see, you can increase
the multiplier of the lighting of the sample spheres. Right-click on
the highlighted sample sphere and choose Options. On the Material Editor
Options dialog change the Top Light and Back Light Multipliers to 2.0 and
then click OK.
Name the material Garage.
-
 Change
the sample sphere to a box by clicking the box on the Sample Type
flyout on the toolbar on the right side of the Material Editor.
Change
the sample sphere to a box by clicking the box on the Sample Type
flyout on the toolbar on the right side of the Material Editor.The sample is now a box. If you don't see the
two different sides of the mapped box, right-click in the sample
sphere and choose Rotate, then rotate the box within the Material
Editor sample.
TipDouble-click the sample to magnify the sample
slot. This will give you a better view of changes you make to the
material.
Next you will replace one of the standard materials
with a blend material within the multi-sub/object material.
- On
the Modify panel, click the Polygon button and select the side of
the box that is the front of the garage. In the Surface Properties
rollout, in the Material group, make a mental note of the ID number.
- Click
Polygon again to deselect it.
- In
the Material Editor, in the Multi/Sub-Object Basic Parameters rollout,
locate the material ID for bfrontgarage, then click its material
button.
The Material name changes to the name of the
material with the selected ID.
- Click
the Standard button to display the Material/Map Browser.
- Select
Blend, then click OK. In the Replace Material dialog that displays,
click OK to keep the old material as a sub-material.
This creates a blend material that will consist
of the bfrontgarage bitmap and the garage
sign bitmap you'll add in the next step.
- Open
the Asset Browser again. Drag garagesign.jpg to
the Material 2 button in the Blend Basic Parameters rollout in the
Material Editor.
- Next
drag bfrontgaragemask.jpg to
the Mask button labeled None.
The button label changes to reflect the filename.
- Name
the material Garage Front with Sign.
You will now make modifications to the size
of the garage sign bitmap so that it fits within the opaque area
in the mask.
- Click
the Material 2 button.
- In
the Blinn Basic Parameters rollout, click the button labeled M next
to the Diffuse color swatch.
TipIf
you hold the mouse over the button, garagesign.jpg should
appear.
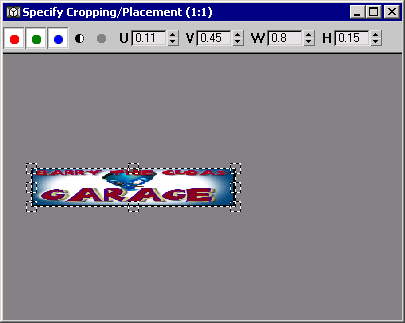
- In
the Bitmap Parameters rollout, in the Cropping/Placement group,
turn on Apply, then click Place.
- Click
View Image to display garagesign.jpg in
the Specify Cropping/Placement dialog.
Here you'll change the overall dimensions of
the bitmap so that it will fit within the area specified in the
mask.
- Enter
the following values in the U, V, W, H fields:
U=.11
V=.45
W=.80
H=.15
The garage sign changes size. Close the window
after entering the values.
-
 Click
the Go to Parent button three times.
Click
the Go to Parent button three times. -
 On the
toolbar, click the Quick Render button or press F9 to render the scene.
On the
toolbar, click the Quick Render button or press F9 to render the scene.
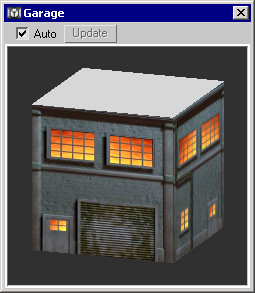
You can see the Blend material displayed in
the Material editor and in the rendering. But you can't see the
Blend material in the viewport, unless you happen to have the right
combination of drivers and graphics card.
Make
a black material for the roof:
- In
the Material Editor, in the Multi/Sub-Object Basic Parameters rollout,
click the Material button for ID #1.
- In
the Blinn Basic Parameters rollout, click the Diffuse color swatch.
The color selector appears.
- Drag
the Whiteness slider up to create a black color, then close the
color selector.
- Name
the material Black Roof.
The roof of the garage turns black in the viewport.
- Click
the Go to Parent button. Close the Material Editor.
- Render
the scene to see the final results.
- Save
your work as mygarage.max.