Creating the Torso

Modeling a Low-Poly Body

Modeling a Low-Poly Head

Creating the Arms
In
this lesson, you create the arms of the helicopter pilot. For the
upper arm and forearm, you can use the same modeling techniques
that you used to model the pants; that is, using a cylinder and
extruding polygons. To create the hand, you can build it based on a
Box primitive. Later, you will attach the hand to the arm and connect
the gap using the bridge tool.
Create
the arm:
- Continue
working on your file from the previous exercise, or load the file soldier03.max from \tutorials\low_polygon_modeling.
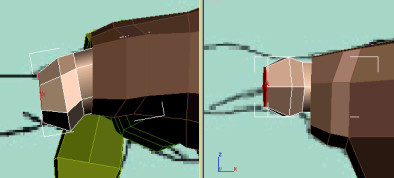
- In
the Left viewport, zoom in on the T-Shirt sleeve.
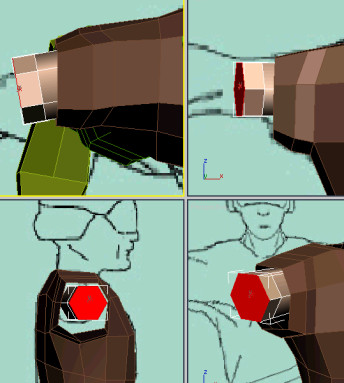
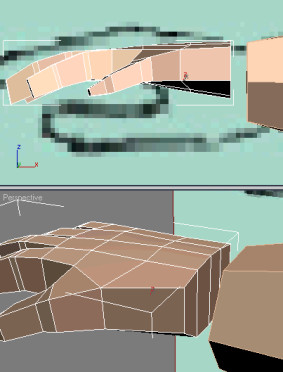
- Create
a Cylinder centered on the sleeve. Set the parameters as follows:
Radius: 12
Height: 30
Height Segments: 1
Sides: 6
- Move
and rotate the cylinder in the Top viewport so that it's oriented
with the sleeve and protrudes slightly from the sleeve.
- Convert
the cylinder to editable poly format.
-
 Go to
Polygon sub-object level.
Go to
Polygon sub-object level. - In
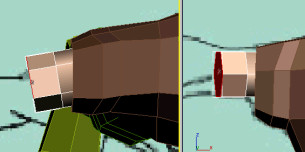
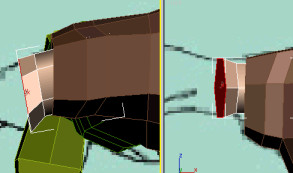
the Left viewport, select the hexagon facing you.
- On
the Edit Polygons rollout, click Extrude. Drag the selected polygon
to create an extrusion for the biceps.
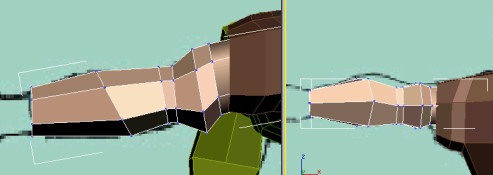
- Using
Move and Local Scale, adjust the biceps to make them bigger.
- Create
another extrusion to close the biceps near the elbow. Use the Move,
Rotate, and Scale tools to adjust the polygon at that level.
- Create
an additional extrusion for the elbow.
This allows the elbow to deform properly when
animating the character.
- Create
two more extrusions to create the forearm. Adjust them to fit the
reference images.
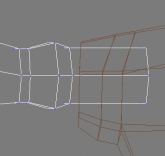
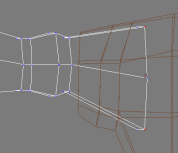
- Right-click
the Front viewport to activate it.
- Press F3 to set the viewport to wireframe
display.
Notice the arm inside the sleeve.
-
 On the
Selection rollout, go to the Vertex selection level.
On the
Selection rollout, go to the Vertex selection level. - Adjust
the vertices in the viewport to get a better flow between the arm
and the sleeve.
- Press F3 again to return the viewport to
shaded display.
- Exit
the sub-object level when done.
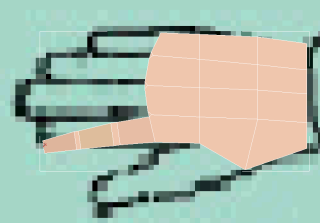
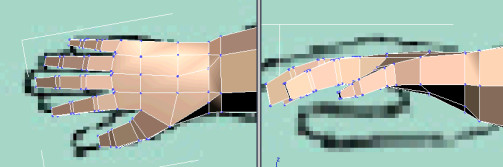
Create
the hand:
- Continue
working on the same scene.
- Zoom
in on the hand sketch in the Top viewport.
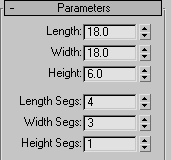
- Create
a Box with the following parameters:
- Use
the Move tool to position the box properly in the Top and Front
viewports.
- Convert
the box to editable poly format.
-
Go to
Vertex sub-object level.
- Region-select
vertices in the Top viewport and move them to follow the shape of
the back of the hand.
NoteIt
is important to use region selection in the Top viewport to ensure
you are selecting the top and the bottom vertices on a vertical edge.
-
 Go to
Edge sub-object level.
Go to
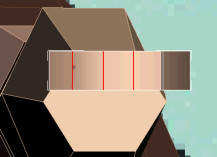
Edge sub-object level. - In
the Left viewport, select the three vertical edges separating the
fingers.
- On
the Edit Edges rollout, click the Chamfer Settings button.
This opens the Chamfer Edges dialog.
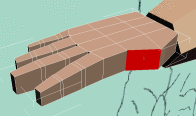
- Set
Chamfer Amount to 0.5 to separate the polygons that
will be used to create the fingers. Click OK to exit the dialog.
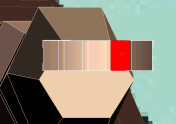
-
On the
Selection rollout, click Polygon.
- In
the Left viewport, select the polygon that represents the index
finger.
- On
the Edit Polygons rollout, click the Bevel button.
- Drag
the selected polygon until you reach the first knuckle. Move the
mouse downward slightly to scale down the selected polygon.
NoteThe
Bevel tool acts like a combined extrusion/scale tool. Alternatively,
you can use the Extrude command and then manually scale the selected
polygon in a uniform or nonuniform way.
- Create
another extrusion/bevel for the knuckle.
The extra detail provided here ensures that
the finger deforms properly when animated.
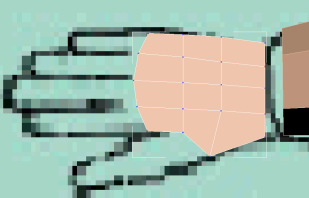
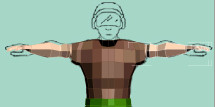
- Continue
beveling the finger all the way to the tip.
- Repeat
this procedure with the other fingers.
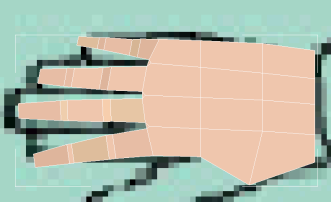
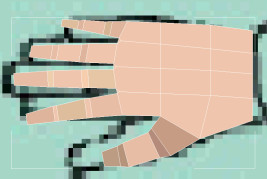
When you are done, the hand should look like
the following illustration.
- In
the Perspective viewport, select the polygon representing the thumb.
- Use
the Bevel tool to create the thumb, as you did earlier. This time,
however, you'll need to use the Rotate tool with each extrusion
to curve the thumb slightly.
-
Go to
Vertex sub-object level.
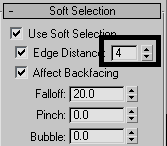
- Select
all four of the vertices at the tip of the index finger.
- Expand
the Soft Selection rollout and turn on Use Soft Selection.
- Turn
on Edge Distance and set its value to 4.
This ensures that soft selection does not extend
beyond four edges and therefore will not affect the neighboring
finger.
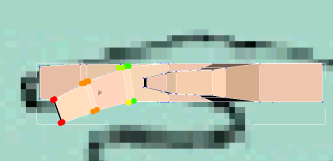
- In
the Front viewport, move and rotate the finger to give it a more
relaxed look.
- Adjust
the other fingers as well. Use the Move, Rotate, and Scale tools
to give the hand reasonable proportions.
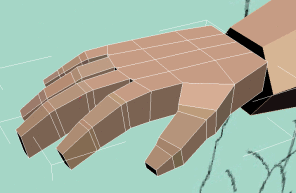
- Adjust
the vertices around the wrist to make that side more rounded.
This will make it easier to connect the hand
to the arm later.
NoteYou
might want to toggle Soft Selection mode on or off to round off
the wrist to your liking.
- Exit
sub-object level when done.
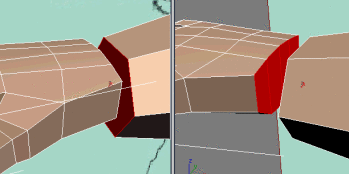
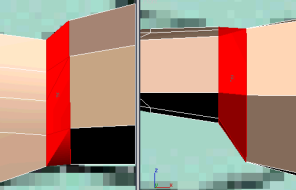
Attach
and bridge the objects:
- Continue
working from the previous lesson.
- Select
the Arm object.
- On
the Edit Geometry rollout, click the Attach button and then click
the hand in any viewport to attach it to the arm.
- Right-click
to exit the Attach function.
-
Go to
Polygon sub-object level.
- Select
the polygons that face each other on the hand and arm.
- On
the Edit Polygons rollout, click the small Settings button next
to Bridge. A dialog appears.
- The
default settings should work fine but try out values for Twist and
Segments to view the end results. Remember that changes will only be
retained after you click OK.
- If
necessary, go to Vertex sub-object level and fine-tune the area around
the wrist.
- Exit
sub-object level when done.
- Rename
the object Arm_Right.
Mirror
and clone the arm:
- Continue
working on your scene from the previous exercise.
- In
the Front viewport, select the Arm_Right object.
-
 On the
main toolbar, click the Mirror button
On the
main toolbar, click the Mirror button - Leave
Mirror Axis set to X and set Clone Selection to Instance. Click
OK to dismiss the dialog.
- Move
the cloned arm in the Front or the Top viewport to reposition it
properly.
- Rename
the clone Arm_Left.
- Save
your file as My_Soldier_Arms.max.