Mapping a Character

Mapping a Character

Mapping the Helmet

Mapping the Shirt
In this lesson, you use the UVW modifier to
map a T-shirt onto a helicopter pilot. The materials have already
been provided, you need only apply them to the objects and then
use the proper mapping techniques.
Apply
the material to the shirt:
- Load
the file pilot01.max from
the \tutorials\unwrap_uvw folder.
- Zoom
in on the pilot’s shirt in the Perspective viewport.
- Press M to open the Material Editor.
- Find
the material named Pilot_Shirt_Boots_&_Belt (it
should already be selected). Drag this material and drop it on the
shirt in the Perspective view.
The shirt turns black.
- Close
the Material Editor.
Apply
and adjust the Unwrap UVW modifier:
-
 Select
the shirt then go to the Modify panel.
Select
the shirt then go to the Modify panel. - From
the Modifier List, choose Unwrap UVW.
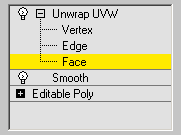
- In
the modifier stack display, expand the Unwrap UVW modifier and then
choose Face sub-object level.
- Press Alt+W to switch to a four-viewport
configuration.
- Adjust
the zoom factor in the Front viewport so that you see the T-shirt
in its entirety.
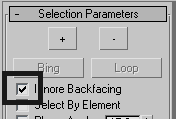
- Using
Region Select, drag a window around the shirt.
Only those polygons facing the Front viewport
are selected. Notice in the Selection Parameters rollout that face
selection is set to Ignore Backfacing by default.
- On
the Map Parameters rollout, click the Planar button. In this case
the planar gizmo was created using the correct orientation and the correct
size.
- Click
the Planar button again to turn it off.
- On
the Parameters rollout, click Edit. The Edit UVWs dialog appears,
displaying the selected polygons against a checkered background.
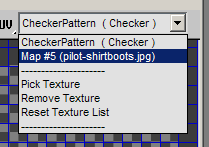
- In
the top-right corner of the dialog, from the drop-down list, choose
the map that displays the texture of the T-shirt. This turns the checkered
background into a tiled version of the map that is part of the material
applied to the object.
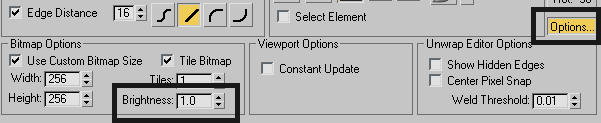
- In
the bottom-right corner of the dialog, click the Options button.
- In
the Bitmap Options group that appears, set Brightness to 1.0.
This makes the background image easier to read.
-
 On the
dialog’s main toolbar, make sure the Freeform Mode tool is active.
On the
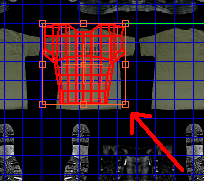
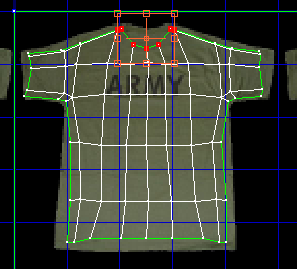
dialog’s main toolbar, make sure the Freeform Mode tool is active. - Place
the cursor on the bottom-right corner of the gizmo surrounding the
red area representing the selected polygons. The mouse is now in
Scale mode. Click and drag to scale the selection until it is about the
size of the t-shirt in the background.
- Zoom
in on that area in the dialog. You can use the mouse wheel to zoom
and pan, as in a viewport.
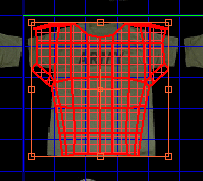
- Place
the cursor anywhere inside the area of the selected polygons. You
are now in Move mode. Reposition the selected polygons over the
T-shirt with the label “Army” on it.
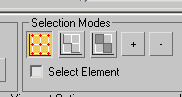
- In
the Selection Modes group at the bottom of the dialog, click the
Vertex Sub-Object Mode button.
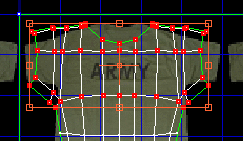
- Drag
a region to select all the vertices that make the top half of the
torso, including the arms.
- Using
Scale (corner boxes) and Move (cursor inside the selection area),
adjust the vertices so they are all contained inside the t-shirt
image.
- Select
the bottom vertices representing the lower section of the shirt.
Adjust scale and position to equalize the flow of vertices on the
3D-object structure.
- Continue
selecting and adjusting groups of vertices to fit the wireframe
structure to the image in the background. Always try to keep the
flow of the vertices even to prevent any stretching in the texture,
especially when the texture has patterns or labels on it.
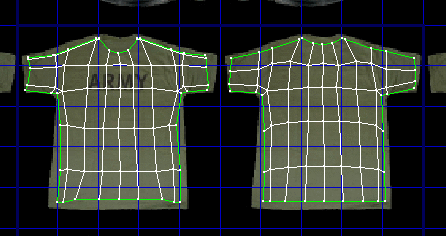
Map
the back of the shirt:
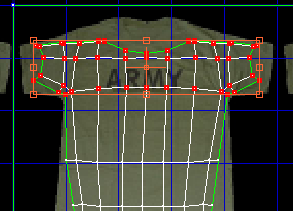
- Right-click
the label in the top left corner of the Front viewport. From the
menu that appears, choose Views > Back.
- In
the Modifier stack, switch the Unwrap UVW sub-selection level to
Face.
- In
the back viewport, drag to region-select all the polygons that make
the back of the T-shirt.
- On
the Map Parameters rollout, click the Planar button once to reset
the mapping coordinates of the selected faces.
- Click
the Planar button one more time to turn it off.
- Using
Scale and Move modes as you did earlier, position the back faces
on top of the back of the T-shirt in the background picture.
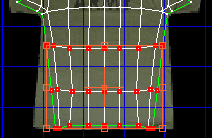
- In
the Selection Modes group at the bottom of the dialog, click the
Vertex Sub-Object Mode button.
- Adjust
groups of vertices, as you did earlier, to fit the wireframe structure
on top of the background image.
- Exit
the Edit UVWs dialog when done.
- Restore
the Back viewport to a Front view.
- In
the Modifier stack, exit the sub-object level.
- Save
your file as my_pilot_shirt.max.
.png)
.png)