


Applying Logic to Crowd Behavior
In the previous lesson, you learned how to switch a team from one behavior to another by animating the Active status. You did this by setting up and solving the first part of the simulation, and then using that feedback to set up the second part. This isn't a very flexible method, though. If you change the target position, or the delegates' speed, the frame where the behaviors should switch would change, and you'd have to move at least two keys. With more complex simulations, such as those with multiple or moving targets, or delegates that travel different distances, modifications can be difficult.
For complex situations, you can assign cognitive controllers to delegates and teams instead of behaviors. The cognitive controller has several states. Each state can contain one or more behaviors, each with a different weight. You set the states up as a diagram and link them with transitions. The transitions use MAXScript scripts to determine when one state relinquishes control to another.
In this lesson, you'll use a cognitive controller to change a team's behavior from Seek to Repel when the team members reach the box.
Set up the lesson:
This scene contains 10 delegates scattered in a spherical pattern about a small, centrally located box.
Set up the behaviors:
 Use
the Edit Multiple Delegates dialog to turn off Constrain To XY Plane
for all the delegates.
Use
the Edit Multiple Delegates dialog to turn off Constrain To XY Plane
for all the delegates.The method for doing this is covered in the previous lesson, Applying Avoidance .
Use the cognitive controller:
Instead of assigning these behaviors to the delegates, you'll use them to build a cognitive controller and assign the controller to the delegates.
 On the
Setup rollout, click Cognitive Controllers.
On the
Setup rollout, click Cognitive Controllers.This creates a new cognitive controller with the name Cognitive Controller and activates the Create State tool (the button at the left end of the toolbar).
This adds two state boxes to the controller. Each state can contain any number of behaviors.
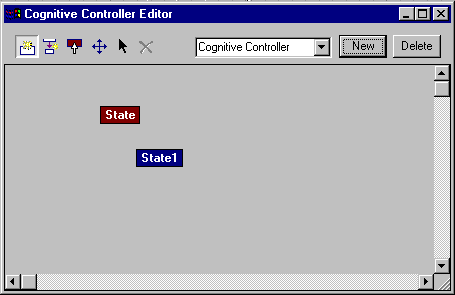
The cognitive controller editor with two states added
The first state you added is dark red, which means it's the Start state. It is executed first when the cognitive controller begins working. You can set any state to be the Start state.
To make the delegates seek the box first, you'll assign the Seek behavior to the first state. You'll also make the states' names more descriptive, and assign a behavior to the second state.
The State dialog opens. The name of this dialog reflects the name of the state at the time you open it. You can change the name, and the new name is displayed the next time the screen refreshes.
The Seek behavior is highlighted in the list. You can change the weight, so that if a state contains several behaviors, some can predominate over others.
When you opened the Select Behaviors dialog, the screen refreshed and the State dialog name changed to Seek.
Create a transition:
You'll add a transition between the two states, and create a short script to tell the cognitive controller when to switch between them.
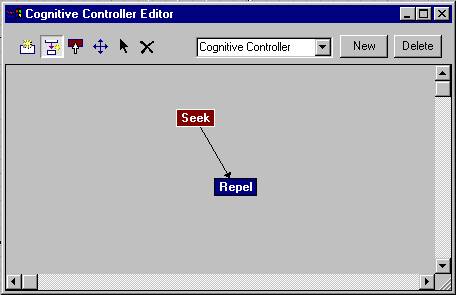
An arrow points from the first state to the second. This is the transition.
This makes the transition take place over 10 frames instead of 25. A shorter transition causes faster reactions.
Note the other settings. If you change the priority, and a state has two or more outbound transition conditions, all of which are true, the one with the highest priority takes precedence. You can also change the rates at which a transition eases out of one state and into the next.
fn TestDist del t = (
get_dist=distance $box01.pos del.simpos
if get_dist < 120
then 1
else 0 )
Alternatively, you can load the MAXScript file test_dist.ms from the tutorials\character_animation\crowd_basics directory in your 3ds Max path.
This script tests, at each frame, the distance between each delegate and the box. If it is less than 120 units, the delegate moves into the next state, which uses the Repel behavior.
The name of the function, which is the second word of the script (after "fn"), must appear in the Transition dialog as well.
The script, which starts with "get_dist," calculates the distance between the position ([name].pos) of a specific object ($box01) and the position of a generic delegate (del.simpos). "Simpos" is a special position property used to determine a delegate position during a simulation solution.
The software executes the transition script once per frame for each delegate that uses this cognitive controller. Each time the script is executed, the cognitive controller substitutes a subsequent delegate for "del".
The first time the script is executed at a given frame, it calculates the position the distance between the objects box01 and delegate01. The second time, it calculates the position the distance between the objects box01 and delegate02, and so on. To see each delegate's name as its position is tested, insert this line in the script anywhere between the first line and the last line:
print del.name
Be sure to have a Listener window open (press F11) before you run the solution.
To learn more about how scripts work in transitions, read the reference topics Cognitive Controller Editor and State Transition dialog, where you'll find more sample scripts with descriptions of their components and functions.
Two more short steps remain before you can test the transition.
The delegates move toward the box until they're fairly close, at which point they turn and move directly away.