


Using Crowd with Animated Non-Biped Objects
The 3ds Max Crowd animation system has a number of special features designed for applying behaviors to non-biped objects. In this lesson, you'll learn how to create a flock of birds that automatically flap their wings when they fly upward, and glide without flapping when they fly horizontally or downward. You'll use the Crowd system's non-bipedal motion synthesis methods to achieve this.
You'll animate several delegates and link them with clones of an animated global object. Next, you'll use clip controllers to define clips from the global object's animation. You'll define states to specify which animation clip the clones should use, depending on their parent delegates' speed, acceleration, pitch, and so on. Crowd will blend the clips and synthesize an animation based on the clip and state information.
This scene uses a vector field, which is a special type of 3ds Max space warp that enables crowd members to move around complex objects.
Set up the lesson:
This file contains the basic setup for the birds scene. It contains a crowd object and a "flock" of five delegates in V formation, as well as a vector field surrounding a C-shaped "obstacle" object.
Examine the vector field:
The vector field is already set up, so you needn't make any changes to it, but it's useful to take a quick look at it to see how it works.
The vector field object is the gizmo shaped like two double-headed arrows in an X formation, near the C-shaped object. It's probably easiest to use the Top viewport to select this.
The lattice is a yellow, box-shaped, three-dimensional grid surrounding the obstacle object. Its settings determine the location, resolution, and maximum volume of the vector field. This field uses a high-resolution grid, so the display in the Perspective viewport is almost solid yellow, but you can see the grid clearly in the orthogonal viewports.
The range is typically an expanded version of the obstacle object, and is used by the vector field to calculate vectors within the lattice.
The blue lines represent forces used by the Vector Field space warp to guide delegates through this volume. As you can see, their spacing is determined by the lattice resolution, and the overall shape of the field is determined by the range volume.
Assign behaviors:
Now, any delegates using the Space Warp behavior will use the vector field to guide their motion.
 On the
Avoid Behavior rollout, click the Multiple Selection button.
On the
Avoid Behavior rollout, click the Multiple Selection button. This instructs the delegates to avoid each other.
 Open
the Behavior Assignments dialog.
Open
the Behavior Assignments dialog.The delegates have already been grouped into a team (Team0).
You can stop the simulation at any time by pressing ESC. As Crowd solves the simulation, the delegates move around the obstacle object, roughly following its contours while remaining at their starting height. Some might fly away, which you'll remedy in the next procedure.
To allow the delegates to fly up and down, you turn off the switch that constrains the delegates to the XY plane.
Modify the delegates:
 On the
Setup rollout, click Multiple Delegate Editing.
On the
Setup rollout, click Multiple Delegate Editing.The delegates have already been added to the Delegates To Edit list. You don't need to highlight them.
You can also vary the delegates' speeds.
Turning on Random gives you access to both Average Speed settings.
Crowd will use random values between 3 and 5 units per frame for the delegates' speeds.
The delegates move in three dimensions, soaring and then descending.
If any of the delegates still fly away, try changing its starting position, or if you want to keep the V formation, move all of them together.
Reveal the eagle:
You'll assign an animated bird object to each delegate.
Only the Eagle object was hidden. If you haven't changed the Perspective view, you'll see it in that viewport. If you have, and the Eagle object is not visible, use SHIFT+Z to undo viewport changes.
The bird flaps its wings from frames 0 to 186 and then remains still. The last key frame is 288.
The bird is animated in place, so you can combine the delegates' motion with the bird's animation to create a convincing animation.
There are quite a few interim keyframes, even while the bird doesn't move, because Motion Clips uses interim frames to blend animation clips when it synthesizes an object's animation.
Assign animated objects to delegates:
 Select
the Crowd object and click Scatter to open the Scatter Object dialog.
Select
the Crowd object and click Scatter to open the Scatter Object dialog. How Many is already set to 5.
If you don't do this, the existing animation mixes with the synthesized new keyframes, which can create confusing and erroneous results.
Next, you'll link the delegates with the eagle clones, repositioning the clones at the same time.
 Click
Objects/Delegate Associations to open its dialog.
Click
Objects/Delegate Associations to open its dialog.
The two lists appear in alphabetical order, indicating the order in which each delegate and eagle mesh are to be paired. You can change the order by highlighting list items and clicking the up and down arrows in between the two lists. In this case, it's not necessary.
This moves each object to its respective delegate's position, and reorients the object as necessary to align its local axis with that of the delegate. In the viewports, the eagle clones line up with the delegates. But they're not linked yet.
This creates a parent-child hierarchy for each pair, with the delegate as the parent in each pair.
The eagle clones remain in their initial, wings-raised animation position as they move.
Use Clip Controllers:
You'll use Clip Controllers to apply the correct animation clips from the original eagle object to the clones. Three clip controller types are available:
This specifies the Eagle as the Global Object, from which the eagle clones' animation will be derived.

The dialog's three tabbed panels let you set up the clip controllers in a logical workflow.
These controls are useful only when you've animated the global object's position and rotation and want to incorporate this animation in the resulting states.
The MotionClip Parameters dialog opens with the default clip name Motion Clip.
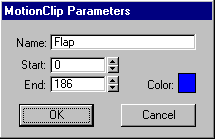
The MotionClip Parameters dialog defines animation clips from the global object. The current end frame is automatically set to the last key in the global object's animation.
The clips use different colors so you can distinguish them in Track View.
Define states:
You'll define two states to specify how a delegate moves at any point in time. You can specify values or value ranges for one or more of these motion categories: speed, acceleration, pitch, pitch velocity, and heading velocity. You can also use MAXScript to define a state. As you define states, you assign clips to them. For example, if your animated object uses different motions for turning sideways or slowing down, you create a state for each one and assign it the appropriate motion clip.
In this procedure, you'll create one state for upward motion that uses the Flap clip, and a second state for downward motion that uses the Glide clip.
You'll use this dialog, which has the same name as the state (in this case, “Flap”) to apply the Flap state when the delegate moves upward.
The Range settings become available. Use these to specify the range of pitches to activate this state.
The bird will flap its wings whenever its pitch is between 1 through 180 degrees (when it's flying upward).
The bird will stop flapping its wings whenever it's flying downward or level. You can also set different flapping rates for different pitches by creating more clips when you set up the global object.
Specify master motion clips:
This is the final part of the motion clip setup procedure. Here you specify the master motion clips, that is, the objects to which the synthesis is to be applied. You also blend the clips and synthesize the animation.
The Global Object doesn't appear in the Select Object To Copy dialog because you designated it as the object from which the clips are derived.
Auto Blend creates natural-looking transitions between the clips. To see an example of the results of Auto Blend, set From Clip to Glide and To Clip to Flap. The blend from gliding to flapping begins on the 80th frame of the Glide clip.
This generates the animations for the clones. You don't have to solve the crowd simulation unless you change delegate or behavior settings.
 Click
Time Configuration and in the Playback group, turn off Real Time.
This turns off real-time animation playback. Maximize the Perspective
viewport and zoom in.
Click
Time Configuration and in the Playback group, turn off Real Time.
This turns off real-time animation playback. Maximize the Perspective
viewport and zoom in.Although the birds should flap their wings only when they fly upward, and then stop flapping to glide downward, it isn't quite working that way. The problem is that the clips are too long for their matched states. For instance, a bird might fly upward for only 50 frames, but the animation clip for the Flap state is 187 frames long. You'll need to modify the clips.
You might wonder why we didn't start with a Global Object whose animation was set up expressly for use with motion synthesis. In a production environment, you might be working with models containing animation originally created for other purposes; in this lesson, we're attempting to simulate such a situation. The Synthesis dialog lets you specify exactly which frame ranges to use when synthesizing motion from a Global Object's animation.
Examine the Block and Slave controllers:
Before you modify the clips, take a look at the "behind the scenes" results of the synthesis process; that is, the creation of block and slave controllers.
In the track hierarchy, the global motion clip from the Eagle object's animation is the parent to the master motion clips for the eagle clones. Each master motion clip is a different sequence of blocks, created during the synthesis process. The Flap and Glide blocks are each a different color.
Modify the clips:
Examine the Global Object's animation to see how to improve the synthesis.
The wing-flapping animation repeats four times. The clip needs only part of one cycle, though, because the clip controller can blend between the last frame of one cycle and the first of the next. The flap cycle should start with the wings all the way up and end with the wings slightly up.
 Move
the time slider back to frame 0 and turn on Key Mode Toggle.
Move
the time slider back to frame 0 and turn on Key Mode Toggle. Click
Next Key repeatedly while watching the eagle object. Stop at frame
48.
Click
Next Key repeatedly while watching the eagle object. Stop at frame
48.The wing-flapping animation returns to the initial wings-up position at frame 48.
 Click
Previous Key once.
Click
Previous Key once.The last key before the end of the flap cycle is 42. The Flap clip should go from frame 0 to frame 42.
The glide cycle is different. Because there's no actual animation, you must make the clip long enough to avoid generating too many keyframes (as the result of repeating a short clip many times to fill the state), while keeping it short enough to fit within the state length.
For this lesson, you'll set a glide-cycle length of 10 frames. In your own animations, experiment to find a good length for different clips. Even with animation clips, such as the wing-flap cycle, you may need to scale or adjust the animation so the cycle doesn't exceed the shortest length of a state.
Clip controllers perform spline interpolation over the intersection of each pair of blocks using keys within the blocks. To avoid this interpolation altering the motion within the clip, insert additional keyframes near the ends of the motion. This makes the interpolation occur at the extremes of the clip, rather than over its entire length.
So, for the glide clip, you'll move some keys immediately inside each endpoint. These keys are of Bend modifiers applied to the wings, and have already been set to use linear interpolation.
It helps to watch the status bar text while you do this.
The key icon will overlap the icon of the key at frame 211.
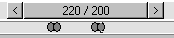
Enlarged view of track bar, showing keys at frames 211, 212, 219, and 220.
In the above illustration, the track bar has been "zoomed in" for illustrative purposes by shortening the active time segment. You'll see more overlap on your screen.
Now you have keys at frames 211 and 220 that define the clip ends, and keys immediately inside the ends that can be used for interpolation.
To change the clip lengths used for synthesis, edit the global clip controller.
Redo the synthesis:
From Clip and To Clip now reflect the changed clip lengths. Also, after the Auto Blend, the Blend Start items change.
Hide the Global Object and the delegates:
At this point you can hide the Eagle object and the delegates. This makes it easier to see the synthesized motion of the eagle clones.
 Use
Select By Name to select all the delegates and the Eagle object.
Use
Select By Name to select all the delegates and the Eagle object.In this lesson, you worked with a global object that was animated in place. All transformational animation was supplied by the Crowd system. You can also derive delegate motion from the global object's transformational animation, if it exists.
The Global Object's animation wasn't ideal for the crowd simulation. You learned how to adapt an animation so it works better in a simulation.