


Animating the Biped with Footsteps
Now that you're familiar with freeform animation, you'll learn the basics of footstep animation. Footstep animation only controls the placement of the biped's feet. In this lesson, you'll create a footstep animation where Dr. X walks for eight steps.
You can see what your animation should look like by viewing the preview animation, drxwalk.avi, in the tutorials\character_animation\quick_start folder.
Set up the lesson:
This scene contains Dr. X with Physique applied to the mesh, and all envelopes adjusted. The mesh is ready for animation.
Hiding the mesh makes it easier to select the biped and test the animation. This is especially true if you have a highly detailed mesh.

Create the footsteps:
Now you'll make Dr. X walk forward in a straight line.
 Open
the Motion panel.
Open
the Motion panel. On the
Biped rollout, turn on Footstep Mode.
On the
Biped rollout, turn on Footstep Mode.Using the rollouts that now display, you'll create footsteps for Dr. X.
 On the
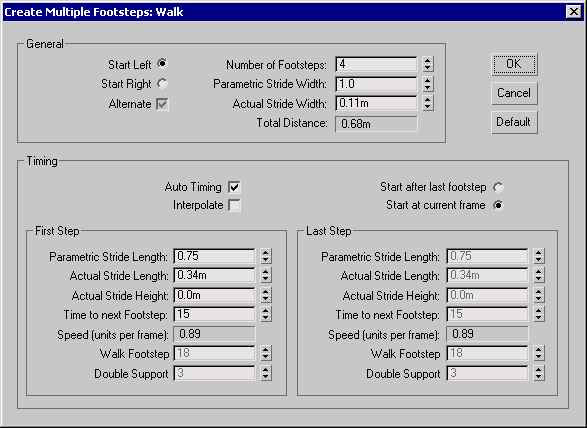
Footstep Creation rollout, click the Create Multiple Footsteps button.
On the
Footstep Creation rollout, click the Create Multiple Footsteps button.The Create Multiple Footsteps: Walk dialog opens.
 In the
Footstep Operations rollout, click Create Keys For Inactive Footsteps.
In the
Footstep Operations rollout, click Create Keys For Inactive Footsteps.
When the footstep keys are created, Dr. X changes his pose.
 Right-click
in the Perspective viewport, and then click the Play Animation button.
You can also scrub the time slider to examine the animation more
closely.
Right-click
in the Perspective viewport, and then click the Play Animation button.
You can also scrub the time slider to examine the animation more
closely.
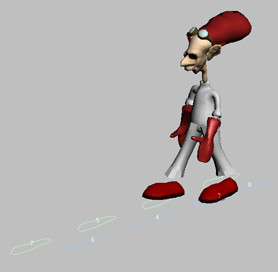
By just watching the biped walk, you can tell that Dr. X's walk doesn't look right. You can see that the feet are too close together, and his arms are straight down at his side. In addition, the shoes and hands will collide or intersect with other body parts when the mesh is displayed again. Next, you'll do some fine tuning to make Dr. X's walk look better.
Fine-tune the animation:
In this part of the lesson, you'll make a few adjustments to clean up the animation.
 In the
Display group, click the Show Footsteps And Numbers button.
In the
Display group, click the Show Footsteps And Numbers button. If the
footsteps still fail to display, click the Show Footsteps And Numbers
button and hold until you see the button flyout. Choose the Show
Footsteps And Numbers button from the flyout.
If the
footsteps still fail to display, click the Show Footsteps And Numbers
button and hold until you see the button flyout. Choose the Show
Footsteps And Numbers button from the flyout.The footsteps turn white after they're selected.
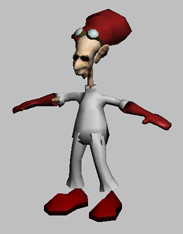
The biped's stance widens to more closely match how it looked in Figure mode. However, now that the stance is wider, the hands will intersect the legs when the mesh is unhidden. You'll fix that next.
Rotate the arms:
With the wider stance, the hands intersect the legs as they swing past. Now you'll do a little freeform animation to give the arms some clearance.
 On the
Biped rollout, turn off Footstep mode.
On the
Biped rollout, turn off Footstep mode.Now you can rotate Dr. X's arms.
 In the
Track Selection rollout, click the Symmetrical button.
In the
Track Selection rollout, click the Symmetrical button.Notice the keys in the time line. At each of the keys, you'll rotate the arms.

 Turn
on Auto Key and Key Mode Toggle, then click the right arrow on the
time slider.
Turn
on Auto Key and Key Mode Toggle, then click the right arrow on the
time slider.The time slider jumps to frame 30.
 On the
main toolbar, click the Rotate button.
On the
main toolbar, click the Rotate button.The arms are rotated out away from the body.

Don't forget the key at frame 0.
 Turn
off Auto Key to end the animation process.
Turn
off Auto Key to end the animation process.
Save the motion in a BIP file:
You can save the footstep motion for later use in other scenes.
 On the
Biped rollout, choose Save File.
On the
Biped rollout, choose Save File.The Save File dialog displays.
The footstep motion is saved in the BIP file.
Prepare for playing or rendering:
 Press the H key. In the Select From Scene
dialog, click Select All button, and then click Select.
Press the H key. In the Select From Scene
dialog, click Select All button, and then click Select.The biped is now hidden.
The Unhide Objects dialog displays.
Dr. X's mesh is unhidden.
Click
the Perspective viewport and then click the Play Animation button.
You can find a finished version of this scene in the file cs4_qs_drX03_footsteps.max.