


Using Weighted List Controllers
There are many different animation controllers in 3ds Max. Each has its own attributes, strengths, and uses, and each has associated techniques. You can combine different controllers for unique animation effects using weighted list controllers. By changing or animating the weights of controllers in the list, you can adjust each controller’s effect, and animate in a nonlinear way. Here, you’ll learn to animate the weights and to see what they can do.
Use the Weighted List controller:
With the Position List controller, you can add other controllers on top of the Bezier Position controller you already have. Here you will add a Noise controller to layer the animation of a Ping-Pong ball.
A Ping-Pong ball and table are visible.

Ping-Pong volley
The Ping-Pong ball bounces over the net in a simulated volley. The last four bounces happen in place. You can use weighted list controllers to remove those last four bounces, and replace them with a rolling motion. A Noise controller can be added to get rid of the bouncing, and instead you will have the ball wobble around on the table, then stop.
Notice that the Assign Controller rollout displays the Position controller as a Bezier Position for the Ping-Pong ball. Use the pan hand in the window to read the label.
There are at least three different places where you can assign a controller to an object: in Track View windows, on the Motion panel, or from the Animation menu. You'll use the Animation menu to assign the controller, and the Motion panel to edit the weights.
The viewport trajectory changes into a frenzied red spline. Don't worry, this is correct.
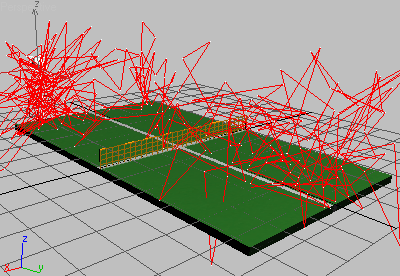
Noise controller: A frantic trajectory
You can see that Noise Strength is indented beneath the Noise Position. If you scroll down a little, you can see that the Weight is listed as well.
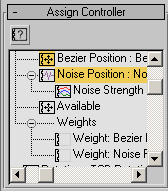
The new Noise Position track appears below the Bezier Position track. The old animation has not been replaced; instead, the new Noise controller has been added to it.
If you play the animation, the ball flies all over the place. It is following the position controller tracks and the noise controller tracks. This probably isn’t what you want here. You will need to adjust the noise parameters and the weighting of the controllers.
Adjust the Noise Frequency and Strength:
The Noise Controller properties dialog is displayed
This creates the motion of the ball wobbling around on the table surface.
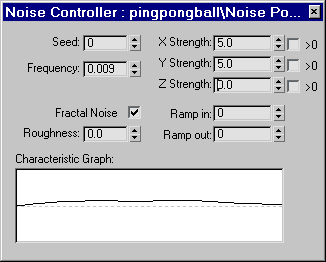
Noise Controller Properties dialog
The Noise is now less jittery, in fact barely visible. You need to weight the controllers so the noise doesn't affect the bouncing until frame 201, and to turn off the position controller after frame 200.
Animate the weights:
 Turn
on Auto Key.
Turn
on Auto Key.
 The
Auto Key button turns red.
The
Auto Key button turns red.
You'll set keys at frames 200 and 201 for the Bezier Position. You'll also set keys at frames 200, 201 and 0 for the Noise.
The spinner is outlined in red, showing a keyframe has been placed there.
The Weight value is reset to 0, and a key is set.
This removes the bouncing from this point on.
 In the
animation playback controls, click Go To Start.
In the
animation playback controls, click Go To Start.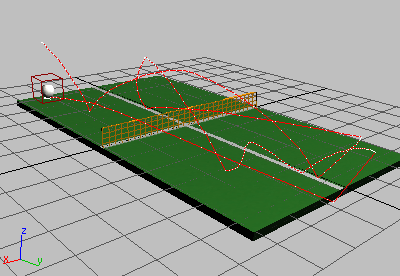
Ball stops bouncing after frame 200, rolls around table
The Ping-Pong ball bounces across the table, then stops bouncing, but still rolls around a bit.
Turn
off Auto Key.You can open pingpong_layered_animation.max to compare your work with a completed tutorial file.