Setting Up Behaviors
In this lesson, you'll work with biped settings and behaviors to make the simulation solve correctly.
Set up this lesson:
This file contains the scene from the previously completed lesson.
Set delegates to use random start clips:
You can specify that biped/delegates should use either the first clip of the current script or a random start clip setting. When you first solve this simulation, none of the bipeds will have scripts, so you must choose the second option.
 In the
Modify panel > Setup rollout, click Multiple Delegate Editing.
In the
Modify panel > Setup rollout, click Multiple Delegate Editing.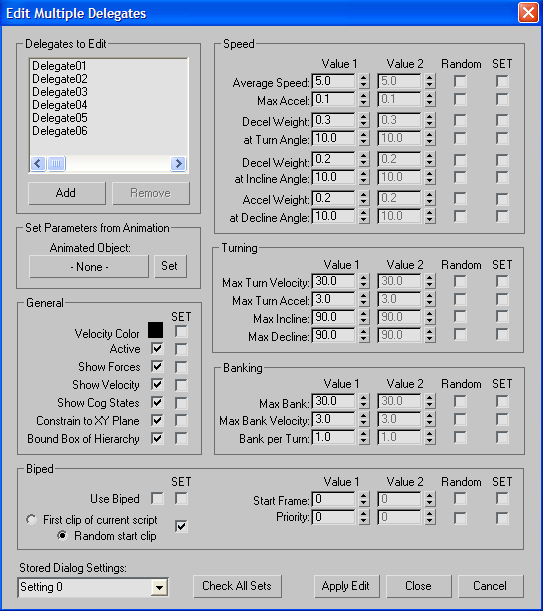
Turning on SET indicates that this new setting should take effect when you click Apply Edit.
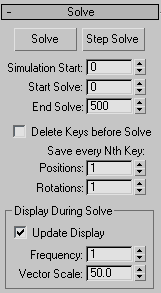
Solve the simulation:
After a few moments, each biped moves to its respective delegate, and begins to walk through the simulation.
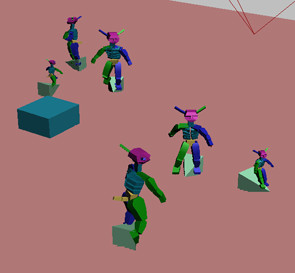
The bipeds move toward and away from the center, as the delegates did earlier. However, they tend to cluster at the center. The fathers don't wander very much from the center, and the other bipeds follow them.

This is a common situation with biped crowds. Often, the behavior settings for delegates alone are not exactly right for a biped simulation. You will change the behaviors slightly to suit the bipeds.
There is an additional problem that the bipeds pass through one another. You will solve this problem after you get the behaviors working correctly.
 All
the clips in this simulation contain freeform animation, rather
than footsteps. Freeform and footstep clips work equally well in
a biped crowd simulation. However, a simulation that uses footstep
clips will display all the footsteps used by each biped, which can
clutter viewports and make it difficult to see what's going on in
the scene. For this reason, freeform clips were used for this simulation.
The clips actually started out as footstep clips, but were converted
to freeform animation by loading the clip on a biped and clicking
Convert on the Motion panel > Biped rollout.
All
the clips in this simulation contain freeform animation, rather
than footsteps. Freeform and footstep clips work equally well in
a biped crowd simulation. However, a simulation that uses footstep
clips will display all the footsteps used by each biped, which can
clutter viewports and make it difficult to see what's going on in
the scene. For this reason, freeform clips were used for this simulation.
The clips actually started out as footstep clips, but were converted
to freeform animation by loading the clip on a biped and clicking
Convert on the Motion panel > Biped rollout.Adjust the behaviors:
In the Wander Behavior rollout, the Period value sets the number of frames during which the delegate or biped should wander. Then the biped or delegate ceases wandering, and follows other behaviors in the simulation.
When using the Wander behavior with biped crowds, the Period should be set to slightly longer than the average clip length. This gives the simulation enough time to choose an entire clip for the wandering period. Most clips in this simulation are about 90 frames long.
To keep the father bipeds from clustering at the center, you can also reduce the weight of the behavior that causes them to seek the center box.
 In the
Setup rollout, click Behavior Assignments.
In the
Setup rollout, click Behavior Assignments.This lower weight setting will make the father bipeds less likely to seek the center box, and more likely to wander.
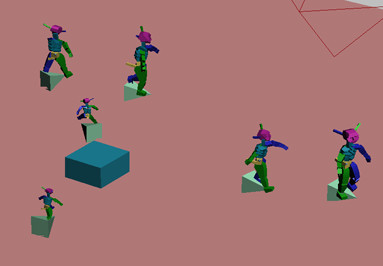
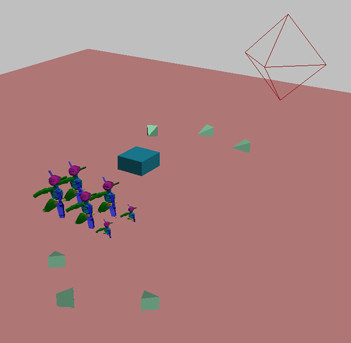
This time, the activity in the scene is more varied. The bipeds approach the center, walk away from the center, and come back, which is similar to the original movement of the delegates alone.
However, the bipeds don't always avoid each other successfully; at times, they pass through one another. This happens because directional changes indicated by the delegate behaviors can be overridden by the motion clips guiding the biped animation. To avoid collisions, the biped motion must take precedence.
Set priorities:
To resolve the problem of biped collisions, you can set priorities for bipeds. This approach causes the crowd system to solve one biped's motion at a time. As each biped's motion is determined, subsequent bipeds can accurately predict the location of bipeds solved earlier, and choose clips in such a way that collisions will be avoided.
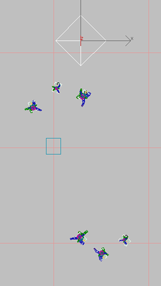
The Browns, the three delegates at the top of the Top viewport, will have priority over the Blacks.
In the viewport, each delegate displays the number 0. By default, the Priority value 0 is assigned to all delegates. You can change Priority assignments manually, picking delegates in the appropriate order.
When this mode is turned on, you can pick only delegates in the scene.
By default, you assign a Priority value of 0 to the first delegate you pick, so the number doesn't change.
The Priority value 1 appears next to the delegate.
The Brown family members now have priorities 0, 1, and 2, while the Blacks have 3, 4, and 5.
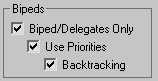
To enable Crowd to use priorities, you must turn the feature on.
Solve the simulation:
This time, because Use Priorities is on, the solution proceeds one biped at a time. First, the Brown father heads toward the center, and then his child and wife join in, one at a time. During each subsequent sub-solution, you can see the previously solved delegates moving without their bipeds. Next, the Black father takes his turn, followed by the mother and child.
At certain points during the solution calculation, you will see the time slider jump back to an earlier frame. This occurs when the system uses backtracking to avoid collisions.
When the crowd system can't find a way to avoid a collision, and returns to the previous motion clip to try a different path through the motion flow network. If the crowd system can't avoid a collision by jumping back one clip, it jumps back again to look for a better path, and so on. You can see the time slider jump back during backtracking even when the Update Display option is turned off.