


Associating Bipeds with Delegates
In this lesson, you'll associate each biped in the Brown and Black families with its corresponding delegate. You'll also set up a motion flow graph so each character can choose from the same batch of motions over the course of the simulation.
The behaviors in the crowd simulation are set up to make the delegates wander around a camp, seeking the center of the camp and other members of their families.
This series of lessons assumes a basic knowledge of the crowd and motion flow systems. If you haven't done the tutorials Animating Crowds and Using Motion Flow , do these tutorials before proceeding.
Set up the lesson:
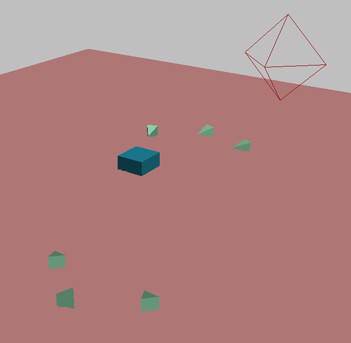
This file contains a crowd scene with six delegates and a ground plane. The delegates on one side represent the Black family, while the others represent the Browns. At the center of the ground plane is a box that represents the center of the pandas' camp.
 On the
Setup rollout, click Behavior Assignments. The Behavior Assignments
and Teams dialog appears.
On the
Setup rollout, click Behavior Assignments. The Behavior Assignments
and Teams dialog appears.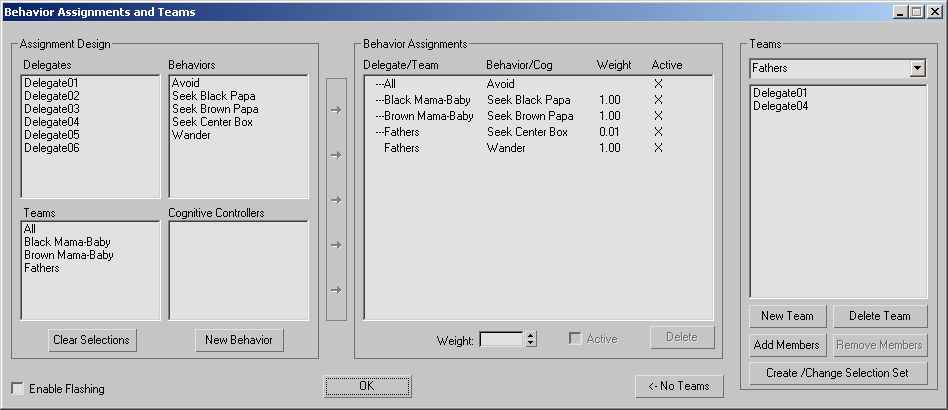
Behaviors have been set up to make the mama and baby bears seek their respective fathers, who wander from time to time. They all seek the box in the center to a small degree, which keeps the delegates from wandering too far away from the camp. An Avoid behavior prevents collisions between all delegates.
Even though there are no bipeds in the scene yet, the simulation has been solved with just the delegates. The two sets of delegates alternately mingle in the center and wander off as a family group.
 It's
a good practice to test the simulation with delegates only, to ensure
the behaviors are all working correctly. A common error is to test
behaviors with delegates moving at high speeds that do not accurately
approximate the speed of biped movement. Test the behaviors with
the delegates' average speed similar to speed the bipeds will use.
You can change all the delegates' average speed by selecting the
Crowd helper, and clicking Modify panel > Setup rollout >
Multiple Delegate Editing. In this simulation, the average delegate
speed is 2 units per frame.
It's
a good practice to test the simulation with delegates only, to ensure
the behaviors are all working correctly. A common error is to test
behaviors with delegates moving at high speeds that do not accurately
approximate the speed of biped movement. Test the behaviors with
the delegates' average speed similar to speed the bipeds will use.
You can change all the delegates' average speed by selecting the
Crowd helper, and clicking Modify panel > Setup rollout >
Multiple Delegate Editing. In this simulation, the average delegate
speed is 2 units per frame. Merge the characters:
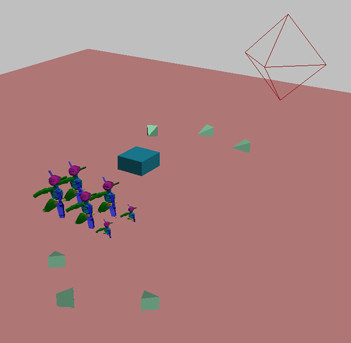
The families of pandas have been merged into the scene. The bipeds are visible, but the skins have been merged as hidden objects.
Pair up bipeds and delegates:
 On the
Modify panel, in the Setup rollout, click the Biped/Delegate Associations
button.
On the
Modify panel, in the Setup rollout, click the Biped/Delegate Associations
button.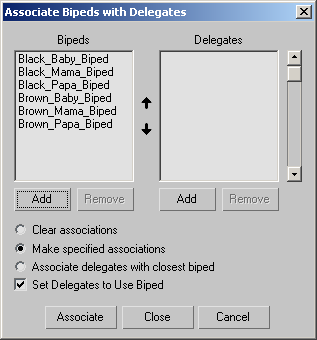
The selected bipeds display on the dialog in alphabetical order. You want the papa biped to be listed first for each family.
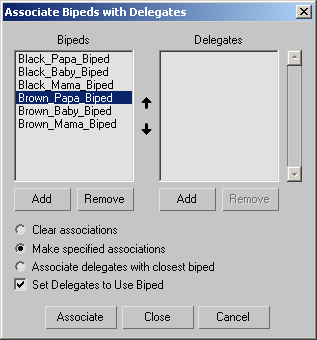
This will associate each biped with the delegate directly across from it on the list.
This option will turn on the Use Biped option for each delegate in the scene, which will make it possible to create a biped crowd simulation.
Although each biped is now associated with its respective delegate, the bipeds are not aligned with delegates. This will happen later once you solve the simulation for the first time. Before you can solve the simulation, however, you'll need to set up a motion flow graph.
Set up a motion flow graph:
You'll set up a motion flow graph that they'll all share, also known as a shared motion flow. When solving a simulation with delegate-controlled bipeds, Crowd uses this graph to synthesize motion flow scripts for the bipeds. The motion is shared, but Crowd typically generates a unique script for each biped, depending on the behaviors influencing its delegate. This process is motion synthesis.
 Before
creating the motion flow graph, you might find it helpful to look
at each of the clips to see what they contain. To do this, reset 3ds Max,
create a biped, and load each clip listed in step 5 by clicking Load
File on the Biped rollout. Watch the motion contained in each clip.
When you have finished looking at the motions, reload
my_biped_crowds02.max
or
tut_biped_crowds02.max
,
and continue from this point.
Before
creating the motion flow graph, you might find it helpful to look
at each of the clips to see what they contain. To do this, reset 3ds Max,
create a biped, and load each clip listed in step 5 by clicking Load
File on the Biped rollout. Watch the motion contained in each clip.
When you have finished looking at the motions, reload
my_biped_crowds02.max
or
tut_biped_crowds02.max
,
and continue from this point.
 Click
the Motion Flow Mode button.
Click
the Motion Flow Mode button. In the
Motion Flow rollout, turn on the Show Graph button.
In the
Motion Flow rollout, turn on the Show Graph button.This opens an empty motion flow graph. As a first step in creating the motion flow graph, you'll add all the necessary clips.
 If you
like, instead of creating the motion flow graph from scratch, you
can click Load Motion Flow Graph and load the file
panda_crowd.mfe
file
in the
tutorials\character_animation\biped_crowds
folder. If
you do, the Reset Unfound Motion Flow File dialog might appear to
ask you for the location of the first clip referenced by the graph.
If this occurs, navigate to the
tutorials\character_animation\biped_crowds
folder under
your
3dsmax
path, turn
on Add Directory to Search Path and Add Directory to .ini File,
and choose the first file requested. The remaining clips will be
located in the same folder, and the graph will load. If you do this,
skip this procedure and the next, and continue with the “Choose
starting clips” procedure to ensure starting clips are selected.
If you
like, instead of creating the motion flow graph from scratch, you
can click Load Motion Flow Graph and load the file
panda_crowd.mfe
file
in the
tutorials\character_animation\biped_crowds
folder. If
you do, the Reset Unfound Motion Flow File dialog might appear to
ask you for the location of the first clip referenced by the graph.
If this occurs, navigate to the
tutorials\character_animation\biped_crowds
folder under
your
3dsmax
path, turn
on Add Directory to Search Path and Add Directory to .ini File,
and choose the first file requested. The remaining clips will be
located in the same folder, and the graph will load. If you do this,
skip this procedure and the next, and continue with the “Choose
starting clips” procedure to ensure starting clips are selected. On the
Motion Flow Graph dialog toolbar, click the Create Multiple Clips
button.
On the
Motion Flow Graph dialog toolbar, click the Create Multiple Clips
button.In the Motion Flow Graph, the software creates a clip for each file.
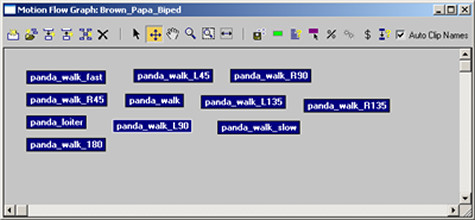
Each clip's file name describes its motion. For example, panda_walk_L90 has the biped make a right-angle turn to the left while walking, and panda_walk_180 has the biped turn around and walk in the opposite direction.
 If you
like, use the Move Clip tool to rearrange the clips in the graph
in a circular arrangement.
If you
like, use the Move Clip tool to rearrange the clips in the graph
in a circular arrangement.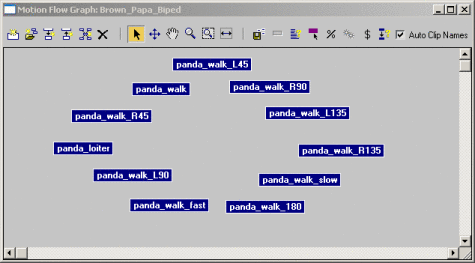
Create a motion flow network:
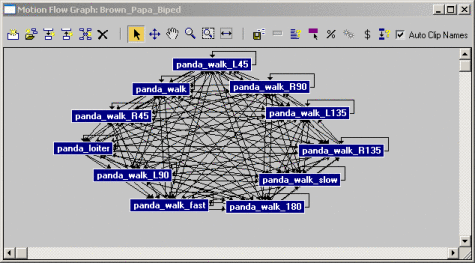
A motion flow network is a series of connections between clips. When the crowd simulation solves, it will choose a series of clips for the biped to follow. Transitions between clips tell the crowd simulation that one clip can follow another in the series.
Transitions are created between all clips, and between each clip and itself.
 You
can toggle the probability display by clicking Show Random Percentages.
The number 100 appears next to and between each transition to indicate
the probability of each transition being chosen during the transition.
You
can toggle the probability display by clicking Show Random Percentages.
The number 100 appears next to and between each transition to indicate
the probability of each transition being chosen during the transition.Next, you will optimize the new transitions. This will change each default transition to the best possible transition for each pair of clips.
Choose starting clips:
Next, you must designate the possible starting clips for the simulation.
 In the
toolbar at the top of the Motion Flow Graph dialog, click the Select
Random Start Clips button. Hold down the CTRL key and choose panda_walk, panda_walk_fast, panda_walk_slow,
and panda_loiter.
In the
toolbar at the top of the Motion Flow Graph dialog, click the Select
Random Start Clips button. Hold down the CTRL key and choose panda_walk, panda_walk_fast, panda_walk_slow,
and panda_loiter.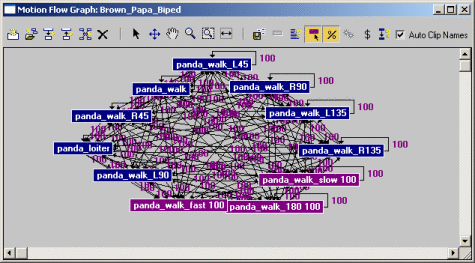
The selected clips are displayed in purple with a probability value (100). This means there is an equal probability that any one of these clips will be selected as the starting clip for the simulation.
The selection of panda_loiter as a possible starting clip means a biped can start the simulation by standing and waiting for other bipeds to pass by before it starts moving.
Next, to share the motion flow network among all the bipeds, you need to save it and then reload it with the Shared Motion Flow dialog.
 On the
Motion panel, In the Motion Flow rollout, click the Save File button.
Save the motion flow network as my_panda_crowd.mfe.
On the
Motion panel, In the Motion Flow rollout, click the Save File button.
Save the motion flow network as my_panda_crowd.mfe. Next, you'll set up a shared motion flow.
Set up a shared motion flow:
The motion flow graph must be “shared” among all bipeds. For the best results, each biped sharing the motion should be of the same scale. The black and brown fathers are the same size, as are the two mothers and two children. You'll create three separate motion flows, pairing up father, mother, and child bipeds.
 In the
Motion Flow rollout, click the Shared Motion Flow button.
In the
Motion Flow rollout, click the Shared Motion Flow button.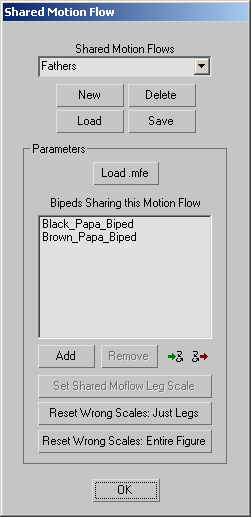
 Click
Put Multiple Bipeds In Motion Flow.
Click
Put Multiple Bipeds In Motion Flow.This turns on Motion Flow mode for the bipeds listed in the dialog. Bipeds must be in Motion Flow mode in order to work with a crowd simulation.
Set up the remaining shared motion flows:
Click
Shared Motion Flow again. Click
Shared Motion Flow again. Create another shared motion flow named Children,
and apply it to Black_Baby_Biped and Brown_Baby_Biped.
Put these bipeds in Motion Flow mode.
 The
Shared Motion Flow button appears with a white circle, indicating
that the currently selected biped is part of a shared motion flow
network.
The
Shared Motion Flow button appears with a white circle, indicating
that the currently selected biped is part of a shared motion flow
network.