


Creating and Using Motion Flow Scripts
The Motion Flow Graph stores .bip files, referred to as clips. To create a script, you select clips that you have added to the Motion Flow Graph.
Set up the lesson:
Tutorial files are in the tutorials\character_animation\motion_flow folder.
 If using
the tutorial file, select any part of the biped and open the Motion
panel.
If using
the tutorial file, select any part of the biped and open the Motion
panel. Click
Show Graph to make sure the Motion Flow Graph is displayed.
Click
Show Graph to make sure the Motion Flow Graph is displayed.Create a script:
 On the
Motion Flow rollout, in the Scripts group, click Define Script.
On the
Motion Flow rollout, in the Scripts group, click Define Script.The clip names appear in the list in the Scripts group. The name script1 displays in the text field above the list. In the Motion Flow Graph, a red transition line joins the two clips, showing that they are included in the current script. By default, Biped uses “Minimum Motion Loss” to find a likely starting frame for the transition between the source and destination clips. You have created a script called script1.


 Close
the Motion Flow Graph window and click Play.
Close
the Motion Flow Graph window and click Play.Use Arc Rotate to rotate the Perspective view for a better look at the motion.
As the animation progresses, the name of the currently-played clip appears in uppercase characters in the script list, followed by three asterisks. The numbers on the left of each clip name indicate the frame numbers where the animation starts.
The default Minimum Motion Loss search method did not choose ideal starting frames in this case: the biped spins unnaturally during the transition. You’ll first edit the transition manually, then you’ll try an optimized transition, which uses minimum foot sliding.
Use the Transition Editor:
When you edit transitions manually, you can discard unwanted motion and adjust the duration of transitions. You can also change the direction of the destination clip in the Transition Editor.
Controls in the Scripts group are activated.
 Click
Edit Transition.
Click
Edit Transition.The Transition Editor dialog displays; the source and destination clip names appear in the title of the dialog. Position the dialog so the Perspective Viewport is visible.
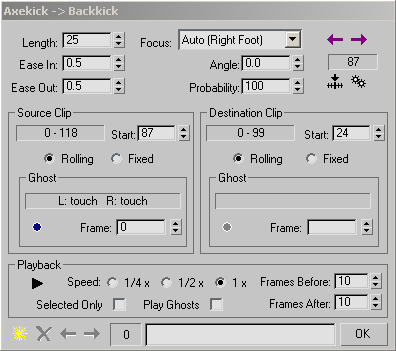
 Click
Go To Start Frame near the upper right of the Transition Editor.
Click
Go To Start Frame near the upper right of the Transition Editor.The time slider is positioned at the first frame of the transition. By default, the duration of the transition is 25 frames. This is displayed in the Length field on the upper left of the Transition Editor.
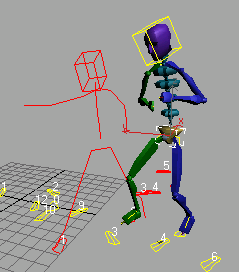
Red and yellow stick figures (called ghosts) in the viewports help to establish a starting frame for both clips. Both stick figures display during the period of transition. Red represents the destination clip motion. The biped interpolates between the yellow and red ghosts over the course of the transition.
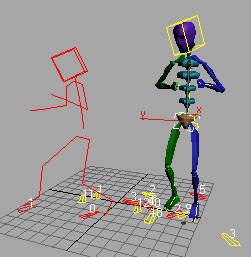
The destination ghost changes orientation.
You can choose the destination starting frame by viewing all of the clip's motion.
In order to create a smooth transition, you’ll look for areas in the source and destination clips where foot and body movements will flow together cleanly. Frame 80, where the character’s right foot is in the air, looks like a reasonable starting frame for the source clip. Body weight is in the process of shifting to the right foot.
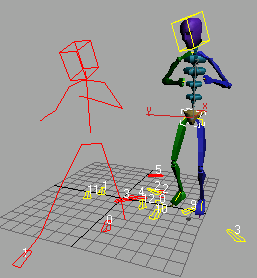
 Click
Set Start Frame in the Destination Clip Ghost group. The Frame value
(20) is copied to the Destination Set Start Frame field; Biped recalculates
and positions the destination clip.
Click
Set Start Frame in the Destination Clip Ghost group. The Frame value
(20) is copied to the Destination Set Start Frame field; Biped recalculates
and positions the destination clip.The weight shifts to the right foot in both clips during the transition. The transition looks natural. Next you’ll try an optimized transition.
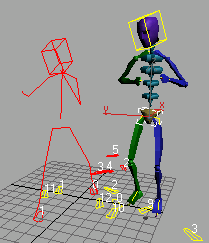
The Transition Optimization dialog displays.
The transition calculated by the automatic optimization also looks good. Optimized transitions are a time saver if there are many clips and transitions that need to be processed.
Make the animation available outside of Motion Flow mode:
To make the animation available in your scene outside Motion Flow mode, use the Create Unified Motion command.
Click
the Define Script button on the Motion Flow rollout, in the Scripts
group, to turn off scripting mode. On the
Motion Flow rollout, in the Scripts group, click Create Unified
Motion.
On the
Motion Flow rollout, in the Scripts group, click Create Unified
Motion.The Unify Options dialog is displayed.
The motion is available as a freeform animation in your scene.
Open cs4_tut_moflow02.max to see the animation. Note that a unified motion does not contain footsteps.