Building the Spine

Creating and Editing Character Bones

Building the Neck, Head, and Hair Bones

Building the Arms
In
this lesson, you'll use the Bones system to create the character’s
arm bones.
Prepare
the scene:
- Open
the scene you saved from the previous lesson, or open tut_char_bone_file03.max.
You should
hide all the bones from previous lessons to prevent any newly created
bones from automatically appending to the existing bones. To minimize
clutter in the scene, it's also recommended that you hide the spine
helper objects and spline IK goal as well.
- Select
the bones, the spline IK goal, and the helper objects. Right-click
to display the quad menu, and choose Hide Selection.
-
 If necessary,
click Min/Max Toggle to display four viewports.
If necessary,
click Min/Max Toggle to display four viewports.
Create
the left arm bones:
- In
the Create panel > Systems object type, click Bones to enter creation
mode.
- In
the Bone Parameters rollout > Bone Object group, set Width and
Height to 5.0.
- Turn
off Assign To Children.
TipWith
the arms, you will use the HI solver later on. When you plan to
assign a HI solver to bones, you will usually create the bones without a
solver first, then apply the solver after the bones have been created.
This allows you to create a chain of several bones but apply the
HI solver to only a few of the bones.
- In
the Top view, create three bones by clicking first at the center of
the shoulder blades, second at the left shoulder, third at the left
elbow, and fourth at the left wrist, right-clicking twice to cancel
out of bone creation mode and create a bone tip.
In the
Perspective view, you can see that the arm bones were actually created
at ground level due to the default placement on the construction
plane. Next, you reposition the bones to fit into the mesh.
- In
the Front view, select the root bone and move it upward, placing
it directly in between the character’s shoulder blades.
- Moving
down the hierarchy, move each bone to place it within the boundaries
of the mesh’s left arm.
- Starting
at the root, rename each bone as follows:
NoteThe term
clavicle
is used to
denote the shoulder bone. In human anatomy, the clavicle is the
shoulder bone.
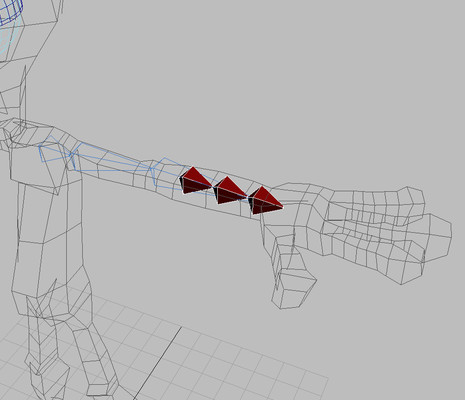
Create
the wrist twist bones:
A lower arm bone can twist to rotate the wrist
without rotating the elbow. Now you will create additional bones
in the arm to simulate this type of movement.
- In
the Top view, create a single bone with a Width and Height of 5.0.
Create it with the same general alignment as the BONE_L_Arm_Lower object.
The bone should be one-quarter of the length of BONE_L_Arm_Lower.
- Delete
the new tip bone from the newly created twist bone; DO NOT delete
the original wrist bone
-
 From
the Main toolbar, use the Align tool to align the Center X, Y, Z
position and rotation of the new bone to the BONE_L_Arm_Lower object.
From
the Main toolbar, use the Align tool to align the Center X, Y, Z
position and rotation of the new bone to the BONE_L_Arm_Lower object. - Click
Select And Move, and change the Reference Coordinate System to Local.
- Move
the bone down one-quarter of the way, so it starts in the second
quarter of the arm.
- Hold
down Shift and drag
a copy to start at the end of the first bone.
- Repeat
to create a third copy that starts at the end of the second bone.
- Link
each newly created bone to the lower arm bone (BONE_L_Arm_Lower).
- Rename
the bones to BONE_L_Twist_Wrist01, BONE_L_Twist_Wrist02,
and BONE_L_Twist_Wrist03.
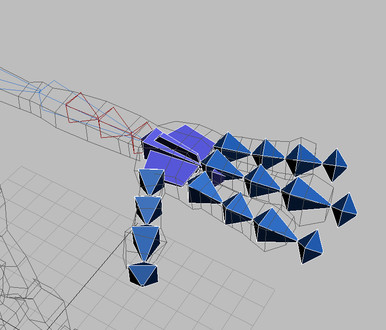
Create
the hand bones:
Here, you'll create the hand and finger joints.
In order to make sure the bones line up with the wrist, you can
click the lower arm bone. The cursor changes to a cross hair, indicating
that the new bone will be parented to this bone, and will start
at the end of it.
- Create
a one-bone chain and tip that goes from the wrist to the start of
the middle finger.
For this character rig, the hand bones will
not be connected hierarchically to the arm bones.
-
 Select
the newly created hand bone, and click Unlink Selection on the Main
toolbar.
Select
the newly created hand bone, and click Unlink Selection on the Main
toolbar. - Rename
each bone to BONE_L_Hand and BONE_L_Hand_Tip.
- Create
bones for each of the fingers and thumbs by creating four separate
chains, one for each new finger, and then link the start of each finger
and thumb chain to the hand bone.
- Move
the finger and thumb bones up to the proper height.
- Adjust
the colors and fins on the hand and finger bones, as needed.
- Rename
each finger bone to BONE_L_Finger1_01, BONE_L_Finger1_02,
and so on.
- Rename
the thumb bones to BONE_L_Thumb_01, and so on.
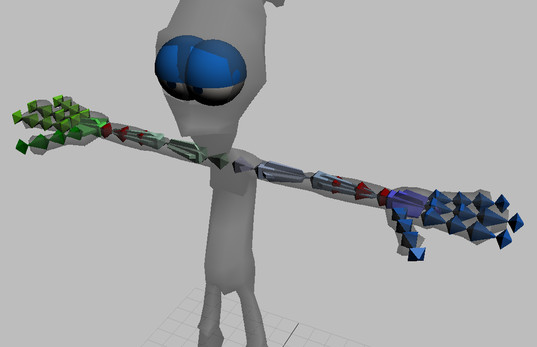
Mirror
the left arm assembly:
Now that the left-hand arm assembly is completed,
it's time to create the right-hand counterpart by using the Mirror
tool again.
- Select
all bones in the arm, wrist, and hand of the left arm assembly.
- On
the Main toolbar, change the Reference Coordinate System to World.
-
 On the
Use Pivot Center flyout, choose Use Transform Coordinate Center.
On the
Use Pivot Center flyout, choose Use Transform Coordinate Center. -
 On the
Main toolbar, click Mirror Selected Object.
On the
Main toolbar, click Mirror Selected Object. - On
the Mirror: World Coordinates dialog, set Clone Selection type to
Copy, and click OK.
Now you have a mirrored copy of the left arm
assembly in its correct position.
- Change
the colors of the right arm bones to green to distinguish them from
the left arm.
If you
like, you can unhide the other bones to see their relationship to
the arms.
- Save
your work as my_char_bone_arms.max.
You can
also open tut_char_bone_file04.max to
examine the result of this lesson.