Group Media
|
Scan QR codes with a mobile device to view online video tutorials. An Internet connection is required to view online content. |
Introduction to Grouping
|
Editing In-Depth
|
Media on the timeline can be grouped together to:
- Help keep the timeline organized
- Resize all the media on the canvas at one time retaining the proper aspect ratio
- Move media together on the timeline or on the canvas
- Copy and paste frequently used sequences
- Save frequently used sequences in the Library for use from project to project
Group Characteristics
- Groups contain their own timeline tracks for editing. You need not ungroup to edit tracks in a group.
- Tracks within a group cannot be locked.
- Groups can contain an unlimited number of media or tracks.
- Groups can be added to other groups.
- Drag media in or out of a group.
- Groups can be renamed.
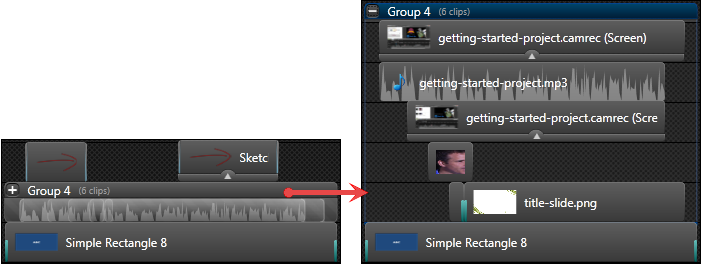
- Click the plus/minus icon to open or close a group.
- Groups can be saved to the Library.
- Groups can have quizzes or markers pinned to them. When saved to the Library, quizzes and markers are also saved.
-
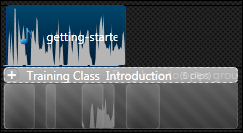
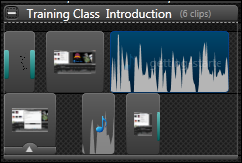
A group shows an outline of the placement of all the media inside of it along with the number of clips in the group.

- Media retains its original placement on the timeline when added to a group.

To Group Media
- Select the media on the timeline:
- Press the Shift key on the keyboard and click on each media to go into the group.
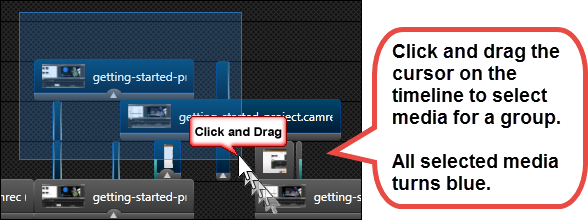
- Or, click and drag the mouse on the timeline capturing all the media to go into the group.

- Right-click one of the selections and choose Group from the menu. The media is moved into the group.
Name a Group
- Double-click on the name. The name will open up for editing.
- Type the new name.

- Press Enter on the keyboard.
Open or Close a Group
To open a group, click once on the plus sign or double-click next to the group name.
To close a group, click once on the minus sign or double-click next to the group name.
- Groups with vertically placed media open up and expand across other tracks on the timeline. This temporarily blocks the view of other media that may be on the timeline.

- Groups with horizontally placed media open with the group header expanded across the track above it. This will temporarily block access to media that may be on that track.

Ungroup Media
Right-click on a group and choose Ungroup from the menu.
- Media from the group will retain its original position on the timeline.
- If there is other media on the timeline, the ungrouped media may be placed on new tracks.
Add Media to a Group
- Drag the media over top of the group and hover until the group header turns white with a dashed line around it.

- Remain hovering until the group opens and the media appears in the group.
- Place the media in the desired location.

Remove Media from a Group
- Open a group and drag media out of the group onto the timeline. If the media in the group was on its own track, right-click the empty track and choose Remove track from the menu.
- To delete a clip, open a group, select the media to be removed and press Delete on the keyboard. This action deletes the clip from the entire project timeline.
Edit Media within a Group
Media in a group can be edited like other media on the timeline with two exceptions.
- Tracks in a group cannot be locked.
- When making a selection in an open group, everything on the timeline is selected. Lock any timeline tracks you do not want to edits applied to.
Resize Group
Hover over either end of the group until the end highlights then drag the group in either direction.
Media touching the edge of the side being dragged automatically increases in duration if it is a media that:
- Can be resized to any duration such as an image or callout.
- Was previously trimmed or resized. However, the media can only increase up to its original duration.
For example, an audio clip that was two minutes was trimmed to one minute. When a group is resized, this clip could increase to its full size of two minutes but not beyond that original duration.
Add a Group to the Library
Right-click on a group and choose Add asset to Library from the menu.

 Online Videos Available

