
Timeline
|
Scan QR codes with a mobile device to view online video tutorials. An Internet connection is required to view online content. |
Timeline In-Depth
|
Editing In-Depth
|
 Online Videos Available


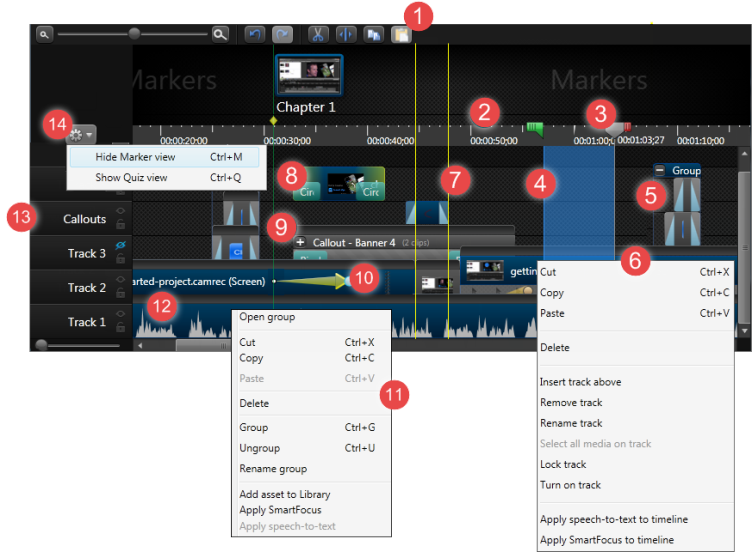
Use the timeline to assemble and edit the video. The timeline represents the sequence of all video clips and other media (callouts, markers, zoom animations, etc.) that will be included in a video.

|
Timeline toolbar | Access basic editing options such as split, cut, copy, paste, zoom in, and zoom out. |

|
Time / Duration |
Tick marks represent time in terms of minutes and seconds. A video is built sequentially through time moving from left to right.
|

|
Playhead |
Indicates the current frame selected on the timeline. The current frame displays in the Preview Window.
|

|
Timeline Selection |
Make a selection with the playhead to:
|

|
Groups |
Add media to a group to help keep the timeline organized, to resize or move all media at one time, or to copy and paste frequently used sequences.
|

|
Timeline Context Menus |
Right-click on the timeline tracks or the track names to view track options. The position of the playhead and the content on the timeline determine the options available in the context menu. |

|
Snapping |
Snapping guidelines allow media on the timeline to be perfectly aligned with each other.
|

|
Transitions |
Transitions add a visual effect between the end of a clip and the beginning of the next clip. Use transitions to indicate the passage of time, change in location, to call attention, or to create a smooth flow between clips. |

|
Open / Close Media |
Groups and media with animations can be opened for editing then closed again.
|

|
Animations |
Animations include cursor effects, visual properties effects, and zoom and pan effects.
|

|
Media Context Menus |
Right-click on media, a group, a quiz, a marker, etc to view the editing options for that media. The position of the playhead and the media on the timeline determine the options available in the context menu. |

|
Audio |
Audio appears on the timeline as a waveform. Camtasia Recording files (TREC, CAMREC (Camtasia Studio version 8.3 and earlier), with audio appear on the timeline as one media. The audio can be separated from the video. Add audio fades, points for precision editing, remove noise from audio, and more. |

|
Tracks |
Tracks represent the sequence of media on the timeline both horizontally and vertically.
|

|
Hide / Show Quiz or Marker View |
Hide or show the quiz or marker view. When a quiz or marker is added to the timeline, the quiz or marker view automatically opens at the top of the timeline.
|


Timeline Toolbar


|
Zoom in on the timeline. Zoom out on the timeline. Fully zoomed out shows the entire timeline.
To change the zoom level, click the zoom icons or grab the zoom slider and drag in either direction.
|

Ctrl+X |
Cut a selection from the timeline. The cut portion can be pasted on the timeline. |

|
Split a clip into two parts at the position of the playhead. |

Ctrl+C |
Copy Copy the selection or media to the Clipboard. |

Ctrl+P |
Paste Paste the contents of the Clipboard onto the timeline. |
|
Ctrl+Z |
Undo Undo the last action in the succession. This is an unlimited undo feature. |
|
Ctrl+Y |
Redo Redo the last action in succession. This is an unlimited redo feature. |


