
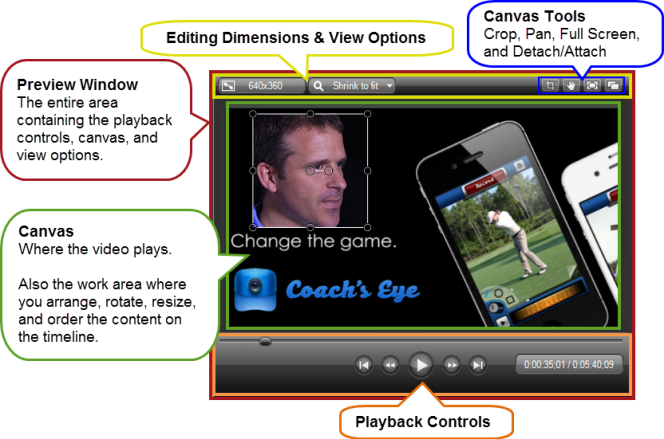
Preview Window and Canvas
|
Scan QR codes with a mobile device to view online video tutorials. An Internet connection is required to view online content. |
Canvas In-Depth
|
Using Crop Mode
|
Explore the Editor
|
 Online Videos Available


The Preview Window consists of three areas: the Canvas, the Editing Dimensions and view options, and the Playback Controls.
The Preview Window might not always show the video exactly as it will play once it is produced.
Clip speed animations, zoom animations, visual properties animations, callouts, or transitions, etc. might not play back correctly in the Preview Window. To see exactly how a transition, callout, animation, or other effects will appear in the final video, use the Produce Selection As option.
Continue with
Editing Dimensions and View Options
|
The Preview Window displays a preview of how the final video will look produced with the dimensions selected in the Editing Dimensions dialog box. 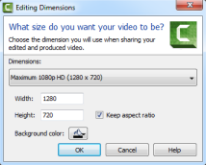
Click the icon to open the Editing Dimensions dialog box. Select a dimension for editing your video. For the best results, select the size you want your final video to be.
|
|
Magnification View Options Click the icon to change the magnification level of the video on the canvas.
|
|
Canvas Tools
Crop removes the unwanted outer areas of a video or an image clip. 1. Click the Crop icon to turn crop mode on. 2. On the canvas, drag the blue handles to remove desired area. 3. Click the Crop icon again to turn crop mode off.
When zoomed in on the video at a high magnification level, use pan mode to move the video around within the boundaries of the canvas.
|


 Toggle Crop Mode
 Toggle Pan Mode
 Switch to Full Screen Mode
 Detach or Attach the Preview Window
Working on the Canvas
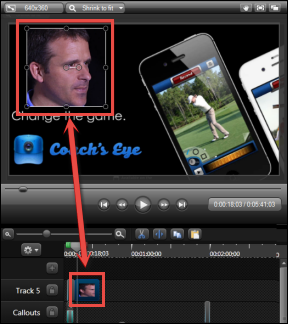
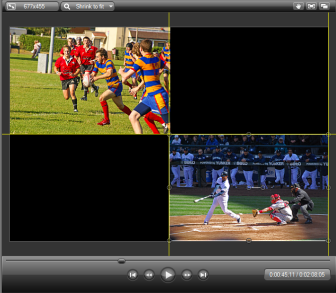
The canvas is the working area where you arrange, rotate, resize, and order the appearance of the media that is on the timeline.
Selected Media
- When a clip, group, or other media is selected on the timeline, it is also selected on the canvas.
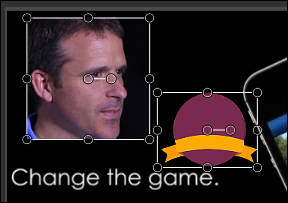
Move, Resize, or Rotate Media

- To move media, grab and drag to new location on the canvas.
- To size media, grab a handle and drag to desired size.
- To rotate, grab center handle and turn.
- Press and hold the ALT key while dragging the clip for 3-D rotation.
To Select More than One Media
- Press <Shift> then click on media to select.
- Selected media can be moved, rotated, and resized together.
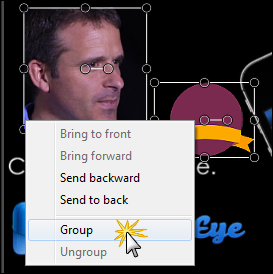
Group Media
Group multiple media clips together to make moving, editing, and saving to the Library easier. Tracks within a group can be edited like any other track on the timeline.
- To create a group: Press <Shift> then click on all media to select. Right-click one of the media selections and choose Group from the menu.
- To ungroup: right-click the group and choose Ungroup from the menu.
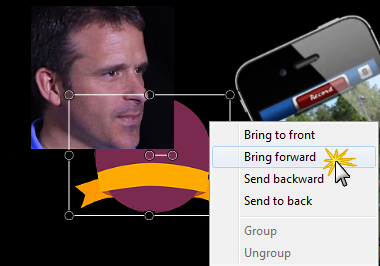
- To reorder media, right-click and choose the desired order placement from the menu. Media on the timeline is automatically updated on the timeline tracks to reflect the new order of the media.
Align Media with Snapping Guidelines
Snapping is available on the canvas to assist in aligning media. As media is moved on the canvas, the snapping guidelines appear.
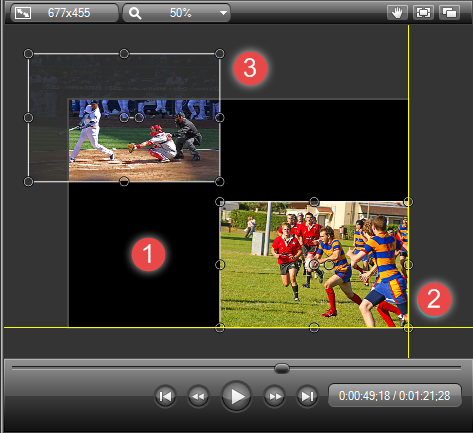
Non Active Part of the Canvas
A non active area surrounds the active part of the canvas. Anything on the non active part of the canvas is not included in the video.

|
The active part of the canvas. Everything on the active part of the canvas is included in the video. |

|
The outside edges of the canvas contain boundary guidelines to help you snap media to the edge of the canvas. |

|
|
Canvas Keyboard Hotkeys
| Arrow Keys |
|
| Scroll Mouse Wheel | Increase or decrease the magnification view level. |
| Shift Key | Hold the shift key while resizing media to maintain aspect ratio. |
| CTRL Key | Override maintaining the aspect ratio while resizing media. |
| Double-click | Double-click on any media to edit it or open its tab. |
| CTRL Key + Scroll Mouse Wheel | Adjust scale for the selected media. |
Playback Controls
Use the playback controls to move throughout the video.
| Preview Window Button | Option | Hotkey | Description |
|---|---|---|---|

|
Previous Clip |
CTRL+ALT+Left Arrow |
Move the scrubber to the beginning of the previous clip on the timeline. |

|
Step Backward |
CTRL+ Left Arrow Hold the keys down to rewind. |
Rewind the video frame-by-frame. |

|
Play/Pause | Spacebar | Start the video from the playhead/scrubber position. Click again to pause. |

|
Step Forward |
CTRL+Right Arrow Hold the keys down to fast forward. |
Fast forward the video frame-by-frame. |

|
Next Clip | CTRL+ALT+Right Arrow | Move the scrubber to the beginning of the next clip on the timeline. |

|
Scrubber | Indicates the playback progress on the timeline. | |

|
Time code | Shows the current position of the playhead within the duration of the timeline. The time code displays in Hours:Minutes:Seconds;Frames. |