Camtasia Editor Overview
|
Scan QR codes with a mobile device to view online video tutorials. An Internet connection is required to view online content. |
Explore the Editor
|
Using Crop Mode
|
Editing In-Depth
|
 Online Videos Available


|
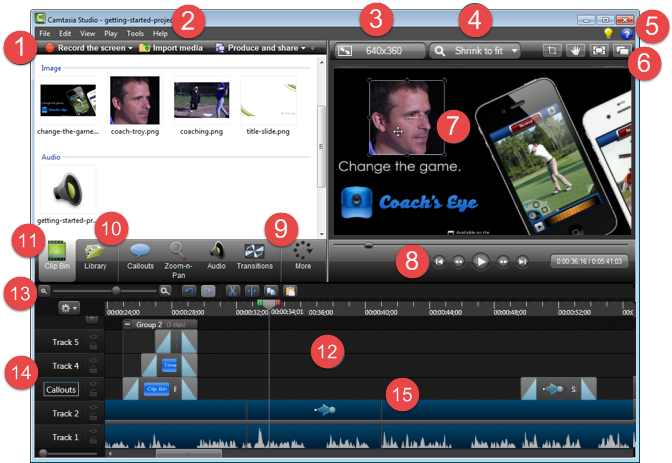
Access to three of Editor’s important features: Record the Screen, Import Media, and Produce and Share your video. |

|
Access program settings and options, import and export functions, and features. |

|
Click to open the Editing Dimensions dialog box. Select a dimension for editing your video.
|

|
Magnification View Options Click to choose the magnification level of the video on the canvas. This does not change the editing dimensions of the video. Choose Shrink to Fit to view the entire video within the boundaries of the canvas. |

|
Get help using Camtasia Studio
|

|
Preview Window View Options
|

|
The Preview Window's canvas is the working area where you arrange, rotate, resize, and order the content on the timeline.
|

|
Use the playback controls to move throughout the video. |

|
Task Tabs Choose a tab to add callouts, transitions, zoom and pan animations, and more.
|

|
Holds timeline sequences, video, audio, and image clips you want to use from project to project. Items in the Library are called media assets. The Library comes pre-populated with professional media assets you can use to add professional looking intros, outros, title clips, and more. These media assets are royalty free. |

|
Holds all video, audio, and image clips imported into the current project. |

|
Timeline The primary working area used to assemble and edit your video. |

|
Timeline Toolbar Access to basic editing tools such as zoom in and stitch |

|
|

|
Stitched Media Stitching joins video clips together.
|
 to open the help file. The help file contains valuable information to help you learn how to record, edit, produce, and share your video.
 or choose Help > Tutorials to access training videos and documentation on the

 Detach or Attach the Preview Window
 Toggle Crop Mode On / Off(or hold the Alt key to enable crop mode)